Creating courses in WordPress is now easier than ever with so many amazing LMS plugins out there.
However, the true challenge is selling the courses. Preparing a sales funnel for your course can often get very complicated in WordPress.
But today, you will learn how you can create courses and sell them in WordPress easily.
All you need is three plugins:
- Tutor LMS – for course creation
- WooCommerce – to monetize your courses
- WPFunnels – to create a sales funnel for your courses.
In this article, you will get a step-by-step guide on how you can plan a course funnel, create a course using TutorLMS, and then set up a sales funnel for your course using WPFunnels.
So let’s begin.
Planning A Sales Funnel For Courses
A well-designed sales funnel can help your online course business grow quickly. But the funnel flow will vary depending on the courses you sell and how you intend to sell them.
Here are some examples you can implement while planning a sales funnel for your Tutor LMS course.
- Offer A Related Course In Your Funnel
- Suppose you are initially offering courses on Clipping Path in your sales funnel.
- You may offer a related course on Image Re-touching as an order bump.
- Later you can offer a complete Image Editing & Designing course as upsell offer.
The idea is to offer multiple related courses when a certain course is being bought.
- Offer A Course Bundle as Upsell
- Let’s say a person is willing to purchase the SEO Course from your site.
- After checkout, you may offer a bundle of Digital Marketing courses that includes the SEO Course, SMM Course, Copywriting Course, and Content Planning course altogether.
In this case, you are offering a bundle instead of the initial course.
- Suggest A Higher Level Course
- Let’s say you are selling a course on ‘Transitions In Adobe After Effects’.
- You can offer a ‘Complete Video Editing Course’ (which includes the guide on Adobe After Effects) as upsell.
- In case the upsell offer gets rejected, you can follow up with a mid-level course on ‘Animations with Adobe After Effects’ as a downsell offer.
In this case, upsell will act as a replacement for the main course. The Downsell will just be a separate course in case the upsell doesn’t work.
- Offer Certification For Your Paid Course
- You may offer a free course on Facebook Marketing (without a certificate) to attract students
- Later you may offer a paid course on “Complete Social Media Marketing” as an upgrade, which will include a certificate.
There could be many more scenarios when it comes to a course funnel. Depending on what course you sell, you can split them into multiple courses and plan a funnel journey that will convert more.
Let us go ahead and devise a complete course funnel using Tutor LMS and WPFunnels.
Step-by-step Guide To Creating And Selling Courses Using Tutor LMS and WPFunnels
For this guide, we will devise a sales funnel related to Digital Marketing Course.
To do so, first, let us choose 3 courses that are related:
- Basic SEO Guide – at $12
- Customer Journey Evaluation checklist – at $10
- Advanced SEO Guide – at $50
Now, let us decide how to distribute these to a sales funnel.
- Offer The Basic SEO Guide As The Initial Offer
- Landing Page to promote the Basic SEO Guide.
- Checkout Page to process the payment.
- Thank You Page to summarize the purchase.
- Offer The Customer Journey Evaluation Checklist As Order Bump
- Set up an order bump at the checkout page for this product
- Write a short attractive copy to take this offer as order bump description
- Offer the Advanced SEO Guide As An Upgrade To The Basic Guide
- Create An Upsell offer after checkout
- Set the Advanced SEO Guide as the Upsell Offer
- Set this offer as a replacement to the Basic Guide when accepted.
There you go, the courses and the funnel is planned. It’s time to get to work.
First, let us go ahead and see how you can create these courses.
How To Create Your Course Using Tutor LMS
First, install and activate Tutor LMS, WooCommerce, Elementor, and Tutor LMS Elementor Addon.
**We will use Elementor to design the course pages. You may choose your preferred page builder.
Let’s create the Basic SEO Guide.
Step 1 – Add a Course in Tutor LMS
- To build your first course, go to Tutor LMS → Courses → Add New
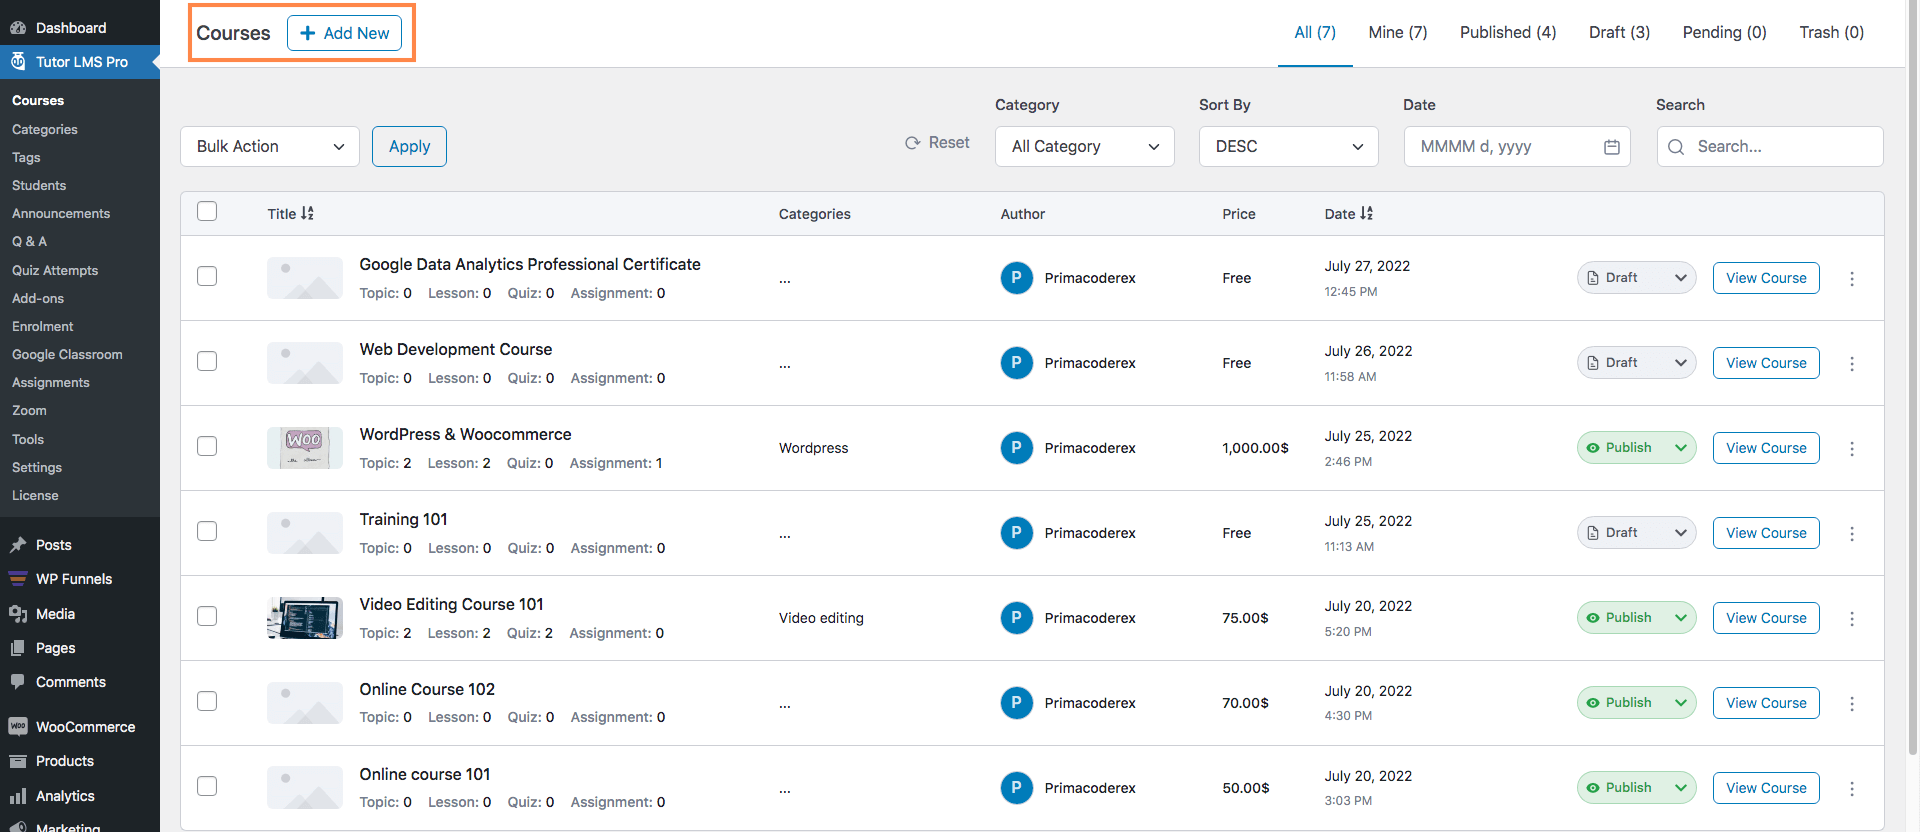
- Fill out all the essential details for your courses, such as the title, description, categories/tags, feature image, the options in the Course Settings box, and the options in the Additional Data box.
- Additionally, you can specify the number of students who can sign up for the class and choose the level of difficulty for the course’s material.
Step 2 – Add Course Topics
When you create a course, it should include multiple Lessons and Quizzes, which can be under Topics.
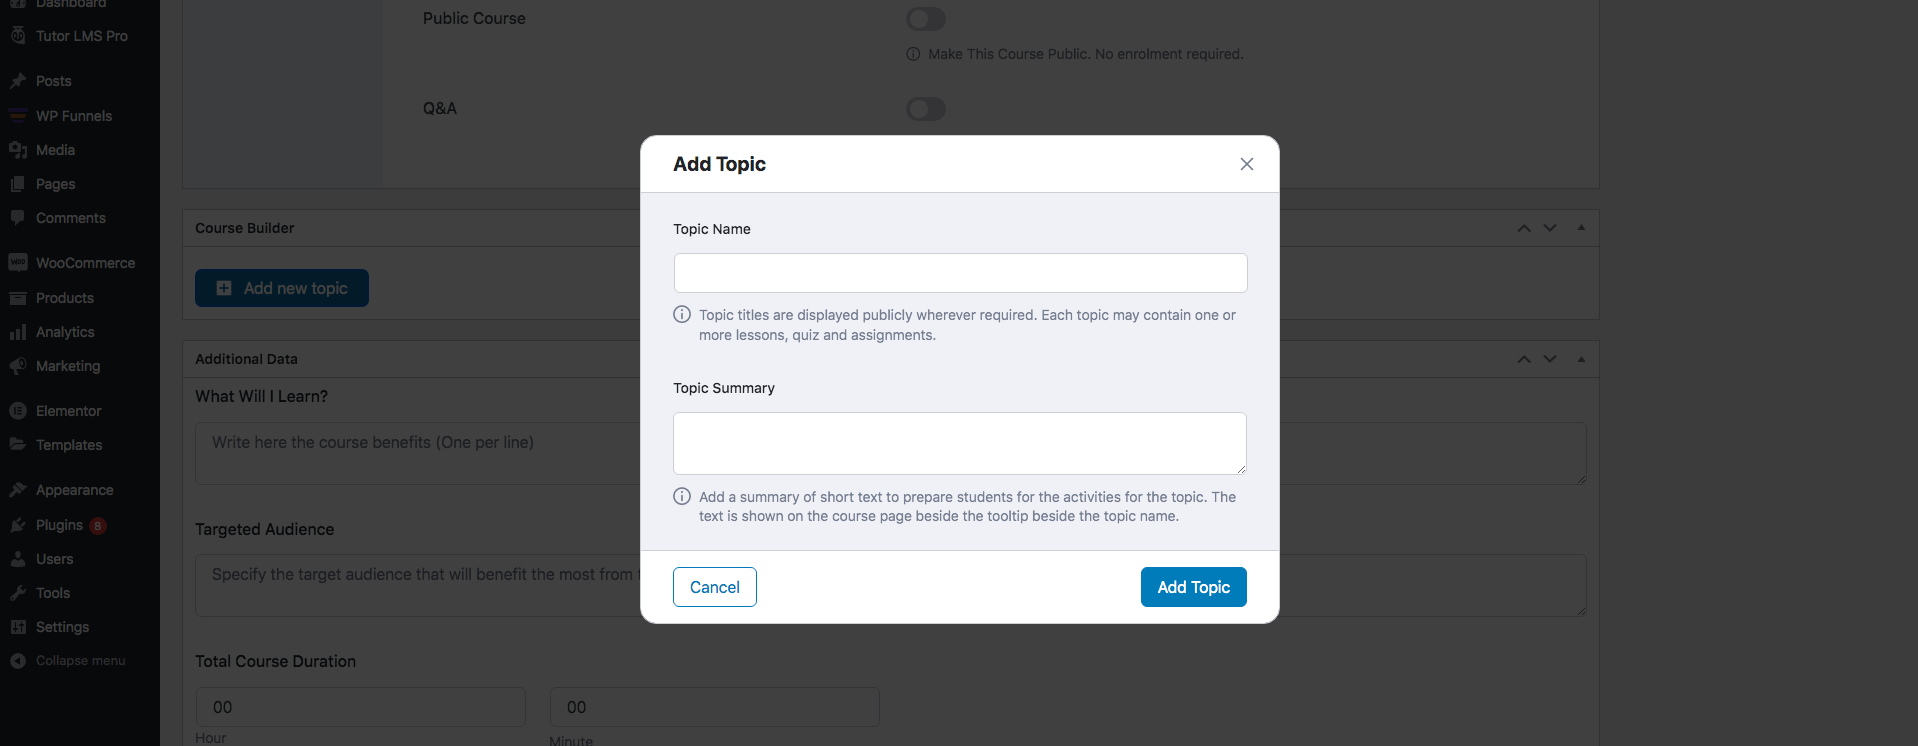
- Add a Topic by clicking on the ‘Add New Topic’ button in the course builder section in when editing your course.

- Set the Topic Name & Topic Summary.
Step 3 – Create Lessons For Your Course
- Once the topic is added, click on the ‘Lesson’ button under the Topic.

2. A pop-up will appear where you can fulfil your Lesson with content and Title.
Step 4 – Add Quizzes For Lessons
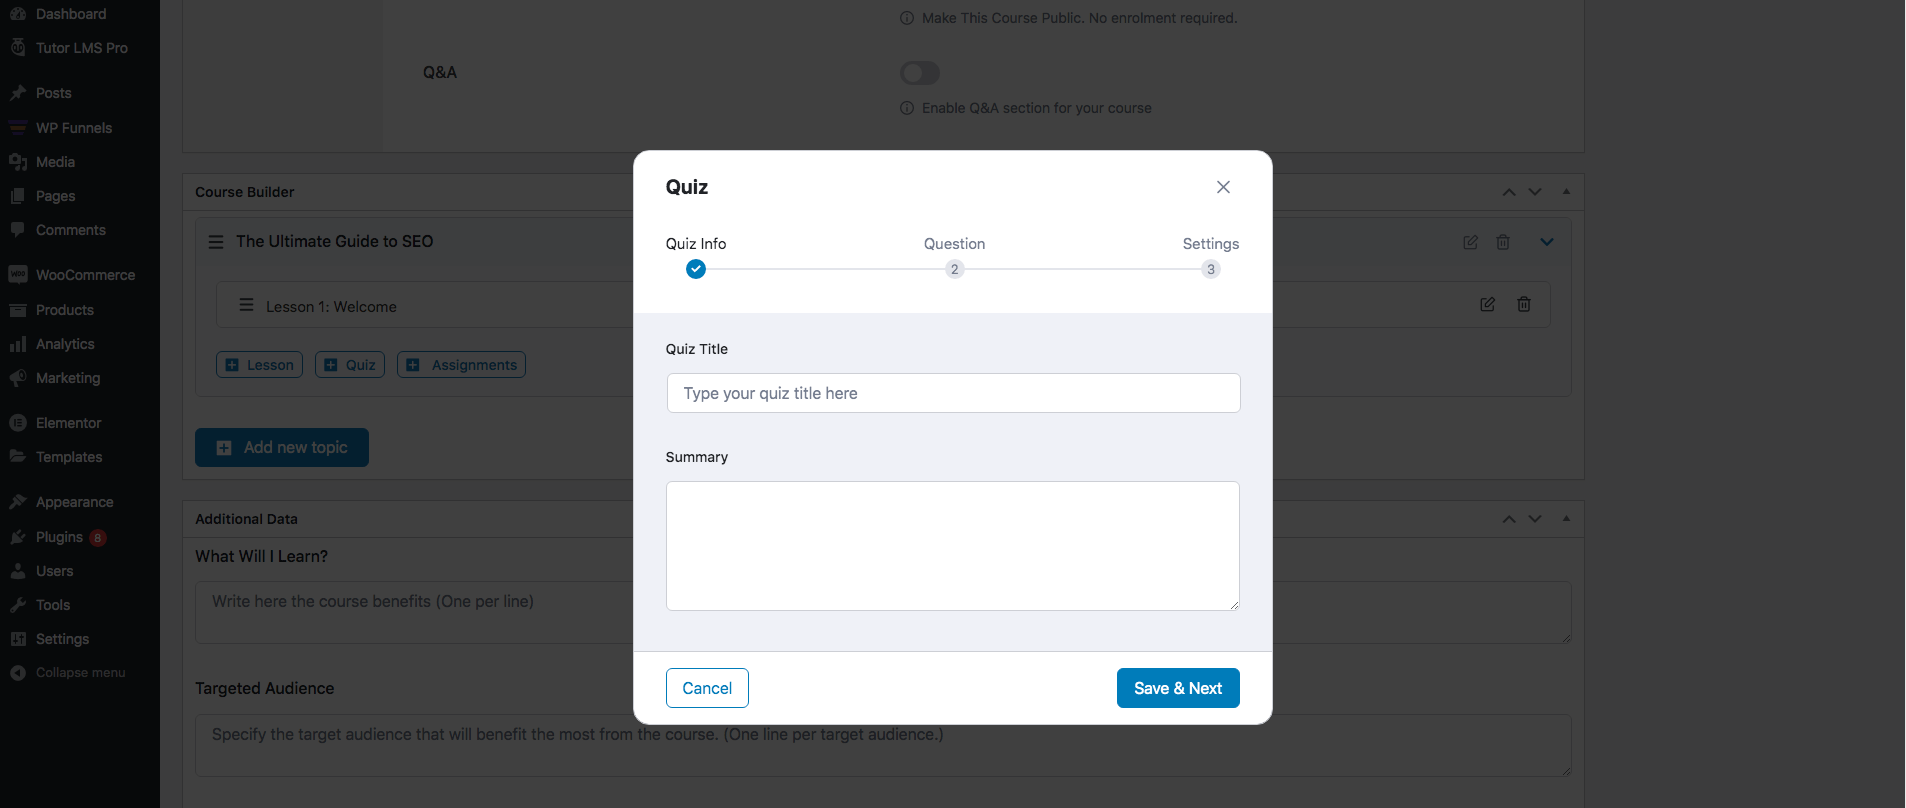
Quizzes can be a great addition to your courses to keep the students hooked and help them learn the course better.
You may add quizzes for a topic by clicking on the Quiz button.
Step 5 – Setup Additional Details & Publish
- Fill in the following details
- Added Information
- Course Length
- Benefits
- Requirements
- Target market, and
- Materials Included
- Once you are happy with all the content, click on Publish and the course will be ready.
You can follow the same steps to create the other two courses in Tutor LMS.
(Or you may follow this guide)
Once you have the courses ready, you have to configure them and get them monetized for your sales funnels. Let us learn how.
How To Configure Tutor LMS Courses For Sales Funnels
To sell Tutor LMS courses with the sales funnel, first, you need to add your courses as WooCommerce products.
Normally, Tutor LMS allows you to sell courses and various ways, but the most convenient way is to sell courses via WooCommerce.
Since you have the courses ready, follow the steps below to learn the proper way of adding courses and products and monetizing them for sales funnels.
Step 1 – Enable Monetization Of Courses
- First, you need to enable monetization in the Tutor LMS settings. Go to Tutor LMS → Settings → Monetization
- Here, under eCommerce Engine, choose WooCommerce.
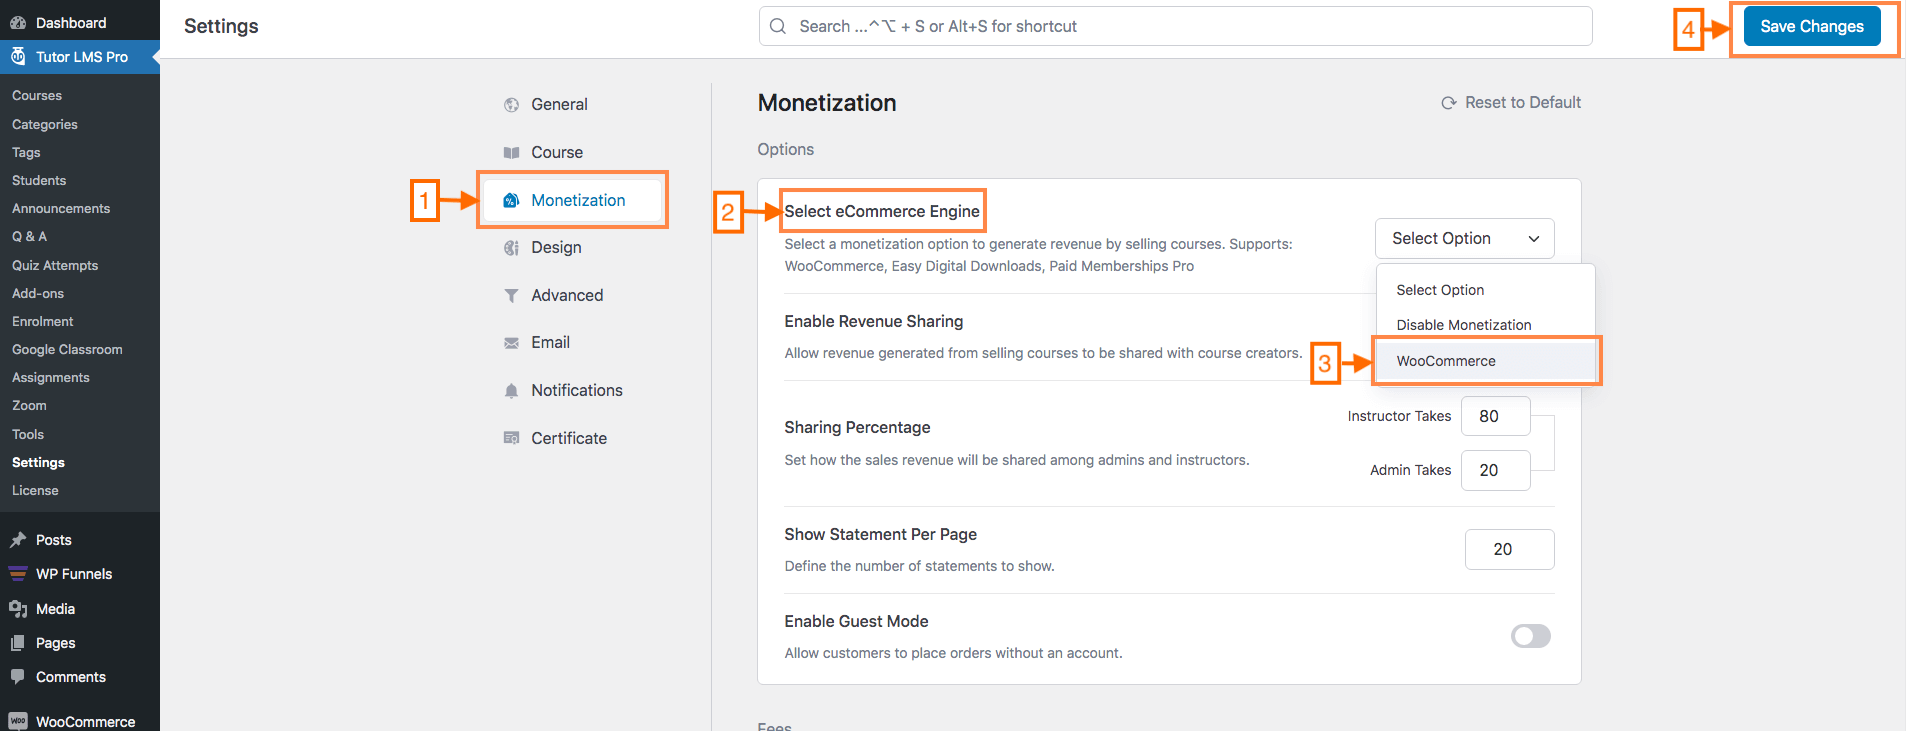
- Then click on save changes.
Step 2 – Create Products For Your Courses
- Add products in WooCommerce.
- Create a detailed product with your course details, category, title, and Feature image.
- Mark your product as ‘Virtual And For Tutor.’
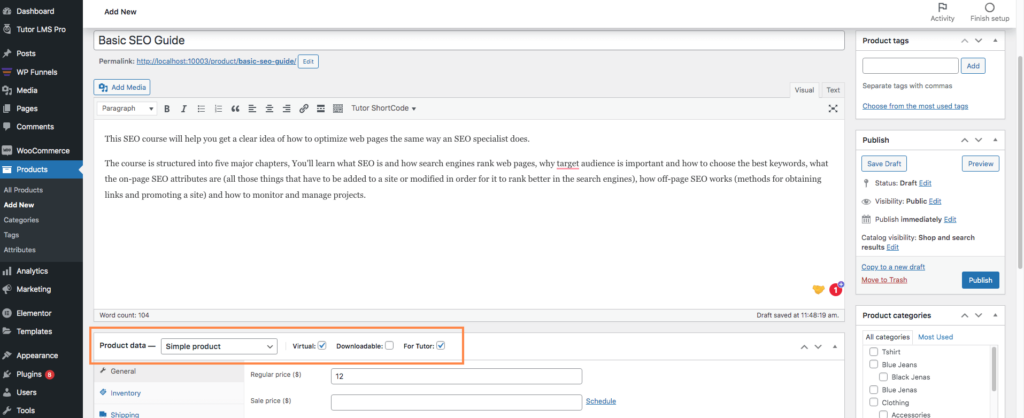
- Insert a price you want to charge for your course.
In this case, for Basic SEO Guide, the regular price will be $12.
- Then publish the product
Follow the same process to create products for all your courses.
Step 3 – Link Your Course To Their Respective Products
- Go To Tutor LMS > Courses.
- Edit a course you want to link to a product.
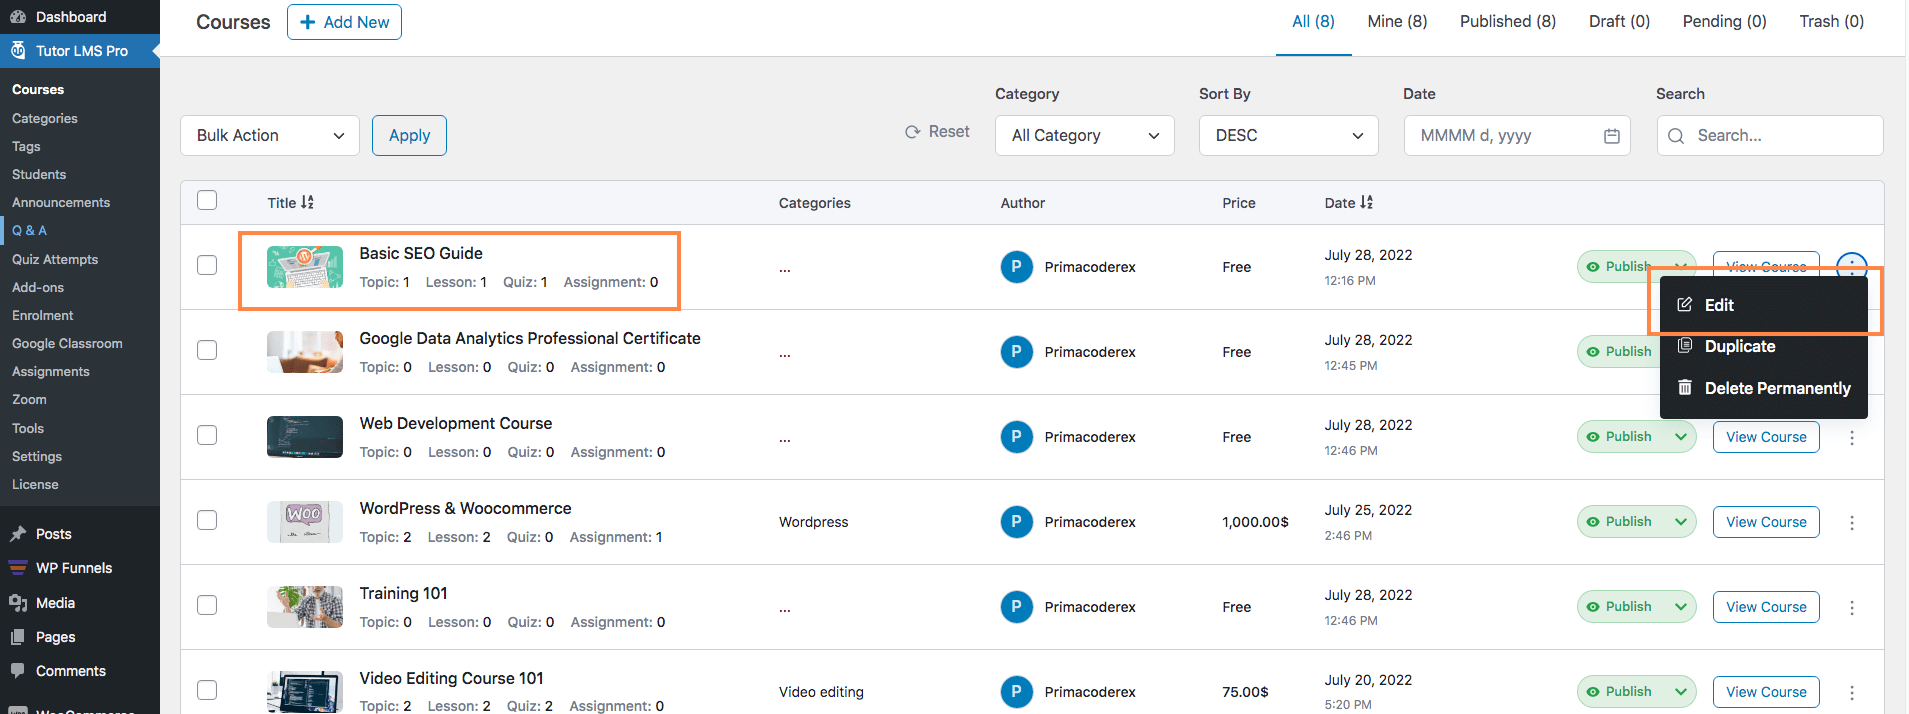
- Set the Course Type as Paid.

- Assign your course product from WooCommerce under Select product.
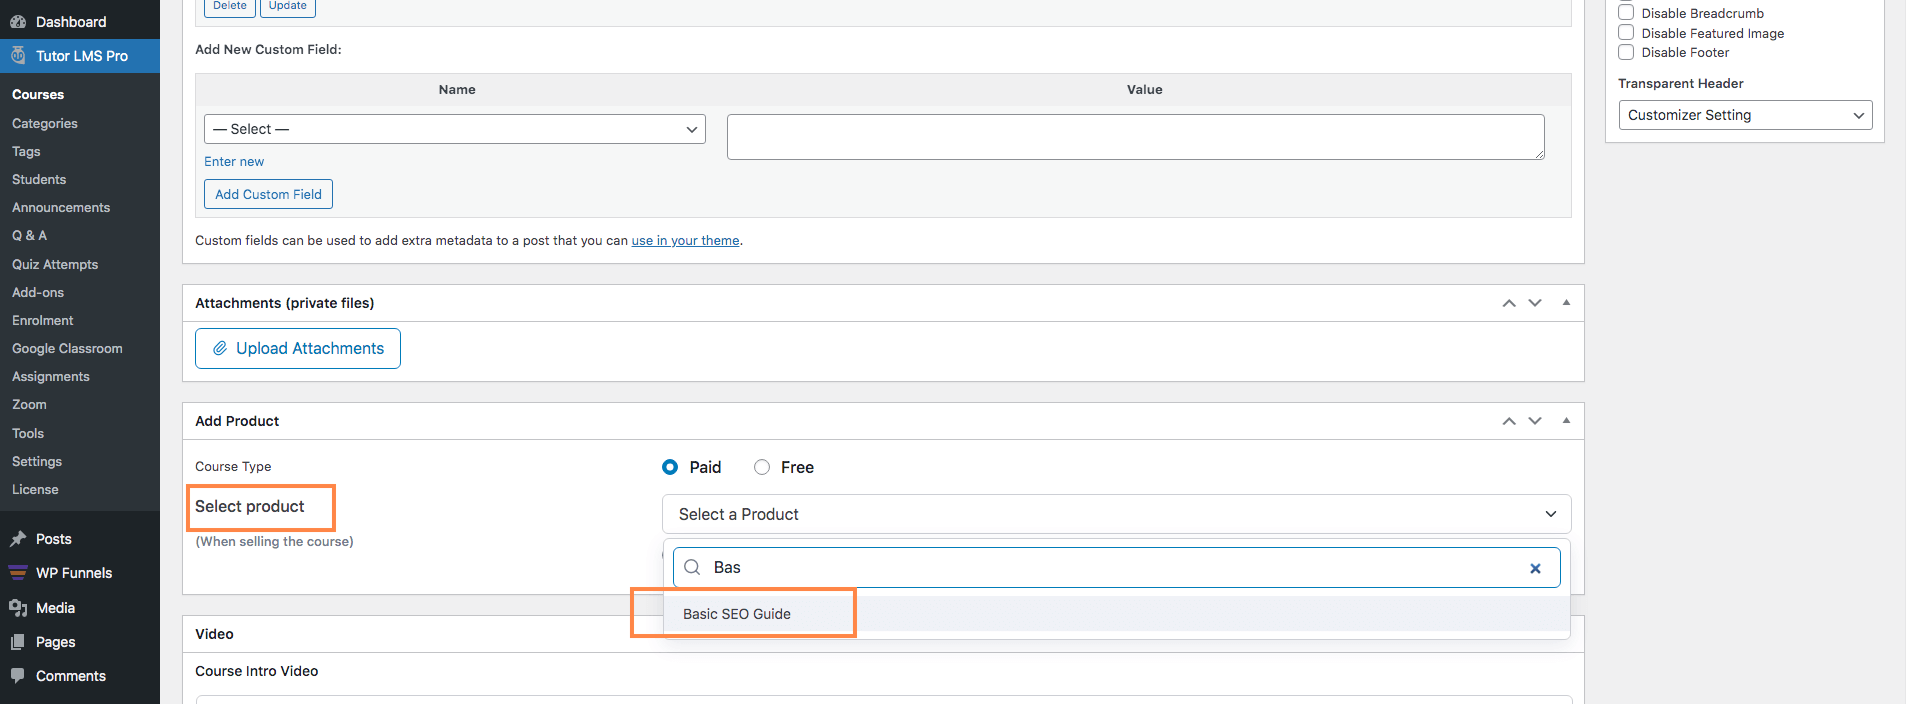
- Now, update the course.
That’s it. Your course is now connected to the WooCommerce product and people can purchase it from your online shop.
Follow the same steps to link the other two courses to WooCommerce products.
Now, let’s go ahead and create a sales funnel for these courses.
How To Create A Sales Funnel For Your Courses Using WPFunnels
Follow the step-by-step process to create a sales funnel for your Tutor LMS course.
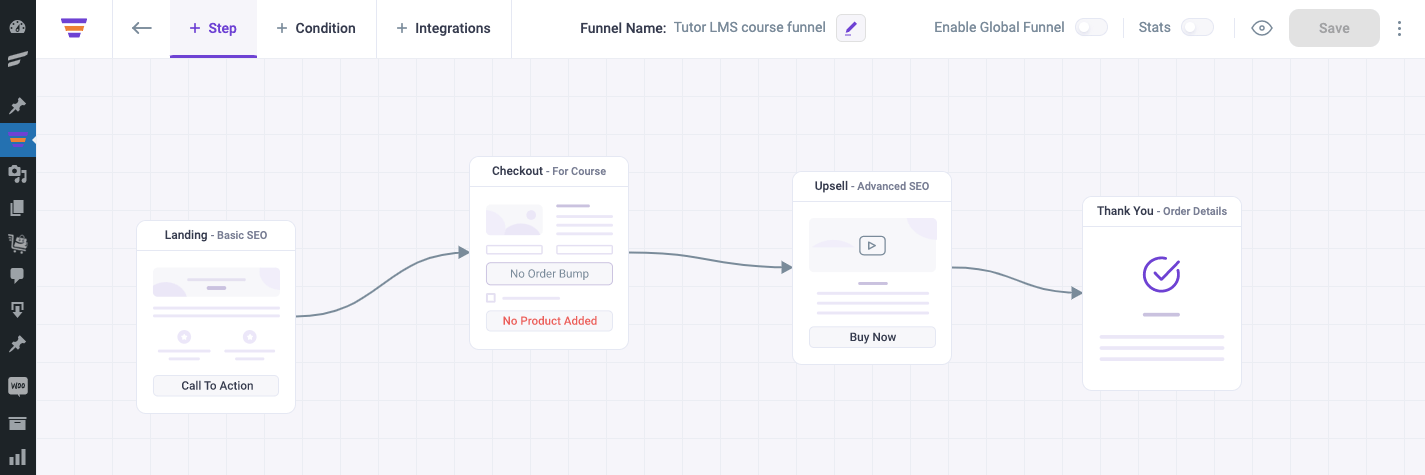
Step-1: Create A Funnel Template
1. Go to WPFunnels → Add New Funnel

Now, start creating a funnel from scratch or use a pre-built template. For the SEO course funnel, we’ll have 4 steps on the funnel mapping canvas – Landing, Checkout, Upsell and Thank you.
Step-2: Add Initial Course to Your Funnel Checkout
Keep the landing page as it is for the time being and let’s configure the checkout with your initial course offer.
1. Click on the Checkout step and you will find the settings option. After clicking it, the Checkout settings drawer will appear on the right side of the window.
2. Type the WooCommerce product name that you have linked with your course – it’s the “Basic SEO Guide” in this case.
Select it and click on “Add Product” to add it to your sales funnel checkout.
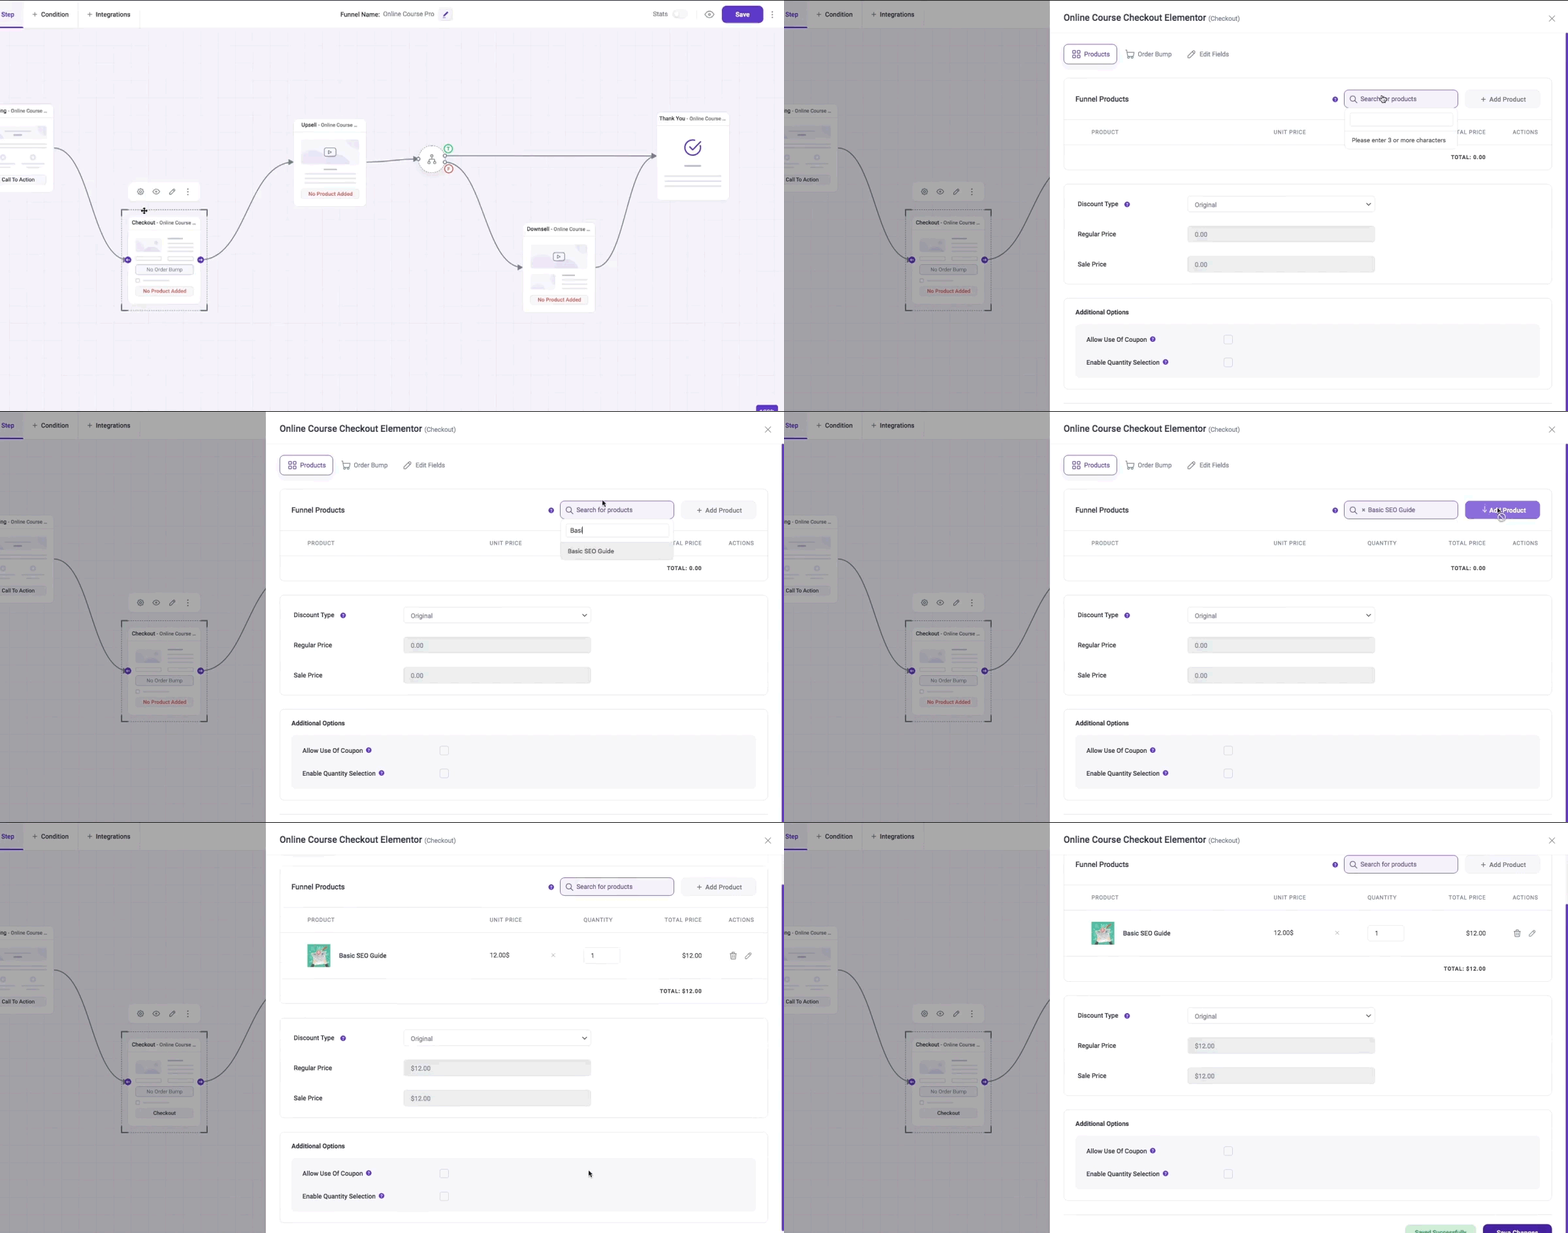
3. Now click on the Save Changes button to finish adding your product.
Step-3: Offer a Related Course as Order Bump
After adding the product, you can offer an order bump on the checkout page.
1. On the checkout step, click on the Order Bump tab & select the Add Order Bump option.
2. Add the “ Customer Journey Evaluation” course as the order bump just like you’ve added the initial course.
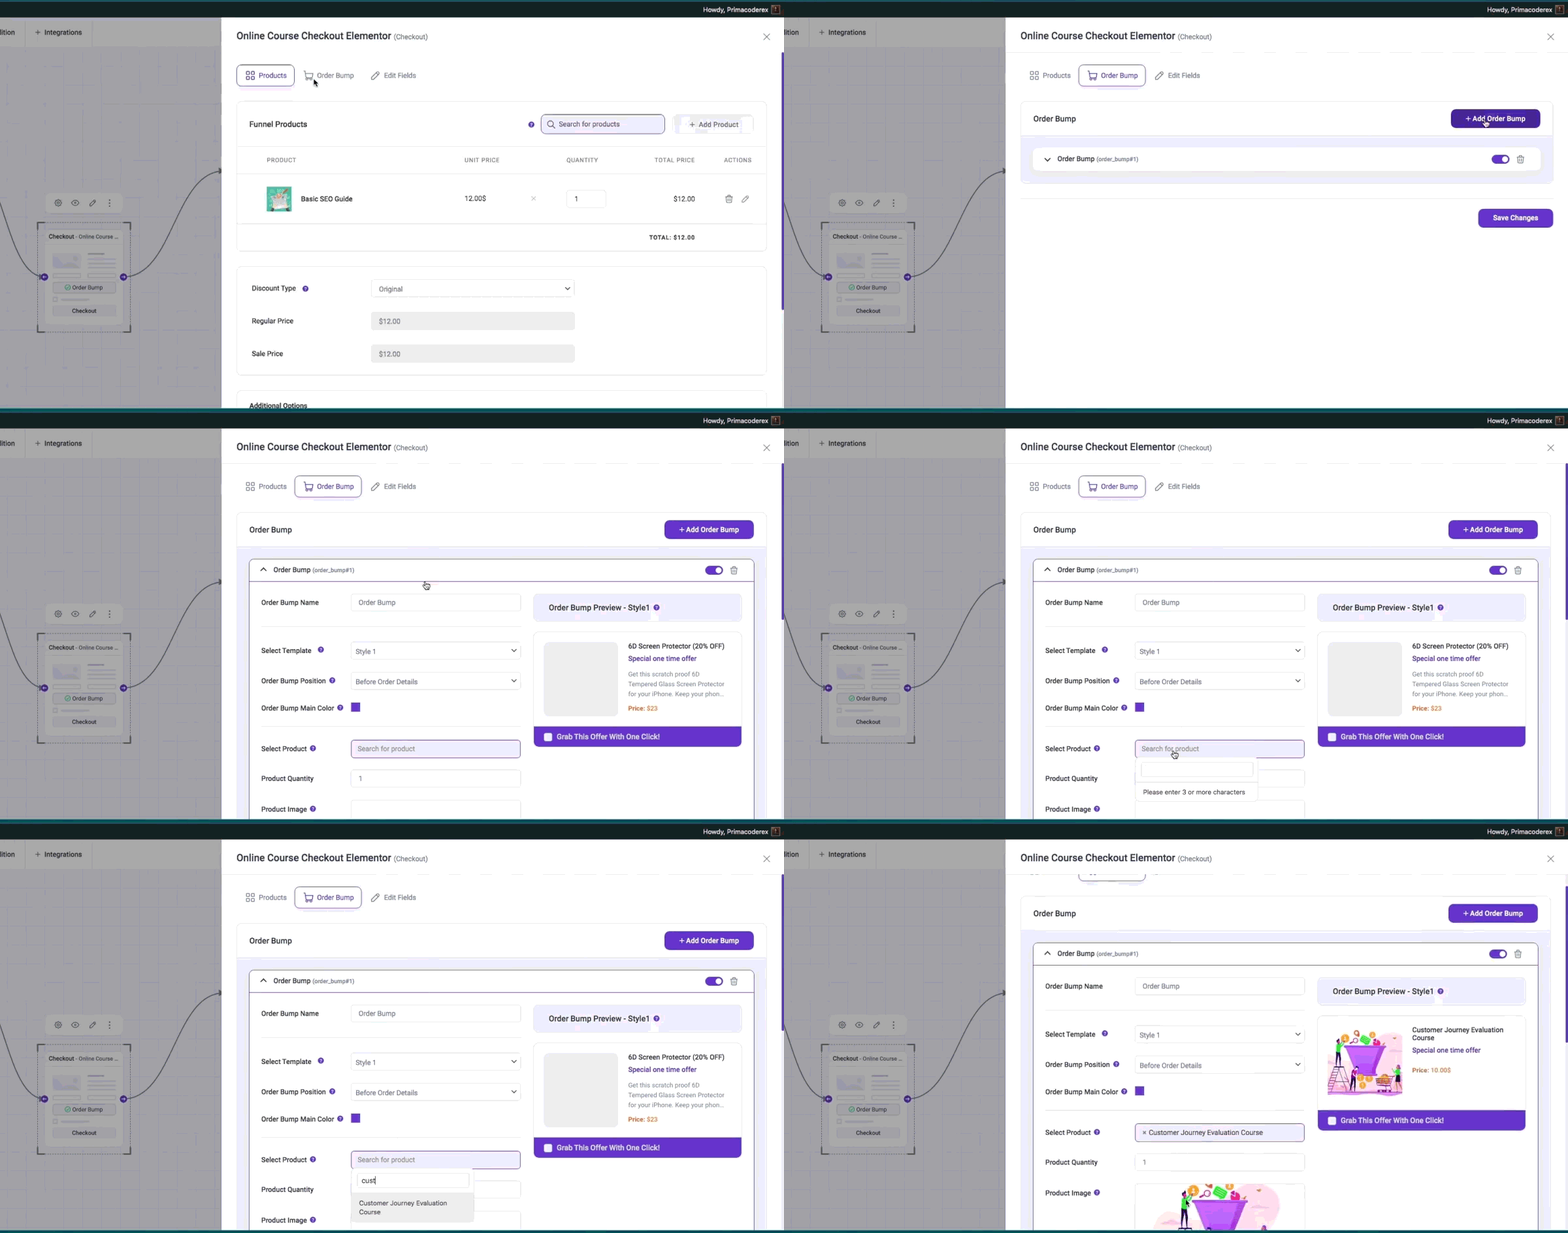
3. Now click on the Save Changes button to finish adding your order bump offer.
Your enroller will find order bump at the checkout page before payment. By accepting the offer, they can purchase both courses at a time. In addition to that, you can let your customer replace the main order with the order bump course.
Step-4: Pitch a Post Purchase Upsell
After checkout, you can offer a post-purchase upsell in your sales funnel.
1. To configure that, click on the Upsell step & go to settings.
2. Add the “Advanced SEO Course” as the upsell product just like you’ve added before.
3. Now to replace the “Basic SEO Course” with your “Advanced SEO Course”, scroll down to Additional Options.
Enable Replace Settings and select “Replace Main Order Excluding Order bump”.
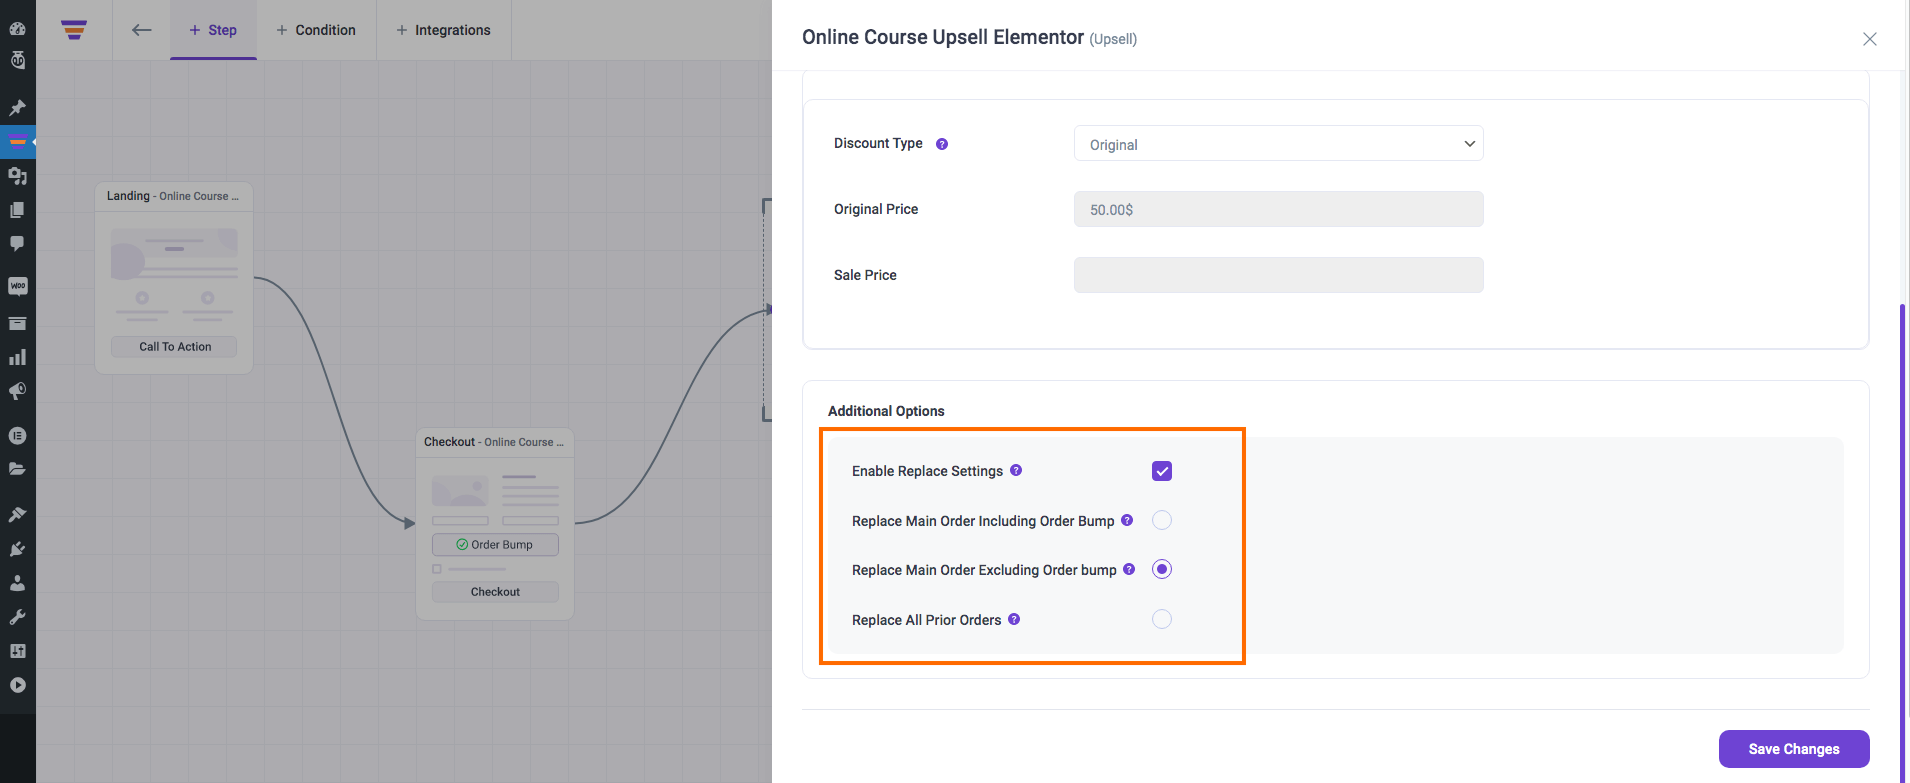
This will only replace the initial course, not the order bump. But you can choose to replace both if you want.
4. Click on Save Changes to save your upsell step.
After this, you can set a conditional downsell offer in your sales funnel. If the students decline the upsell offer, the less expensive downsell will be shown to them.
Step-5: Design your Funnel Pages
Once you are done with the above steps, tap the Save button on the right side of the drag & drop canvas of WPFunnels & preview your sales funnel for your online courses.
Now that your sales funnel is created, you can customize the page designs however you want.
The next segment is about some marketing strategies for your sales funnel.
How To Market Your Sales Funnel For Your Courses?
After creating the sales funnel for your online course, you need to market your sales funnel to bring traffic.
Below I am sharing some ways to promote course funnels.
1. Create a Facebook Group to add Value to Your Sales Funnel
Facebook groups are a quite popular place where all of your admirers may assemble to exchange tales, advice, and assistance. As a course seller, you can talk, and give updates & guidance.
Imagine you have a funnel for the video editing courses you are selling. You can drive traffic to your course funnel by sharing the link on the Facebook group where you have established a community of people interested in the area.
2. Use Instagram Hash Tags
Nowadays it’s prevalent to use Instagram to promote your sales funnels. Look for hashtags that are relevant to your niche and the courses you are selling. Use such hashtags and then submit insightful stuff along with your sales funnel link.
3. Create Videos on Youtube to Draw Attention
Youtube is the most widely used search engine worldwide after Google. You can generate endless traffic virtually while growing an audience by uploading videos about your courses to YouTube.
You can create informative videos to grab people’s attention who are interested in your target niche and market your course funnel to them.
Suppose you are a web development course seller & you want to promote the sales funnel you have created for your courses.
You can make videos on the significance of learning web development & promote your course funnel with them.
4. Plan for Paid Ads to Reach Potential Students
Find out where your potential students roam out more. Then plan for Social Media ads, Google ads, or even YouTube ads to get in front of them. Here, it’s crucial to focus on specific demographics, interests, and behaviors while targeting your potential students.
Craft your ad banners carefully to attract as many students as possible.
Wrapping Up
If you are still up with my article, you already know how to sell more courses using a sales funnel.
So now go forth, create courses with the popular WordPress LMS plugin, Tutor LMS and start selling your online course automatically with a sales funnel created with the popular funnel builder WPFunnels.
Comments are closed.


![How to Create and Sell Courses Online in WordPress? Beginners Guide [2025] 17 Create and Sell Online Courses in WordPress](https://getwpfunnels.com/wp-content/uploads/2022/08/Create-and-Sell-Online-Courses-in-WordPress.png)
![How to Build a Profitable Online Course Business for Additional Income [2025] 18 Online Course Business](https://getwpfunnels.com/wp-content/uploads/2025/01/Online-Course-Business.webp)


![Crafting A Highly Effective Online Course Sales Funnel – Comprehensive Guide [2025] 25 Online Course Sales Funnel](https://getwpfunnels.com/wp-content/uploads/2023/12/Crafting-A-Highly-Effective-Online-Course-Sales-Funnel-Comprehensive-Guide.webp)
![What is a Learning Management System (LMS) Funnels - Complete Guide [2025] 26 Learning Management System (LMS)](https://getwpfunnels.com/wp-content/uploads/2025/05/Learning-Management-System-LMS.webp)
Comments (3)
Very good, detailed and informative.
Thank you.
We are glad you found it useful.
Very good article, detail step by step what I’m looking for. Thank you