A free webinar is one of the best ways to attract more clients in the early stages of a marketing funnel.
You can easily collect more leads through webinars if you are promoting your online coaching services, offering marketing services, making a product launch, or simply trying to promote yourself to build a community.
The main challenge here is to create the perfect journey for your clients so that you can qualify the right individuals into becoming potential leads.
According to ReadyTalk, 20% of 40% individuals who attend webinars become qualified leads.
Now, planning and hosting webinars can be quite challenging. And in WordPress, there is no complete tool that can help you prepare the perfect webinar funnel.
But guess what, creating webinar funnels in WordPress is rather quite easy.
All you need is to use a combination of a few reliable plugins to set up a proper journey. And in this article, you will learn exactly how you can use these plugins to prepare a webinar funnel on your own.
After reading this article, you will learn:
- The basic concept of a webinar funnel and why it works
- What tools you will need to create a webinar funnel in WordPress
- How you can create a complete webinar funnel to get more leads
And eventually, you can start hosting free webinars to get more qualified leads and hopefully close profitable deals.
So let’s begin.
Why Do Webinar Funnels Work Better Than Most Other Techniques?
A webinar is where you directly make a demonstration of your skills or values and then make a pitch of your offer at the end. Sure, you could have simply created a video and promoted it to potential clients. But a webinar brings in more value that you wouldn’t normally get with videos.
- A big advantage you get out of a webinar is the list of people who signed up to join your webinar. But what’s more important here is that these leads are filtered out to match your target audience. The people who will sign up have some necessity for your service or business proposition, and you have the chance to convert most of them sooner or later.
- Next, it’s the personal connection you can create. When hosting a live webinar, you have to keep time for a Q&A session. This is where you interact directly with your potential clients, and there is nothing better than direct communication. The webinar session will help you gain trust and authority from your clients and help you convince them that you are worth the investment.
- And finally, it gives you a chance to pitch your offer to a live audience that is part of your target market. As long as you take a value-added webinar session, people will stick around till the end. And throughout the session, you can promote yourself or your service and eventually make a pitch to the clients to sign up or make a purchase.
All in all, you get a chance to convert a set of qualified leads into your paying clients.
Now, let us understand a webinar funnel.
As you probably know, a funnel is a set of steps where people get qualified for the next stage. A webinar funnel is no different.
You will use a webinar as a reason for people to provide their contact information to you. And in the webinar, you can further make a pitch. And later, you can re-target them with sales offers.
And the reason why this is a better marketing approach than many others is because of the direct integration. People who attend the webinar will have more confidence in investing in your service or product, even if it is more expensive at times.
Let us look at how you can plan a webinar funnel for the best results.
How To Plan & Execute A Proper Webinar Funnel That Converts
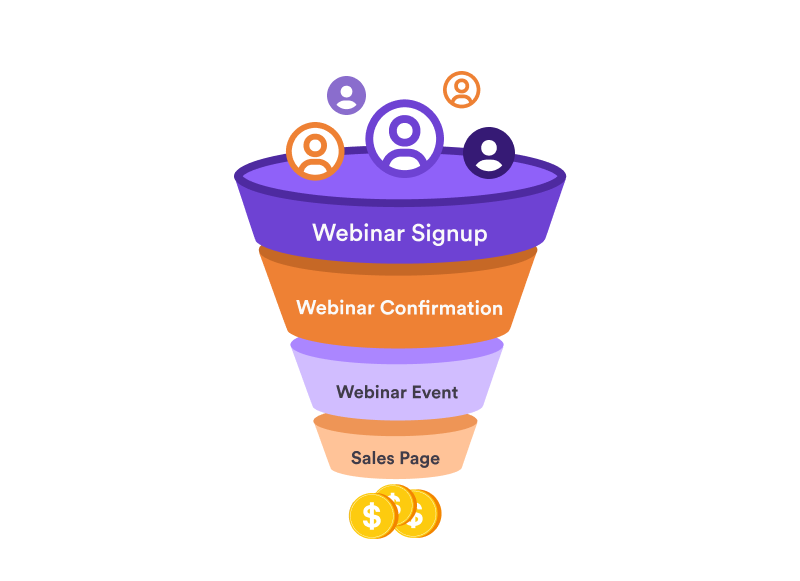
Initially, when you set out to plan a marketing strategy, it’s best not to worry about tools. Rather, plan on what you want to achieve and what steps you want your clients to go through to meet your marketing goal.
Hence, the first thing to do is to decide your marketing goal. And then, you need to decide on the webinar funnel steps.
A typical webinar funnel will have the following steps:
- Advertisement (This could be a paid ad, social post, banner ad, email to a list, etc.)
– This is how you can bring traffic to your registration page. - Webinar Registration Page
– The registration page will let you collect leads and give you the expected attendance when you host the webinar.- Email link to this page to an existing mailing list
- Re-targeting Ads if not registered
- Confirmation email
– Have the prospect confirm the registration via email to ensure it was a real person who registered with a real email. - Send link to Webinar Event via email
- Webinar Event
– Host the webinar on a webpage in due time and make your pitch.- Followup email with webinar recording if missed
- Product/Service pitch
– You can prepare a sales page where you may ask the attendees to visit. A button on the webinar hosting page should be enough, or you can send a link to the sales page via email to attendees.- Email to viewers with a link to the webinar recording and a link to the sales page
- Sale Page Into A Sales Funnel
- Here, you can offer a core product, or you can start with a Tripwire offer, i.e., a low-cost package, and then offer them higher packages as post-purchase upsell offers.
- Email Funnel To Upgrade Buyers To Higher Packages
You can customize this journey and make changes that can benefit your business.
Remember, the above steps are just a checklist for planning.
Once you have planned the steps, next, it’s time to prepare an execution plan that goes with your business. This is when you will decide which tools you will use, what copy to use, the video Ad script, and other optimization to implement when creating this funnel.
In the next section, we use an example to help you understand how you can prepare a detailed plan for your funnel. And then, later, we will learn how you can follow an actionable execution plan where you will learn the right approach and tools to set up the funnel.
Devising A Detailed Plan Of Webinar Funnel
This section will apply to many, but for some, you may need to change some of the approaches to match your requirements. But even if you copy the exact same approach, you will still find great results no matter what service or product you offer.
Let us picture an example.
Suppose you offer training for Digital Marketing to marketing teams in any organization. And your goal is to collect potential leads that include entrepreneurs and CMOs so that you can offer your service to them.
In this case, you can host a free webinar to give basic training on SEO Optimization with unique tips for a business website.
Initially, you can plan the funnel steps as follows:
– This will just be a rough idea of the whole approach
- A Video Ad and Banner Ads to drive traffic
- A landing page with a webinar registration form
- Email automation to confirm webinar registration.
- A page to host the live webinar
- Email automation to send a link to the webinar hosting page to registered users
- A sales page to offer your product/service
- Email automation to send a link to the sales page to users who attended the webinar
- Conversion Optimization Using Sales Funnel
- Further Email Funnel To Trigger Upsells
Once you roughly know what you want to work on, now, as per the above plan, let us turn it into a detailed plan to craft a webinar sales funnel that will convert.
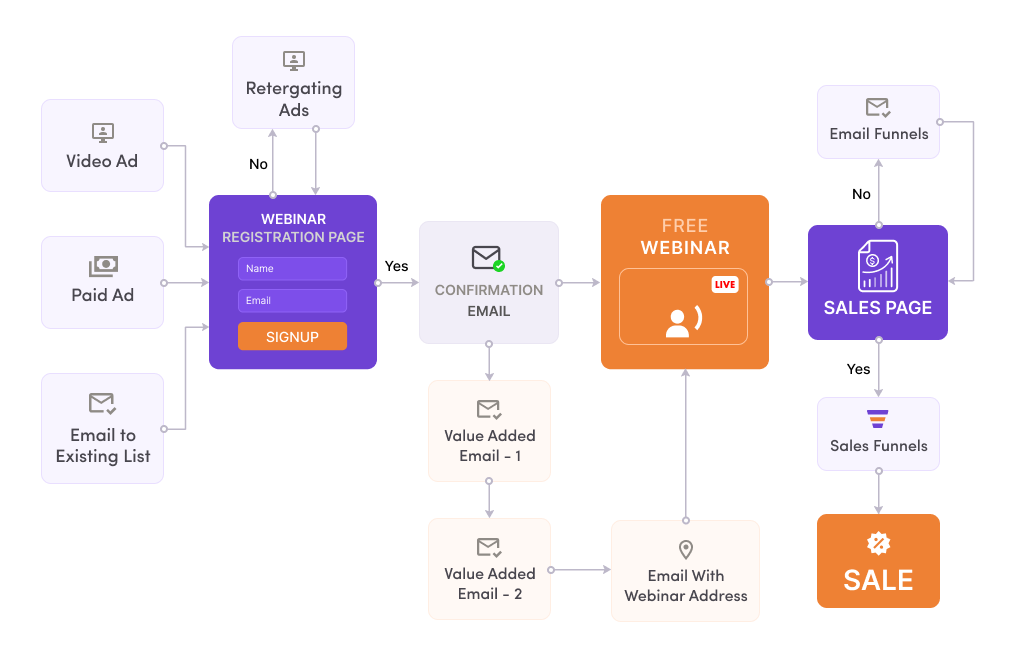
- Use a Video Ad explaining how you helped many businesses with your training and what you will cover in a free webinar. You can promote this on social channels where people can get a link to your Landing Page.
- Create a Landing Page explaining how your service will help to increase online presence & sales, and improve the marketing team’s digital marketing skills. The copy here has to be quite convincing. (We will create guides in the future to learn how to write compelling copies for your funnels.)
Here, keep an Opt-in to register for a free webinar.- Run paid Banner Ads to get traffic to the landing page.
- Send an email to your available mailing list (if any). You can create email automation so that people who do not open it in two days will get another email about it.
- Set up re-targeting Ad banners so that people who don’t register get Ads about your free webinar on their social media or other websites. Some will click on the Ads and come back to the landing page to register.
- Setup email automation for people who registered for the webinar and have them confirm the registration via email. If someone fails to open the email in two days, set up an automation to send them a reminder email.
- Set up the page where you will host the webinar and send the link to the time schedule of the webinar via email to registered users.
- Prepare a drip campaign for the registered users to send them a couple of emails prior to the Webinar. This could be a link to useful content, a free guide attached to the email, or simply a text-based email with some valuable content. Usually, it’s best to send 2 nurturing emails prior to the webinar to make them remember you until the event. End the drip with a reminder email a day before the actual event.
- Set up an automation to send an email to registered users with the link to join the webinar 1 hour prior to the event.
- Create a sales funnel to increase your sales
Once someone has gone through the webinar and is ready to try out your service, you can create a sales funnel to try and see if he agrees to a higher plan at a discount.
- Run email campaigns to upsell your packages to higher plans further. For people who will end the Sales funnel and purchase the lower plan but not go with the higher plans, you can run email campaigns later on to try and convert them.
This is a more detailed execution plan, and you know exactly what you want to execute. Next, it’s time to set it up in WordPress.
Complete Execution Process To Create And Launch Your Webinar Funnel In WordPress
Now, let us turn the above plan into reality. However, when executing the plan, you need to follow a different execution order. It’s not so confusing, though.
Follow the steps below to see how easily you can do it.
1. Setup A Landing Page To Collect Leads
You do have the webinar page and a basic registration form, but that won’t convince people to register.
Rather, you need a Landing Page that will convert. But you also have to keep in mind that you need to run automation for people who register or set re-targeting Ads for people who visit but don’t register.
Having that in mind, you can use the following tools:
- WPFunnels to create a Landing Page
- Elementor (or any page builder) to design funnel pages
- Mail Mint to run automation
The reason why WPFunnels is a good option here is that it has native integration with Mail Mint, and it has analytics that will help you to make marketing decisions.
Plus, since we are creating funnels, WPFunnels will come in handy to run sales funnels later on once people attend the webinar. We will discuss this later in this article.
For the opt-in part, you can do it using WPFunnels Basic.
- Create a funnel in WPFunnels. Then add and connect two steps, Landing & Thank You.
- Design the Landing page and use the Opt-in form widget from WPFunnels.
The landing page is crucial. The copy should clearly state why joining this webinar is important. Mention the topics you will discuss in this free webinar and how this webinar can help in their business.
You can also include sections to inform what you specialize in and how you helped several businesses to scale up in the past.
The goal of this landing page is to convince them that this webinar will add value to their business. It should not have any indication that you have a sales pitch in mind during the webinar.
Include any achievements or recommendations, and do remember to mention the date and time when you will host the webinar.
Place the opt-in form once in the Hero section (i.e., the first section) and the last section of the page. Try to keep the landing limited to 3-4 foldings at max (as long landings for webinar registration aren’t the best idea).
- In the Opt-in form widget settings, choose “Action after submission” as ‘Next Step’
- On the Thank You Page, simply thank the prospect and ask them to check the email.
- You can also include a small CTA below your sales page here (which we will create later).
Once you have the steps ready, you now have a way to collect leads and a way to send the registration data to Mail Mint to set up automation (which we will create later on in this article).
- Go to Mail Mint and create a tag and list for your users that will register from this page. Let’s say, create a list ‘Webinar_registered’ and a tag ‘Registered’
- Now, go back to the funnel canvas where you created the Landing and Thank You pages.
- Here, choose Integration above, and there, choose Mail Mint to set it up.
- Choose the trigger ‘Opt-in form submission’ and assign the tag and list you just created in Mail Mint.
- Then save.
That’s it. You now have a Landing page to collect leads and a way to send the registered data to Mail Mint.
2. Prepare A Video Ad & Banner Ads To Drive Traffic
Now that you are ready with your Landing Page, it’s time to prepare the mode to drive traffic to the page. As per today’s trends, video ads have the highest conversion rate.
87% of marketers claim videos can increase traffic and enhace ROI generation.
Marketers claim they can get over 66% qualified leads and 49% revenue growth via video marketing.
The statistics themselves define why using a video is the best approach to drive traffic.
You can record a video explaining who you are and what you do (i.e., your specialty). Invite them to your free webinar and state how they will benefit from this webinar.
To record the video, you may use Movavi, InVideo, or Flixier which are pretty good to record and edit. You can have a video editor post-process the video to add Intro Maker, Outro, and graphic elements within – I prefer using desktop tools such as Adobe AfterEffects or Premiere Pro for this rather than using any online tool.
Besides this, you can also prepare a couple of Banner Ads, which you can use to run paid ads on Social media or SERPs. Figma or Canva would be great tools to prepare such Ads. These Ads should be more focused on inviting viewers to join a ‘Free Webinar’ and the benefit of the webinar. So the amount of text will be minimal with the right message.
3. Prepare Banner Ads For Re-Targeting
When running re-targeting Ads, it’s wise not to use the same Ad banner over and over again.
Prepare 2-3 types of re-targeting Ad banners that are a bit different from your initial Paid Ad banners.
Again, this should be focused on inviting viewers for joining the free agenda and hooks to create curiosity.
4. Setup Your Webinar Page And Schedule
Since the main element of this whole funnel is a webinar, you need to choose a proper way to host the live webinar.
The best way to do this is via Youtube.
- Simply use your business or personal Google account to log in to youtube and schedule a live session.
– Here’s a guide to help you out with it. - Once you have scheduled the live session, mark it as unlisted and collect its shortcode.
Next, create a landing page to host the webinar and password protect the webinar for registered users only. To do so, you will need WPFunnels and the PPWP plugin, which is a great tool to password protect a certain section on a page.
- Go to WPFunnels and create another funnel. Here, simply include a landing page.
- On the landing page, place the Password protected widget either in a section or as a content element itself.
- In the Protected content box, insert the shortcode of your webinar.
- Edit the title and text of the protected content as:
Headline: Join The SEO Webinar With Mr.ABC
Description: Learn all about enhancing the SEO optimization process for any website with a few secret techniques.
Label: Access Key
Error message: Please enter the correct access key! - Assign a password to this content box.
**Use lowercases and remember to save the password somewhere so that you don’t lose it.
This is a necessary step so that if someone makes the link to the webinar public, people will not have access without the password. And you will not be given the password until the webinar date.
- Then design the page with a proper title, color, and structure, and use a custom slug such as https://www.yourdomain.com/seo-webinar.
- Below the protected section, add a section with text and a button stating:
If you haven’t registered yet, register here. [Register For Free Webinar] - In the button, link to the Opt-in landing page that you created earlier.
Now, obviously, you do not want this extra section to be visible at the time of the webinar. So what you can do is you can make it dynamic so that it will only be visible until the webinar starts, and then it will disappear, and another button will appear to take the viewer to a Sales page (which we will discuss later.)
This can easily be done using a Data & Time based content reveal using the plugin Dynamic Visibility for Elementor.
- Select the section where you added a CTA to register.
- On the widget settings, you will find a menu called Visibility.
- Here, enable it, then scroll down and click on the Date and time accordion.
- Keep ‘Date FROM’ empty and set the ‘Date TO’ as the date and time when the webinar will start. Let’s say 2022-06-01 06:00.
– Keep in mind that the time you assign here will be set as per the time you have set in WordPress. You can check it out by going to Settings from your Dashboard menus. - Below this section, add another section and include text and a button as a CTA to your sales page.
- On the widget settings of this section, go to the Visibility menu and enable it.
- Scroll down to the Date and time accordion.
- Set the ‘Date FROM’ as the date and time when the webinar will start. Keep ‘Date TO’ empty.
There you go. Your webinar page is ready. You now have a link to the page where you will host the webinar.
In WordPress, you will also find a plugin called WebinarPress, which is also a great choice to handle webinars. You can check it out if you want to.
In the first four steps, you have prepared the elements needed. Now, it’s time to start putting them to work to get leads.
5. Create Automation For Registered Users And Nurture Your Leads
In Mail Mint, you have already created a list where you will include the people that will opt in.
- Now set automation for that list, ‘Webinar_registered’ so that they are sent an email with a link to the webinar hosting page. But do not include the password in this email. But do mention they will be emailed with the password 1 hour prior to the webinar.
– View this guide to understand how automation works in Mail Mint. - Set another automation for the same list so that they are sent an email with a link to the page 1 hour prior to the webinar. This time, include the Password as the Access Key in the email.
Prepare a couple of emails where you will send valuable content to the prospect, and keep them curious about your webinar.
This could be a simple email with a little advice on Content Structure optimization or keyword research. Once you have the emails ready, it’s time to set up the automation to nurture your leads.
- In Mail Mint, set up an automation for the registered users’ list, ‘Webinar_registered’, so that they get one nurturing email 5 days prior to the webinar event and another email 2 days prior.
6. Run An Email Campaign To Your Existing Mailing List And Invite Them To Register
In Mail Mint, you can also import any existing mailing lists that you may have. So the first people you would like to sign up for your webinar would be your existing leads who already know you.
You can collect these leads either by offering a lead magnet or by getting subscribers to the website by posting value-added content. Or, they could simply be people who took services from you in the past but are no longer collaborating with you.
- Create a campaign.
- Devise an email where you explain you have something great for free.
- Invite them to the webinar and mention the key benefits of attending it.
- Add a CTA button and link it to your Registration Landing Page from the first funnel that you created using WPFunnels earlier.
This email is crucial and has to be structured in a way so that the reader feels like this is something valuable that they can’t miss.
Here is an example email:
Subject: A Free Webinar – Biggest SEO Secrets Revealed
Dear Alex, I have something great for you!
As you know, SEO requirements have evolved, and it’s getting harder to rank high in SERPs. But I have found a few secrets that can make it easier to rank your content.
And I want to share it with you for FREE!
On 01 June 2022, I am hosting a live webinar where I will reveal all the secrets that I have learned through testing and implementation over the past 6 months.
Register now as slots are limited.
Cheers!
7. Initiate Paid Ads On Facebook, Google, And Youtube
One of the core concepts of any business is that you have to spend to reach more people, and only then you will get more business.
This is the same for a webinar funnel. You have to spread the word about your free webinar to as many people as possible. Only then you will get enough attendees and hopefully close more deals.
You can simply run Google Ads using the banners you prepared earlier from Google Ad Manager. And you can run Facebook Ads using the Meta Business Suite.
The crucial part here will be deciding your target audience. Both Google and Facebook give you a lot of options.
Sure, you can target any industry and get benefits as a SEO specialist, but it’s always best to narrow down your market to get better conversion opportunities. So, look into your skills and find out which industries are you the most comfortable with when it comes to implementing digital marketing. And find out which industries usually require trainers to train their marketing team.
For example, entrepreneurs of digital marketing agencies will not find your webinar much interesting as they are probably already researching SEO trends. But, a software firm with an in-house marketing team may be a better industry to target as their main focus is ‘software development’ and may lack knowledge in digital marketing.
But don’t just focus on the industry. You have to let go of a few industries based on your budget as average spend value may fluctuate depending on your target industry. Following are a couple of guides to planning your budget for paid Ads:
- How to Plan Your Advertising Budget
- How To Create A Budget For Paid Ads
- The Ultimate Facebook Ads Budgets Breakdown
On Facebook and Youtube, you will need to run the Video Ad. Make sure to use a strong headline and CTA.
You may also consider promoting on Twitter and LinkedIn as entrepreneurs are active in these social channels as well.
8. Prepare for Re-targeting Ads
It’s natural that most of the traffic you drive will not end up registering immediately. So, the next thing to do is to set up Re-targeting Ads.
You may use a platform called AdRoll to handle your re-targeting Ads. All you need is to connect it to your WordPress set and set up the Ads using the banners that you created earlier.
AdRoll will give you a calculation of the amount you spent on your re-targeting Ads and how many have converted.
And that’s it. Your initial Webinar Funnel is ready to help you generate leads.
Tips To Host A Webinar That Converts
Now that you have started collecting leads, eventually, you will have several people joining you on the webinar.
Here are a few tips to ensure your webinar is a successful campaign and you can sell your service to many of the attendees.
1. Make sure your content is useful to your viewers
Remember, a webinar is not just a sales pitch. People will join and stay till the end only if you have something time valuable for them in-store. Do not just give vague points that everyone knows about. Include some unique ideas and make sure to give EXAMPLEs that people can visualize.
This means you need to prepare a presentation where you will have examples designed for every idea you share.
If possible, include statistics and results of your ideas in real life, either when you tested it or in the case of some other firms that used it.
2. Include As Many Real Examples As Possible – With Your Touch
People are crazy for proper examples. You have to provide examples so that it gets easier for people to picture your points. So everything you say has to have a related example to help them understand how it works.
But here’s the catch. Try to give examples that involve you. Maybe it can be an example with something you applied in the past, or you tested it recently.
For example, you can say something like this:
“Last month, I sent out an email where I tried this new approach, and guess what results were immense. Out of 100 emails, I got responses from 70 of them, which normally doesn’t go above 40.
I even got a reply from a client saying……”
See how it involved yourself? This is practical, and people will want to learn from you since you have applied it in real life – your guide is not something you learned from elsewhere.
There’s one more thing I did. You can see I used numbers to define the outcome. People love numbers of results, and it’s best if you could include such stats in your examples.
3. Do Not Keep On Prompting To Take Your Service – Make Tactical Passive Offers
Now, I know it’s tempting to try and promote your offer as many times as possible. But do not do that. You have to be very tactical about self-promotion. It’s better to be passive when referring to your own service in between the benefit-rich content.
For example,
“…now, you could hire someone remote to handle your SEO, or hire someone who can train your in-house team to be great in SEO.
I would suggest getting a trainer as that will be a long-term benefit. So, you could choose someone you know or an agency with a proven record, or maybe hire me as your trainer if you need to. You can maybe discuss it with me about it after this session. But the end goal is to have a proper SEO implementation….”
You can see how I didn’t refer myself directly, and nor did I say that I was the best option. But it is clear that I can handle it and is a good option to consider when taking an SEO trainer.
But there are a few more things to consider. The way you speak matters a lot here.
For example, in the speech above, I would say the first few sentences at a normal pace, and then for the part, “You can maybe discuss it with me about it after the session,” I would say it a bit quicker as in a tone as if it is not a big factor. Then move on to the next sentence where I would stress the whole sentence and say it slower than the rest. Here’s a recorded version of how I would say it:
– Listen to the recording
So, make passive offers with the right tonality and it will sell itself.
4. Make Your Sales Pitch As The Second Last Thing In The Session
What most people do is, they take the whole session, and then they make the pitch right at the end, and most people leave at that time.
Rather, here’s what you should do.
- Plan your webinar so that you have something interesting and important to say near the end.
- Once you are there, mention that point and give a hook to explain that this is very interesting and important.
- But then, before sharing in detail, dive into your pitch.
What this will do is, this will create suspense and many will stick around to find out about this last important point. You can add icing to the cake by stating you will give some free goodies along with the last point.
This will make sure people listen to your pitch and stay till the end.
Then, make sure to give a CTA a couple of times within the pitch to click on the button below to take them to your offer sales page. Also, do the same near the end.
5. Some Tips On The Sales Pitch
Now the big question, how to go for the sales pitch? The sales pitch will vary depending on your product or service. But you can follow some of the tips below:
Start with examples of what you achieved with other companies in the past and the results. Refer back to the data you shared when giving examples in between your session.
Once offering your service or product, mention what they will get and what benefits they will get.
And mention the discount you have in store just for the attendees – yes, you need to offer something special for better conversion. So decide on a plan prior to the webinar about what you can give to the attendees to make them feel special. Usually, a discount on your services is a good option.
If you are planning to make a Tripwire offer, i.e., a small package to start with, or a trial, then mention that directly along with the cost.
Here’s a template you can use for the pitch:
“Before I get into more details, and share the __________________ , let me share something else you might find useful.
Now, I’ve worked in over _________ firms in the past and helped them build a strong SEO team. For example, remember when discussing on ___________________ I mention the _______________ where I worked with the team for 6months only. The Team had __________ members and lacked __________. I taught them _________________________ . I also worked with ___________________ and got their revenue to grow from _________________ to ____________________.
The way I work with teams is ________________________ (Explain an effective process you follow and for each step, you explain why that works well. This section should give an impression that you are different and can make a difference in the way you handle things.)
**The next couple of paragraphs are dummy content to match the context of the example we used when creating the Webinar funnel. You can modify it as per your product or service and the offer you have.
And since all of you are entrepreneurs or marketers, you have the opportunity to take my services and help you build a strong in-house team. Mind it, SEO is just one part of the whole digital marketing process. And I’m sure you found today’s session somewhat useful. Imagine the benefit you could get from proven training in complete digital marketing.
I have a few slots left for the next 6 months and I was looking to give you guys something special since you took the time to attend this session. Just for the attendees today, I will accept to work with you at 50% of what I usually charge. But first, you do get a chance to try it out. I have a few 1-week crash course slots which you can join out at only $20 per person. Normally it costs $60. And if you find it valuable, we can discuss a 6-month agreement. And yes, you can still available the 50% off at that time.
Click on the button below the webinar video and you can get more details on it.
Now, let’s get back to ___________________”
**Don’t mind if the copy in the template is sloppy. I’m sure you can prepare one that will work a lot better than mine.
Now that you have everything you need to prepare and launch your free webinar, next, it’s time to prepare for increasing conversion. In the next section, you will learn how you can use a sales funnel and email campaigns to try and sell higher plans to your potential buyers.
Post-Webinar Actions To Increase Your Conversion
Following are two important marketing actions you must take to increase conversion, apart from so many other things.
- Use an online sales funnel
- Use an email funnel
1. Prepare A Sales Funnel For Your Main Service Or Product
Earlier, you included a button for a sales page on your Webinar Landing Page. Now, you will create a sales funnel which you will link to that button.
Use WPFunnels to set up this sales funnel.
- Create a new funnel and include 5 steps – Landing, Checkout, Upsell, Downsell, and Thank You.
- On the Landing, explain your services, but offer a Tripwire at a discount.
- Include an opt-in with just the email field to accept the Tripwire offer. Set “Action after submission” as Next Step.
- On the Checkout page, include your main offer as an order bump (to replace the main offer) to the Tripwire so that a person can accept your main offer at 50% off right away, without the small plan.
- Next, set up an upsell offer with your main service at 60% off. But, make this conditional so that this will appear if someone doesn’t accept the order bump offer.
- Then set up the downsell offer with a lower value package than your main service and make it conditional so that this will appear if someone doesn’t accept both the order bump or the upsell offer.
- And end with a Thank You step with the order summary and a generous thank you.
This will be the sales funnel flow with a chance to convert some of your attendees to take your main offer right away, rather than going for the initial small offer.
But there’s more to it. You need to also run email marketing campaigns to convert the ones that did not take the offer, or did not take the main offer.
You will use Mail Mint for it.
- Go to Mail Mint and create two new lists for the ones who click on the CTA in your sales funnel, let’s say ‘CTA_Attendees_Accept’ and ‘CTA_Attendess_Followup’.
- Create 4 tags:
A tag for the attendees who went to checkout but didn’t complete the purchase, let’s say ‘No’
A tag for the people who accepted the tripwire, let’s say ‘Tripwire_accepted’,
A tag for the prospects who accepted the order bump or upsell, let’s say ‘Full_Service’, and
A tag for the clients who take the downsell offer, let’s say ‘Downsell_accepted’. - In your funnel canvas, you have the option to create events with Mail Mint for every step, except the ‘Thank You’ step.
- Add an Event “After Opt-in Form Submission”. Choose the list ‘CTA_Attendees_Followup’ and the tag ‘No’.
- Add an Event “Order Bump Not Accepted”. Choose the list ‘CTA_Attendees_Accept’ and the tag ‘Tripwire_accepted’.
- Add an Event “Order Bump Accepted”. Choose the list ‘CTA_Attendees_Accept’ and the tag ‘Full_Service’.
- Add an Event “Upsell Accepted”. Choose the list ‘CTA_Attendees_Accept’ and the tag ‘Full_Service’.
- Add an Event “Downsell Accepted”. Choose the list ‘CTA_Attendees_Accept’ and the tag ‘Downsell_accepted’.
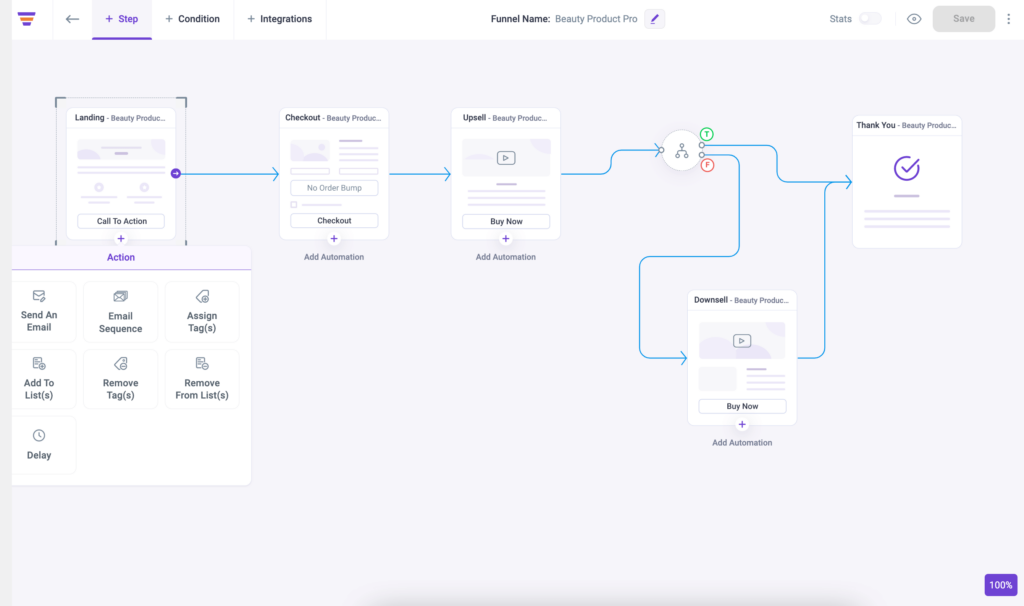
So, in the landing, if someone inputs the email and wants to accept your deal but doesn’t go through with the checkout, it will add the user to the dedicated list ‘CTA_Attendees_Followup’ and a unique tag ‘No’.
In the checkout, if someone chooses the Tripwire and no the main service, he will be added to the dedicated list ‘CTA_Attendees_Accept’ and a unique tag ‘Tripwire_accepted’.
It will be the same for the rest based on user action. This will let you run dedicated email automation campaigns as explained in the next section.
2. Prepare An Email Funnel For Your Attendees
Now that you have the sales funnel in place, it’s time to set up the automation in Mail Mint.
- In Mail Mint, create automation with the trigger “Not in the list ” and choose the lists ‘CTA_Attendees_Accept’ and ‘CTA_Attendees_Followup’. Then run an email campaign with the link to your Webinar where they can view the recorded version of your webinar and a hook to your offer.
- Create another automation with the trigger “In List and Tag” and choose the list ‘CTA_Attendees_Followup’ and the tag ‘No’. Then run an email campaign to offer them the Tripwire offer you have.
- Create another automation with the trigger “In List and Tag” and choose the list ‘CTA_Attendees_Accept’ and the tag ‘Tripwire_accepted’. Then run an email sequence. First, send them an email with instructions on how to access their service/products. Next, send a couple of emails to make discounted offers for your Main service and the Downsell offer, at bi-weekly intervals.
- Create another automation with the trigger “In List and Tag” and choose the list ‘CTA_Attendees_Accept’ and the tag ‘Downsell_accepted’. First, send them an email with instructions on how to access their service/products. Next, send a couple of emails to make discounted offers for your Main service at a discounted price, at bi-weekly intervals.
- And finally, create automation with the trigger “In List and Tag” and choose the list ‘CTA_Attendees_Accept’ and the tag ‘Full_Service’. Then run an email campaign to send your users access to their service/product.
And that’s it. You have not created a complete funnel for your Webinar and your Service.
You can also set up retargeting Ads for your sales funnel page if you want to. It often works well.
How To Get The Tools Used In This Whole Process
Throughout this guide, you have seen a lot of tools being used. Here’s where you can get each of them:
WPFunnels to collect leads & create sales funnels in WordPress.
Elementor Page Builder to design funnel pages.
AdRoll to manage re-targeting Ads.
PPWP plugin to set a password restriction to access the webinar.
Author’s Notes
This webinar funnel is just one type of webinar funnel. You will find a 3-webinar series funnel, a lead magnet leading into a webinar, a directly paid webinar after value-added email contents, pre-recorded webinar series, or simply a free webinar for branding.
The 3 webinar series works best for high ticket sales, whereas service-based offers sell more with the webinar funnel used in this guide. A product launch can also be done successfully using the webinar funnel from this guide.
The bottom line is, that this process makes it easier for you to connect with your clients and help you build a community.
You can create a Facebook Group and ask viewers to join there while attending the webinar. This will give you further opportunity to keep on building your authority and promoting your services.
The checklist provided in the second section of this article is something you can use as a guideline and modify to meet your user needs.
And the execution process is a glimpse of how you have to plan and execute your own Webinar Funnel, more like a blueprint. It might look like a lengthy process, but the time you spend on this will give way better output than going down the easy route and only using landing pages and paid Ads.
But there are more things that matter here. Your Banner Ads, Webpage designs, Copy, and webinar content have to be good. So, this is not a process for amateurs to try out right away. You have to learn to make those elements competent for conversion. The webinar performance may not be the best right off the bat. But you have to be prepared for the rest.
Remember, if you provide value, people will value you. But you have to learn to show them that you know their needs. That is the main challenge in any marketing aspect.
If you think I missed certain points or made things confusing at any point in this guide, do let us know in the comments. We will improvise or answer your queries.
Cheers.
Comments are closed.



![What Is A Marketing Automation Funnel - Ultimate Beginner's Guides [2024] 7 Marketing Automation Funnel](https://getwpfunnels.com/wp-content/uploads/2024/04/42.-What-Is-A-Marketing-Automation-Funnel-Beginners-Guides.webp)
![How To Create A Gym Funnel - A Proven Marketing Strategy For Gyms [2025] 8 Plan A Gym Funnel](https://getwpfunnels.com/wp-content/uploads/2022/09/Gym-Funnel-.png)
![Stages Of An eCommerce Conversion Funnel And How To Optimize It [2024] 9 Stages Of An eCommerce Conversion Funnel And How To Optimize It](https://getwpfunnels.com/wp-content/uploads/2023/12/Stages-Of-An-eCommerce-Conversion-Funnel-And-How-To-Optimize-It.webp)
![How To Create A Lead Magnet That Works – 2 Main Steps [2025] 10 How to create a lead magnet](https://getwpfunnels.com/wp-content/uploads/2023/08/How-to-create-a-lead-magnet-feature-image.webp)
Comments (2)
Great article!
Thank you. We are glad you found it useful.