Affiliate marketing is one of the best ways to earn a fortune. However, when selling affiliate products, one of the common barriers you face is the information gap.
The traffic you generate using Ads or social media may not always have proper knowledge about the product you are promoting. In fact, the copy on the affiliate product page may not be persuasive enough to close the deal.
So, how can you increase your conversion rate as an affiliate marketer?
Well, the best solution is to use a well-planned bridge funnel.
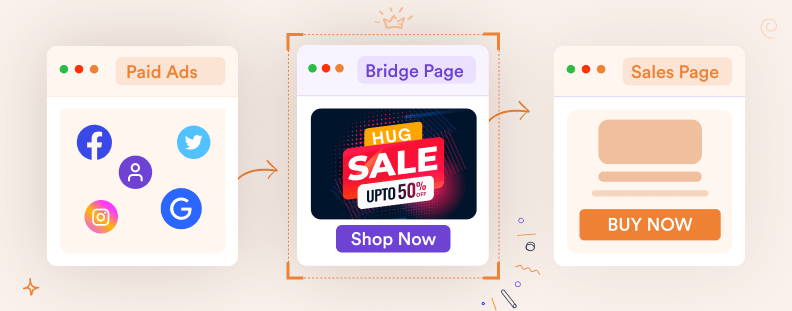
A bridge funnel is a special funnel strategy that can turn less potential traffic into interested buyers before driving them to the affiliate product. The trick is to use a bridge page to hook the prospect before referring him/her to the product.
Today, you will learn how you can create a bridge funnel on your own easily.
After reading this article, you will be able to:
- Start using bridge funnels right away
- Convince more prospects into buyers
- Maximize your conversion rate
And eventually, become a successful affiliate marketer.
So let’s begin.
The Bridge Page Funnel
Usually, when you try to refer relevant traffic toward a product page, you either run paid Ads or write product listicles. Or you may share it on your social channels. And then, you expect prospects to click on the link you’ve provided to visit the product and purchase it.
Now, the problem here is you can only provide a limited amount of information on an Ad, social caption, or a portion of a listicle.
In fact, even if you write a dedicated blog on a single product, you will still need Ads to drive more traffic there because getting traffic organically on a blog page takes more time. Hence, a blog is not the best option for getting quick results.
The good news is there is a better solution – the bridge funnel strategy.
As mentioned above, in this strategy, you use a “bridge page” to convince your prospects to buy the affiliate product.
What Is A Bridge Page?
A Bridge page is an extra step before the actual product page, where you use a persuasive copy to convince the prospect to make a decision.
On this page, you will highlight the benefits and advantages of the affiliate product and make the prospect realize why it is a good decision to buy it.
Unlike a blog, this will be, in some way, a persuasive sales pitch.
Why Do Bridge Funnels Work?
When using a bridge page funnel, you will get a lot of advantages that you probably won’t get with a blog, social posts, or direct paid Ads.
For starters, a bridge page works better than a blog because, here, the copy and design of the whole page are dedicated to promoting your affiliate product. It’s similar to using a landing page to promote your own services or products. Hence, more possibilities for conversion.
Second, your copy can be a long-form sales pitch or a to-the-point persuasive copy where you may highlight the major benefits of getting the product. It is quite limiting in this regard when you use Ads or social posts. Most people tend to avoid reading long captions, and paid Ads have very little space to include text. Hence, you have a better opportunity to try and convince your prospects using a bridge funnel.

On top of that, it will also save you from losing authority due to products being out of stock. Normally, when you write blogs, if the products are no longer available, your blog becomes obsolete, and people clicking on the links end up disappointed. In the case of a bridge funnel, you can simply turn off the ads and the bridge page, and that’s it. You can then create more bridge funnels for other new products.
One of the best uses of a bridge funnel is to sell high-ticket products.
If you want to earn more money in a short time, the only two ways to do so are to either sell a trending product that costs less but sells high in numbers or an expensive product that will give a huge commission.
The latter is more desirable if the product has real value. In this case, a bridge page will help you gain trust and allow you to use a proper sales letter to convince a prospect to invest in a high-value product.
And, if the commission rate is high, you will be able to earn a lot more than what you get from other approaches.
Now, to sell high-ticket products, however, a direct approach may not always work. A more efficient way is to go for a squeeze page bridge funnel. You will learn more about it a bit later in this article.
For now, let us look at a basic example of a Bridge Funnel.
- Let’s say Jane was surfing through Instagram. While scrolling, she found a great image of a happy lady holding an exfoliator. She read the caption and found a link to get more details on this exfoliator.
- Clicking on the link took her to a page highlighting every benefit of using this exfoliator, along with real customer testimonials. For example, it claimed results could be observed in as low as 3 days.
- Jane thought this was great and wanted to purchase it right away. She clicked on the CTA, and it redirected her to Amazon. Since the price and the product details matched, she went ahead and completed the purchase via Amazon.
Let’s assume you are the one who ran this Instagram Ad. And let’s say you are an affiliate promoter of Amazon products. So, since Jane purchased the product, you are entitled to a commission.
If you have a good persuasive copy on the bridge page, it will definitely get you more conversions.
Now, let us get a closer look at different types of bridge funnels.
Types of Bridge Page Funnels
Let’s be clear. It is somewhat mandatory to use Paid Ads when it comes to selling affiliate products if you want to earn a good commission in a short time.
But after a person clicks on the Ad, rather than taking them to the product page, it’s better to go for a strategy where you can convince the prospect and confirm the sale. That’s where the bridge funnel comes in.
However, you don’t always take the prospect to a bridge page first. There are other strategies as well.
Let us look at 3 of the best bridge funnel strategies that can surely get results:
- Typical Bridge Funnel
- Squeeze Page Bridge Funnels
- The Affiliate Quiz For Multiple Bridge Funnels
1. Typical Bridge Funnel
A typical bridge funnel means you will use the following steps:
Step 1 – Paid Ads
Step 2 – Bridge Page
Step 3 – Product Page

First, you create a couple of catchy images and use them for Paid Ads on social media, along with a persuasive caption.
Use the link to your bridge funnel as the link on the CTA of the Ad. Whoever clicks on the Ad, they will be directed to the bridge page.
If the buyer is convinced and clicks on the CTA button on this page, he will be directed to the Product sales page.
And that’s it. That’s the whole basic bridge funnel.
Now, I keep saying it again and again, but make sure you have a good persuasive copy on the bridge page. That is your main tool to convince a prospect to become a buyer.
A basic bridge page funnel works well on physical products, such as beauty products, essential home decor, etc., that cost an average amount but are more likely to sell to the right targetted audience.
2. Squeeze Page Bridge Funnel
Unlike the typical bridge funnel we discussed earlier, a squeeze page bridge funnel is simply a combination of a squeeze page and a bridge funnel.
The idea is first to use a lead magnet to collect leads. And then you may reach them with a link to your bridge funnel to purchase certain products or services.
So here, you will combine the concept of a squeeze funnel and bridge funnel into one.
The steps involved in a squeeze page bridge funnel are as follows:
Step 1 – Paid Ads
Step 2 – A Squeeze Page
Step 3 – Email Automation
Step 4 – Bridge Page
Step 5 – Product Page
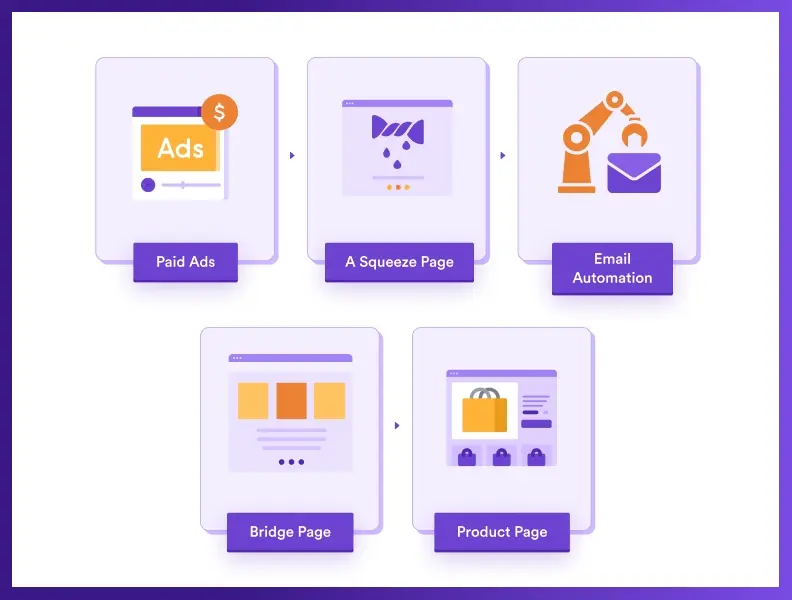
So here, you first run Paid Ads to promote the free resource for giving away. On the CTA, use the link to the squeeze page.
Clicking on the Ad will take the prospect to the squeeze page. Here, use a persuasive copy to explain the benefits the prospects will get if they use the free resource. Include an opt-in form so that the visitors have to provide a name and an email before gaining access to the free resource.
Once the form is submitted, give a quick message to check the email and set automation to send an email with a link to the free resource. After a few seconds, redirect him to a bridge page that contains a persuasive copy to highlight the affiliate product.
However, at this point, most people will probably not take the offer and rather be focused on using the free resource they received via email.
Set up another automation so that anyone who has submitted the form on your squeeze page will get an email after 3 days asking them to check out a product they might find valuable. Here, include the link to the affiliate bridge page on the email CTA button.
Clicking on this email CTA will take the prospects to the same bridge page you used earlier. In most cases, the prospects will remember and read it because now they trust you thanks to your valuable free resource.
If the buyers find the product to be beneficial, they may click on the button and will be redirected to the product page to complete the purchase.
The reason why this approach works is that you already gave value to the prospect beforehand. The squeeze funnel allowed you to collect leads that are more likely to purchase the affiliate product and helped you gain authority by providing value for free.
This bridge funnel strategy works really well with high-ticket services such as business coaching, leadership training service, high-value courses, etc.
3. The Affiliate Quiz For Multiple Bridge Funnels
If you are affiliated with multiple products of the same niche or selling different packages of the affiliate product that may vary from person to person, then this would be the best approach.
The idea is to use a quiz to determine which package suits the prospect and then direct him to the right Bridge Funnel specifically for that package.
So, instead of a simple Bridge Funnel, you first create a Quiz and build bridge funnels for each product or package you want to promote. Then, depending on the answer in the Quiz, you may direct the prospect to the right bridge page.
So the steps involved will be:
Step 1 – Paid Ads
Step 2 – Landing Page With A Quiz
Step 3 – Personalized Bridge Page (based on the answer)
Step 4 – Product Page

The advantage here is that after the quiz if you manage to offer the right product, it increases the chances of closing the deal right away since the prospect feels the offer is personalized for him.
Let’s look at an example of how this is super effective.
- Suppose a startup owner wants to learn Digital Marketing. He saw your Ad on LinkedIn about courses that can take a business to the next level using digital marketing.
- He clicks on the Ad and is taken to a quiz to find out the situation of his business and the level of expertise he has in SEO & digital marketing. He is more hooked because the quiz has specific questions, such as what he understands by internal linking, how often he uses UTMs to track performance, etc.
- After the Quiz, he is directed to a page where he is offered an intermediate course on Digital Marketing, mainly aiming at SEO (as his answer made it clear that this was his weakest side). The user probably already knows his lack of skills in that field, and your persuasive copy makes him realize that he has to learn this before going all out for digital marketing. So he clicks on the CTA.
- He is redirected to the SEO course by DigitalMarketers, which covers all the required tactics to master SEO. It may cost a bit more, but, he may end up taking it as he needs it for business growth.
As you saw, the idea is to ensure the prospect feels important and is offered the right product as per his needs. To succeed with this method, you must research to find out what questions could be the right triggers to understand the user needs of your affiliate product.
Now that you know how you may use bridge funnels let us look at how you can create one yourself.
How To Create A Bridge Funnel In WordPress
Generally, if you think of funnels, you probably imagine using a complicated, expensive tool. But that’s totally wrong. If you use WordPress, creating funnels is actually quite affordable and easy.
Since WordPress is an open-source CMS, you will find countless useful plugins that are not at all expensive and super easy to use.
To create bridge funnels for affiliate marketing, the best option you will find in WordPress is to use WPFunnels and Mail Mint.
WPFunnels has all the features you need to successfully create any of the bridge funnel flows you learned about in this article. You may set up email automation that is required to increase your conversions using Mail Mint.
Just to show you how it works, let us create a Squeeze Page Bridge Funnel using WPFunnels real quick.
You will be surprised how easy this is.
As an example, let’s assume you are an affiliate for a Business leadership coaching program that costs about $1000.
So first, you will need a free resource to squeeze out leads. Let’s assume you prepared a book called “The Business Leadership Skillset Handbook” that defines how one can measure his/her leadership skills and includes a checklist of skills required to be a leader in a business. And this, you are willing to give away for free.
In this case, you need to prepare two funnel pages which include the following:
- A Squeeze Page
- Bridge Page
**And you will need to set up email automation to reach the leads again if they do not purchase on the first attempt.
To create this, we will use the following:
- WPFunnels Pro to create and design the funnel flows.
- Mail Mint Pro for email automation.
Now let’s create this funnel step-by-step.
Step-by-step Guide To Creating A Squeeze Page Bridge Funnel
First, we will create a funnel with WPFunnels to prepare the required pages, and then we will set up the automation required in Mail Mint, which can be easily integrated with WPFunnels.
Step 1 – Create A Funnel From Scratch
First, go to WPFunnels > Funnels, and click on Create Your First Funnel button.
(If you already have funnels created, then the button will be in the top right corner.)

Then click on “Start from Scratch” and then enter the Funnel name as Coaching Funnel for Business Leadership which will take you to a blank canvas.
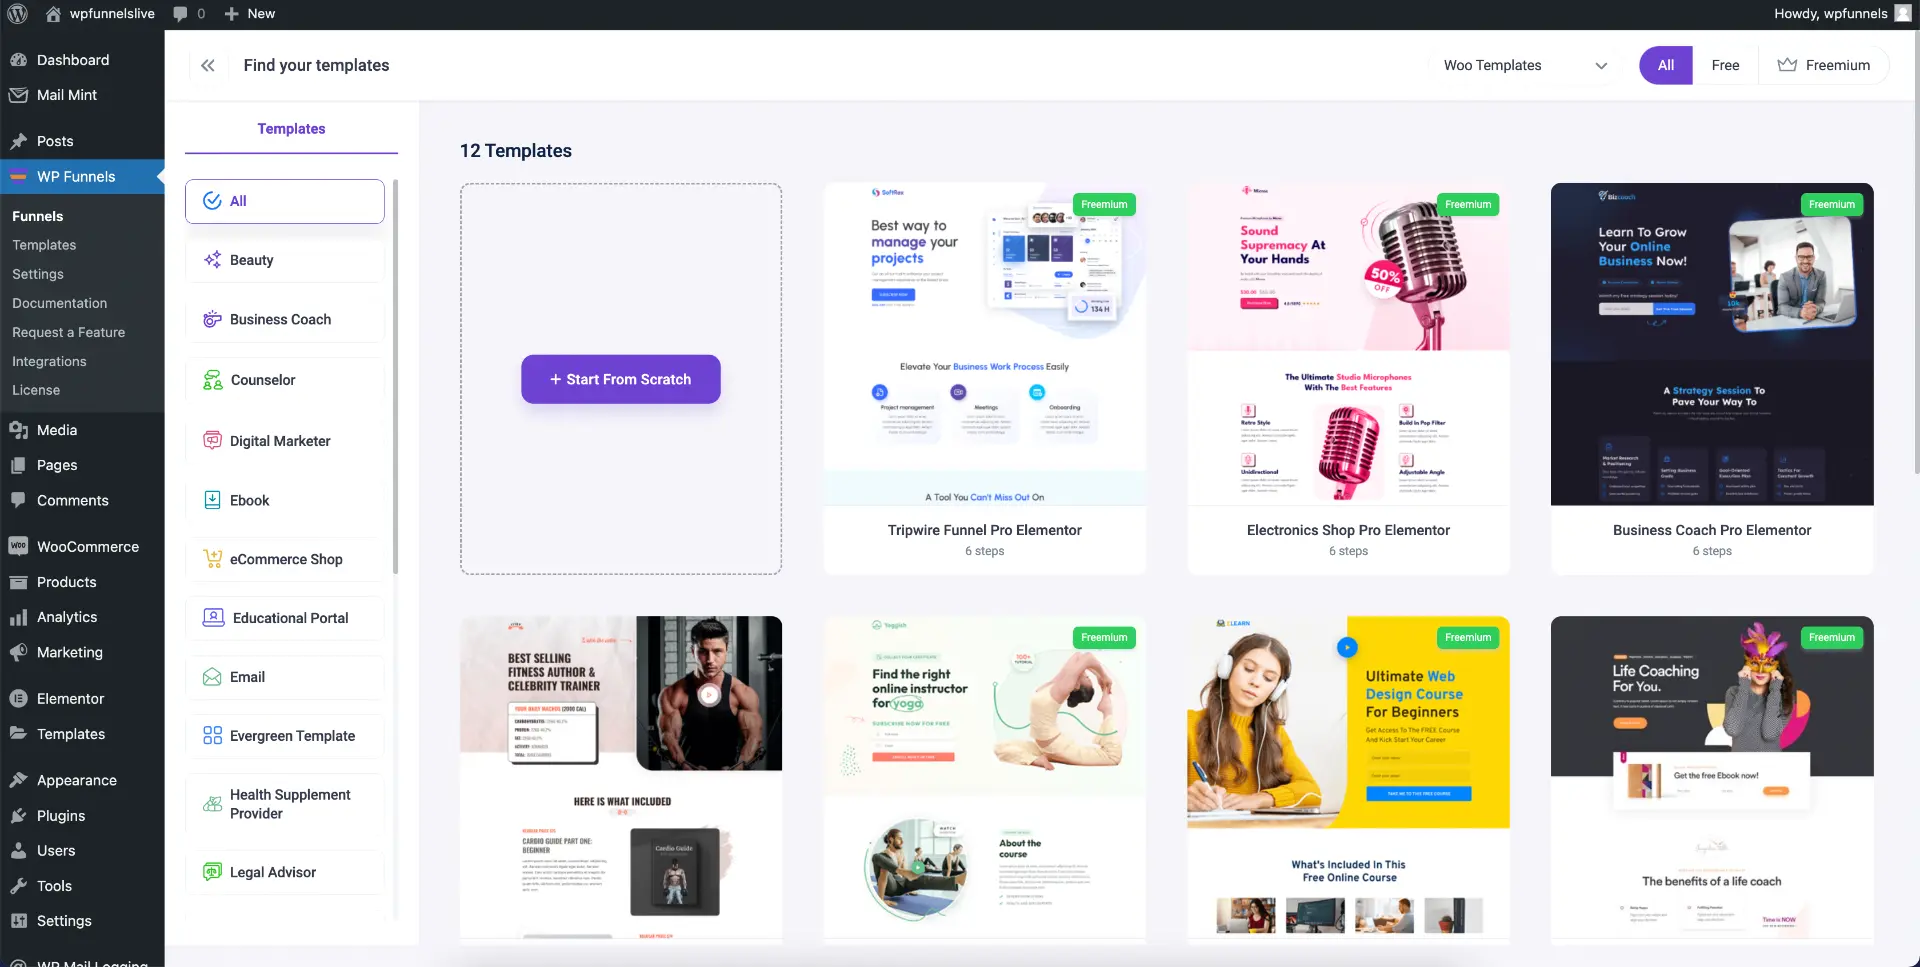

It will take you to the funnel mapping canvas.
Step 2 – Create A Squeeze Page
On the canvas, click on the “+ New Step” button.

It will give you the option to import a template or create it from scratch.

Let’s import the Online Course Pro template for the landing page. You may simply hover on the template and click on import.

The step will appear on the canvas. Click on the edit icon to be able to customize it with your preferred page builder, in our case, Elementor.
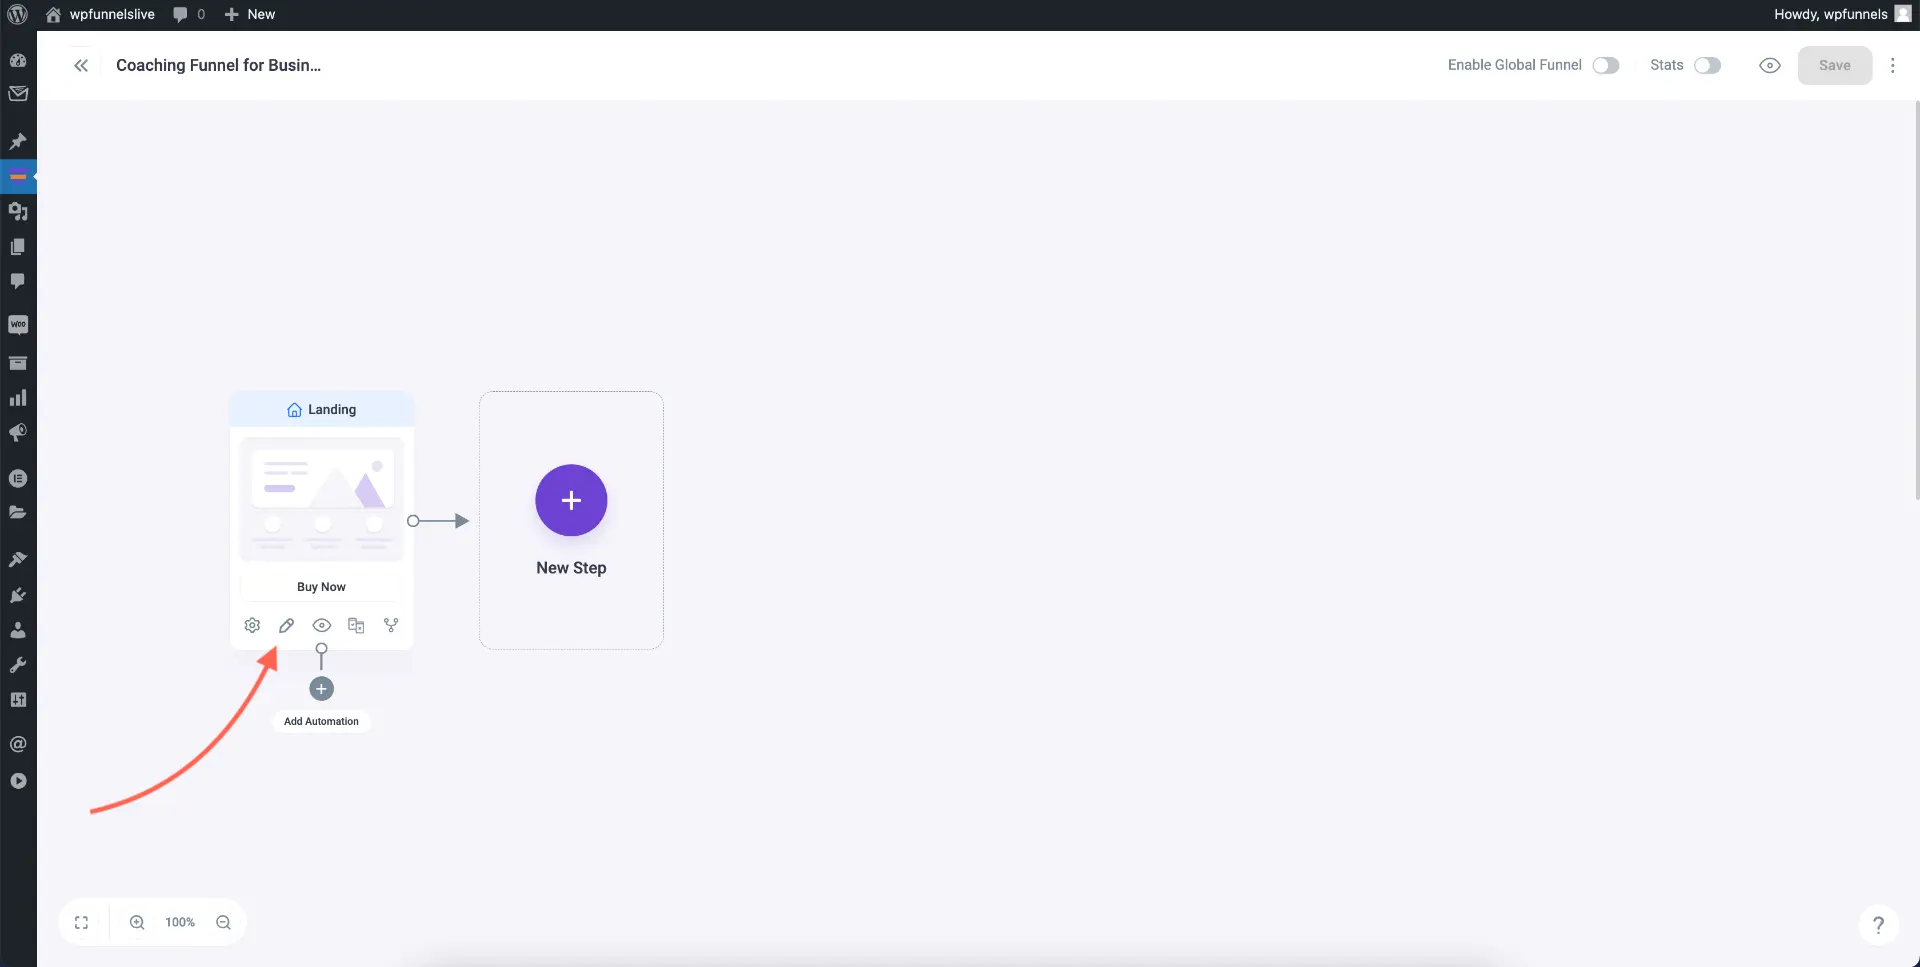

**If you want to use some other page builder, you may change your preference at WPFunnels > Settings.
Re-write the copy and update the design to match your free product, “The Business Leadership Skillset Handbook.”
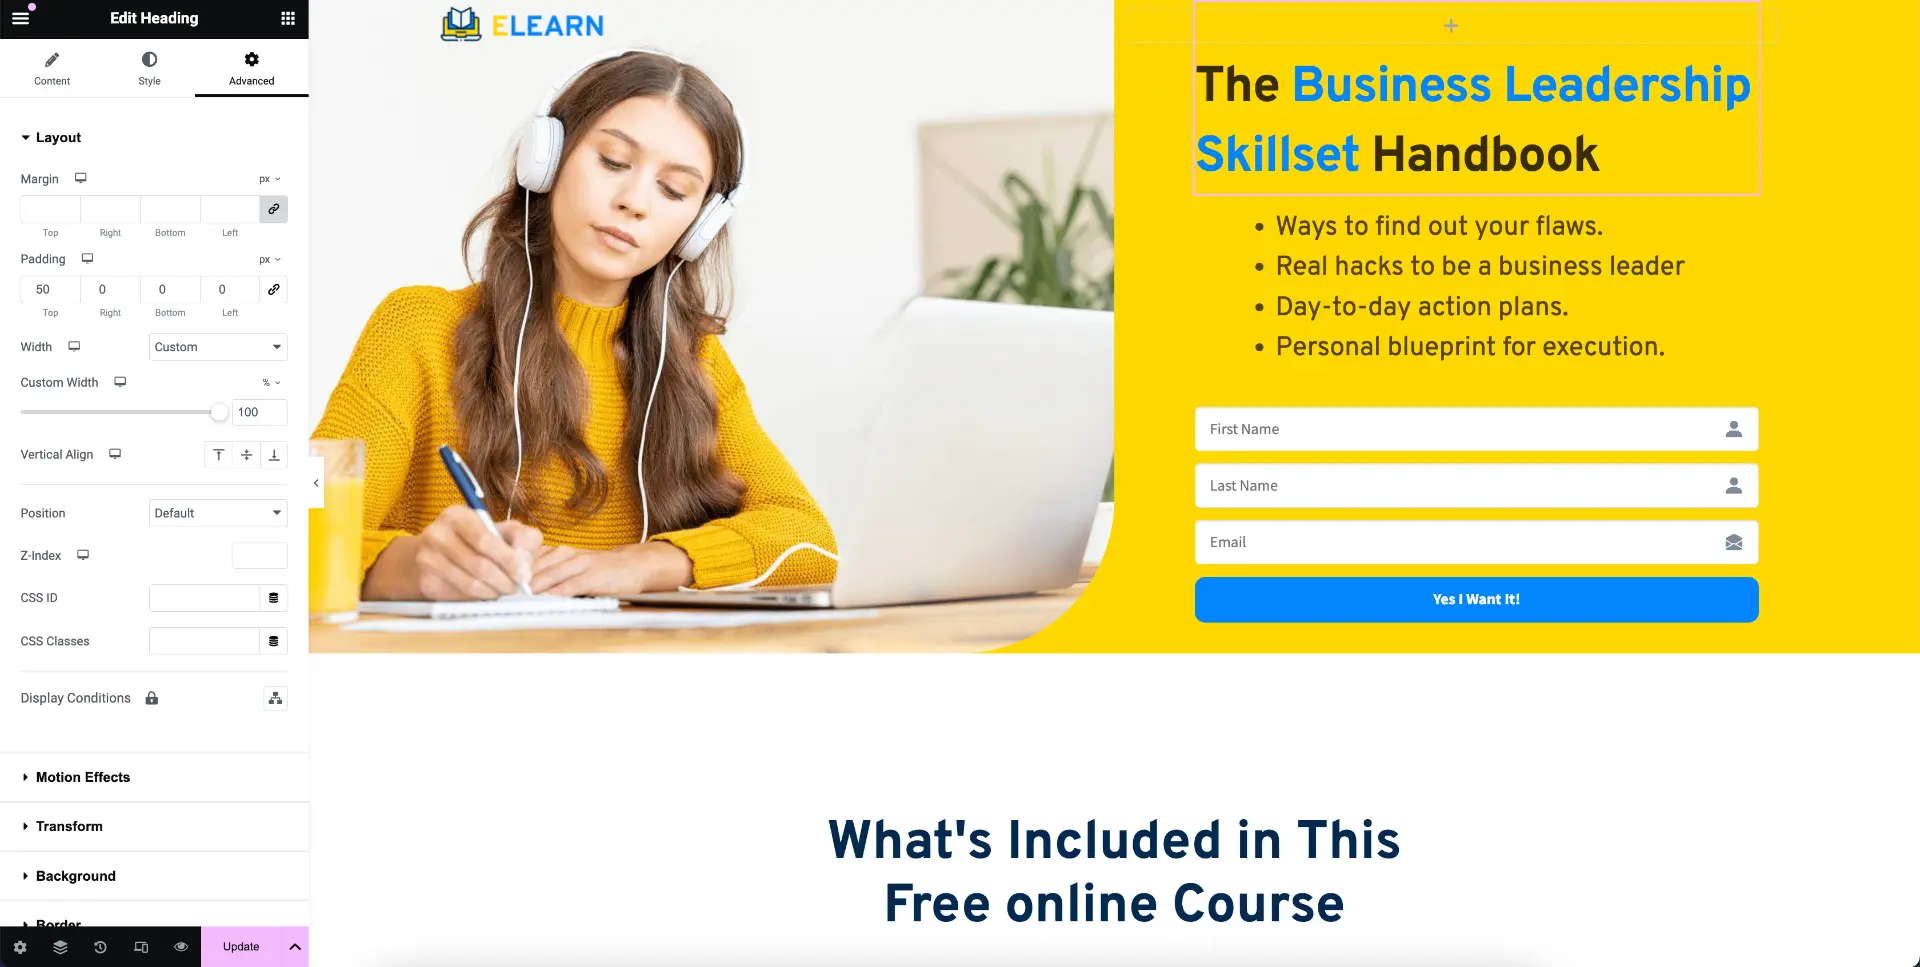
Here, make sure to use the WPFunnels Opt-in form widget to collect leads (as shown in the image).
You will find the widget on the Elementor widget area at the very bottom, called Optin Form.
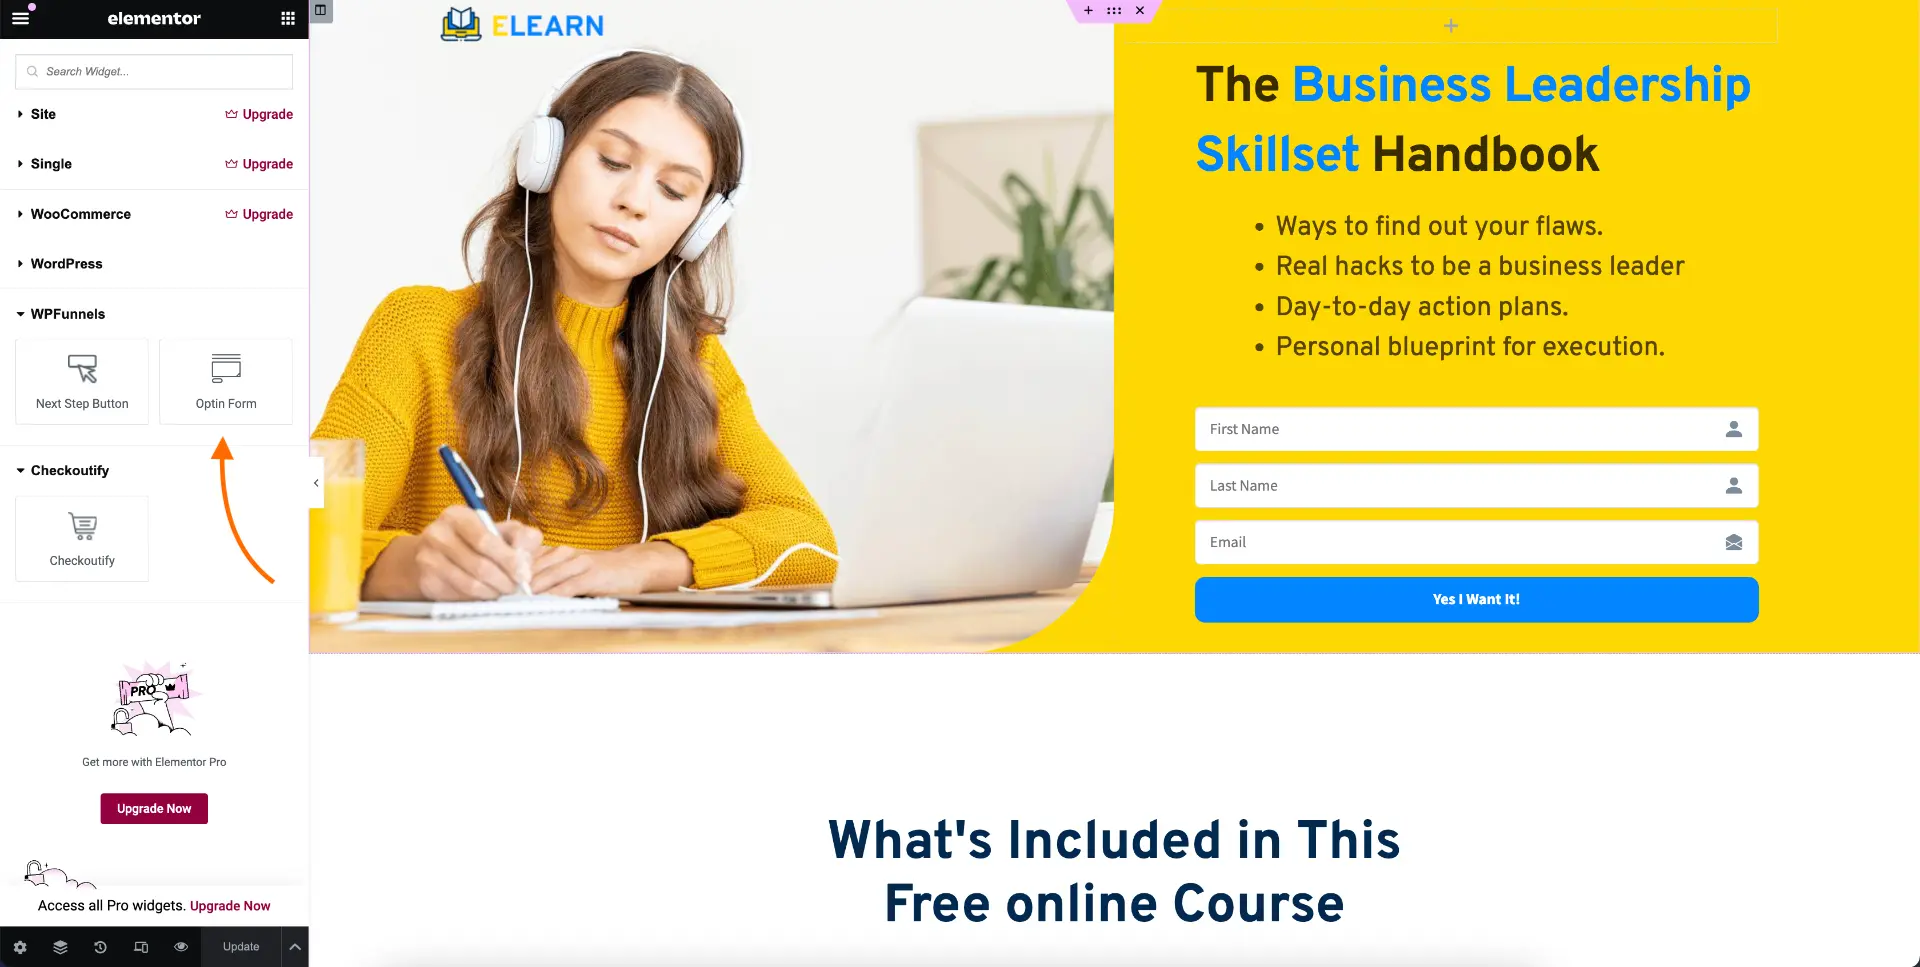
Once done editing, click on Update below and then go back to the canvas.
Step 3 – Create A Bridge Page
Now, let’s create the bridge page. Click on the “+ New Step” on the canvas and then choose “Custom” from the tabs ont he left.


Choose “Start From Scratch” and name it, let’s say, “Bridge Page.” This will add a custom step to the funnel.
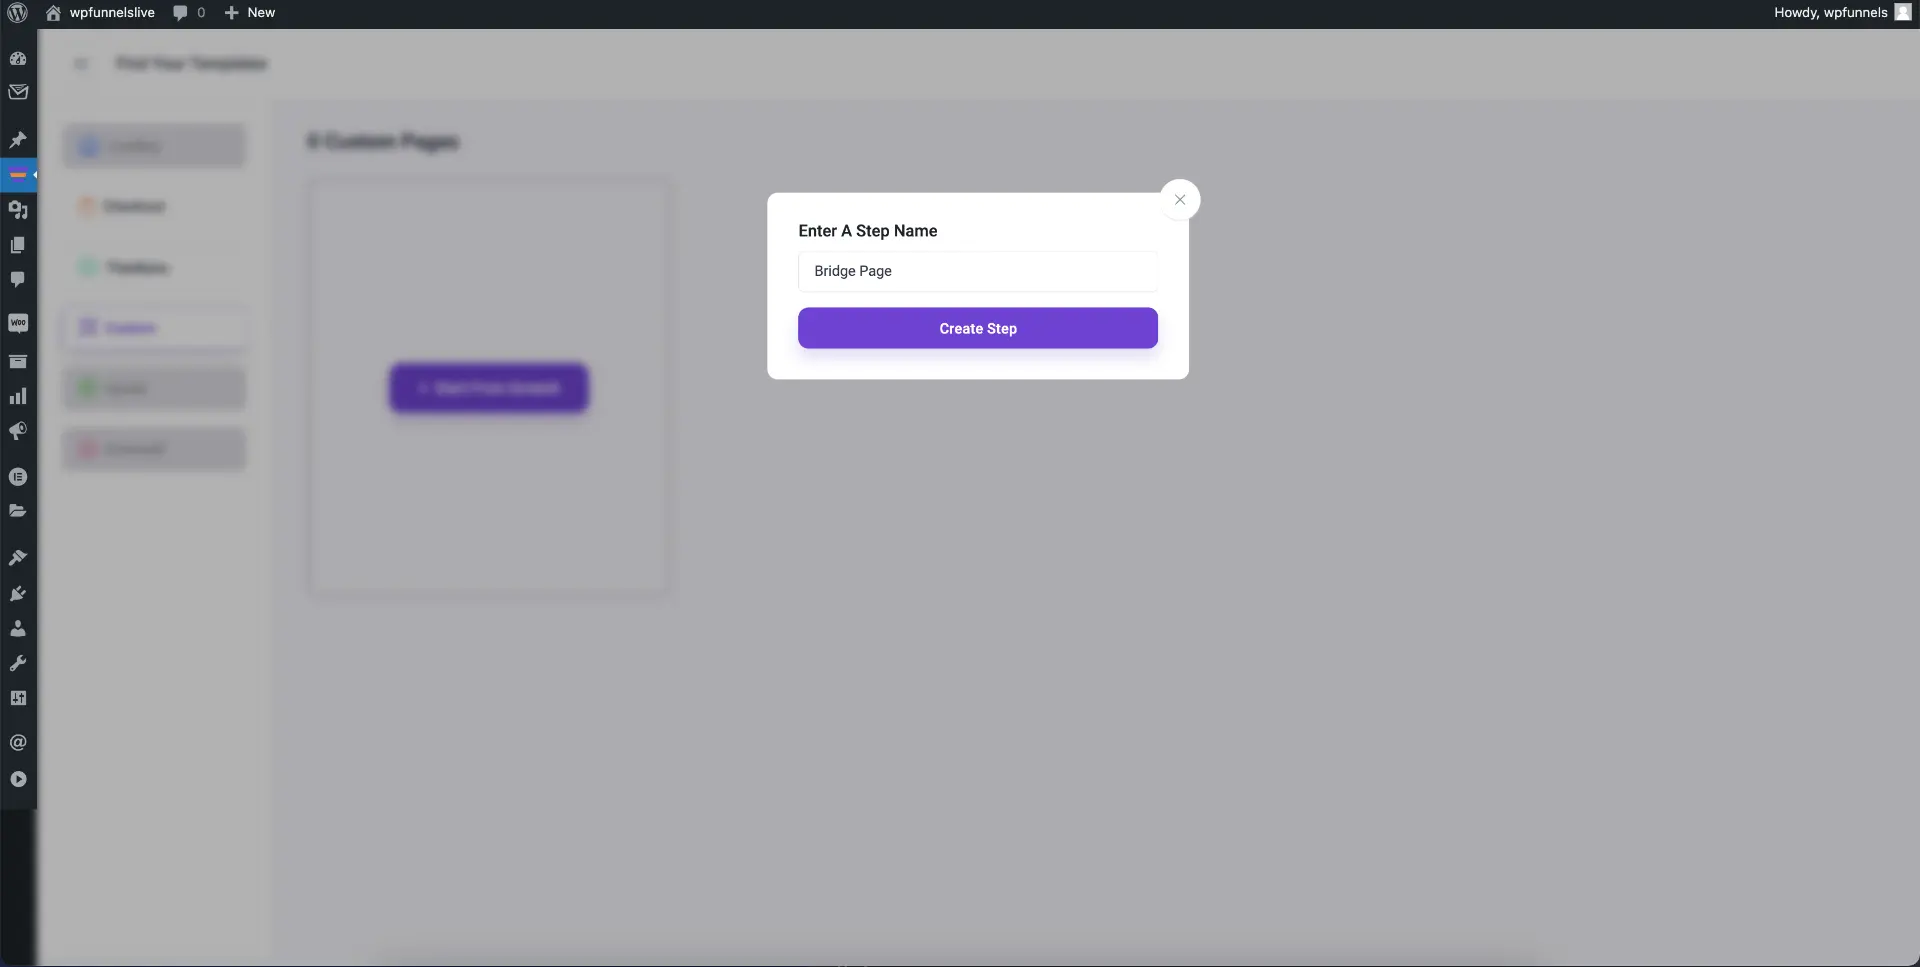

Edit and design this page the same way you did for the landing page. But make sure, in place of the CTA buttons, you use our Next Step Button widget.

Once happy with the page, Update and go back to the canvas.
Step 4 – Set up Redirection To Affiliate Product Page
Again, on the canvas, click on the “+ Add Step” and this time choose Thank You from the tabs on the left.


Here, choose Start From Scratch and name it, let’s say “Product Offer Page.” Then the step will be added to the canvas.
**You do not need to import any templates as you will not be using the page literally. It will only be used to redirect users to the affiliate product page.
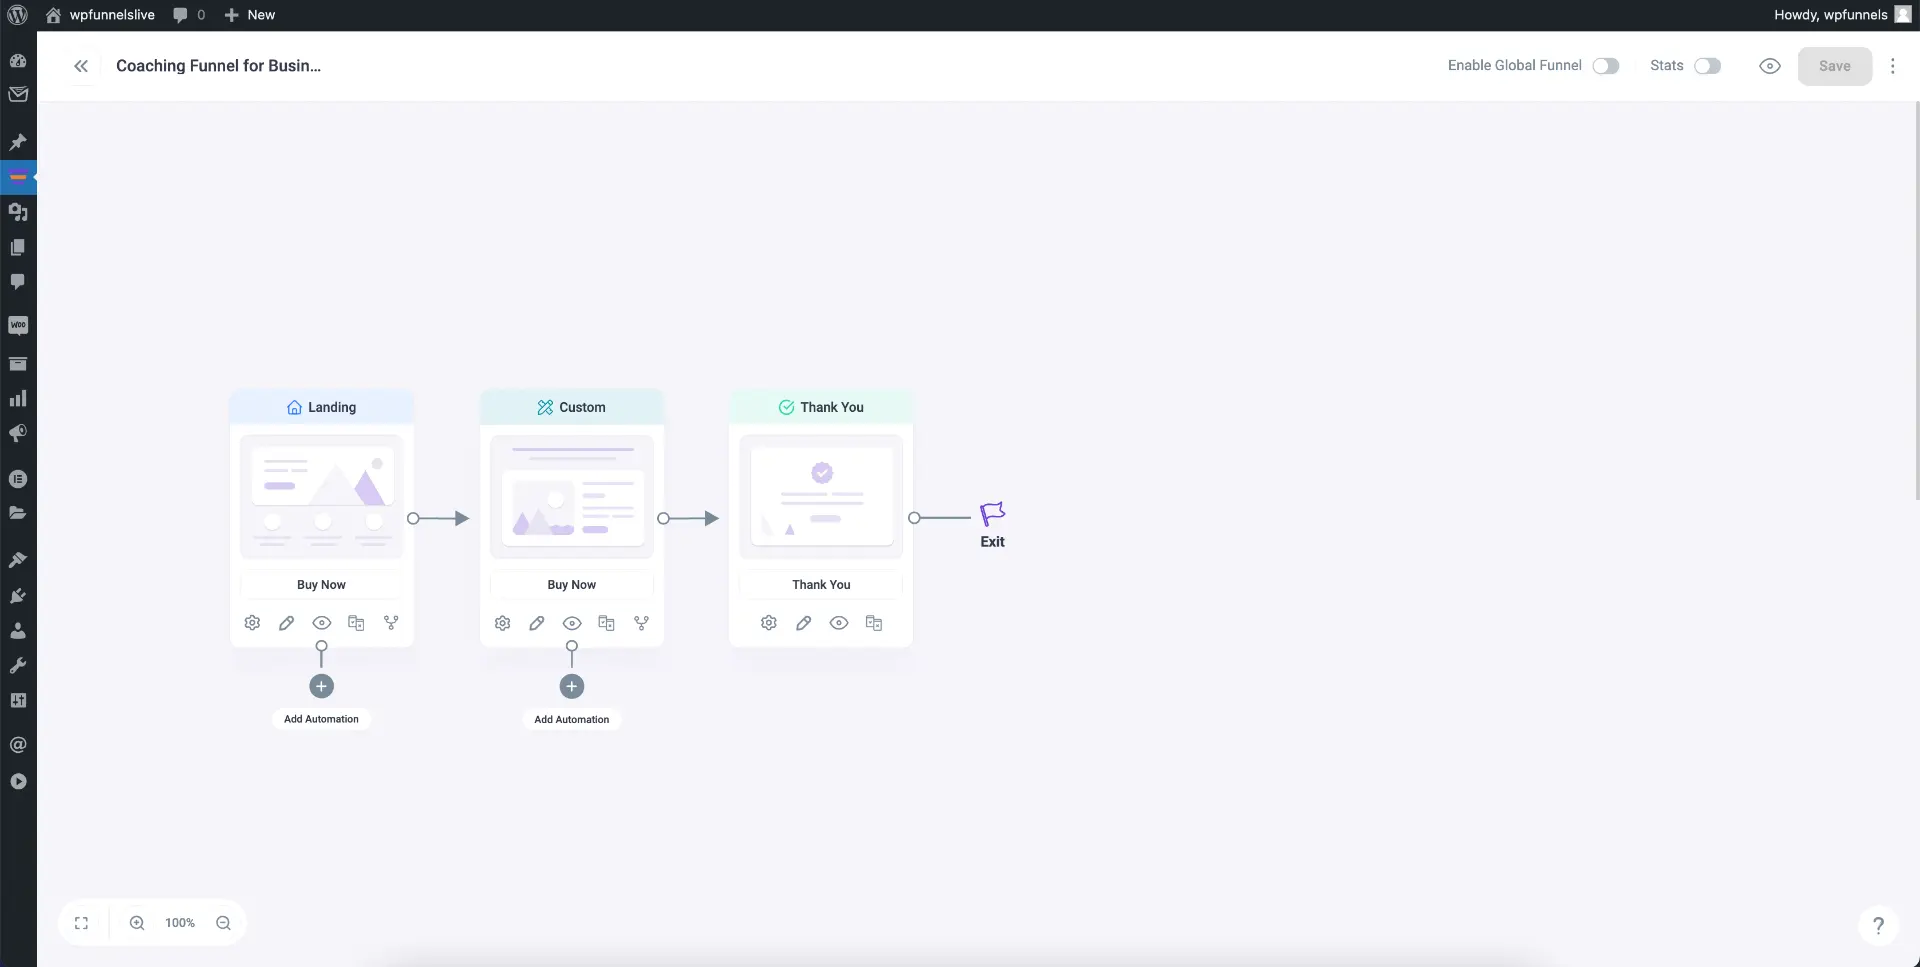
Once the step is added, click on the Settings icon for the step (gear icon) and a settings drawer will appear.

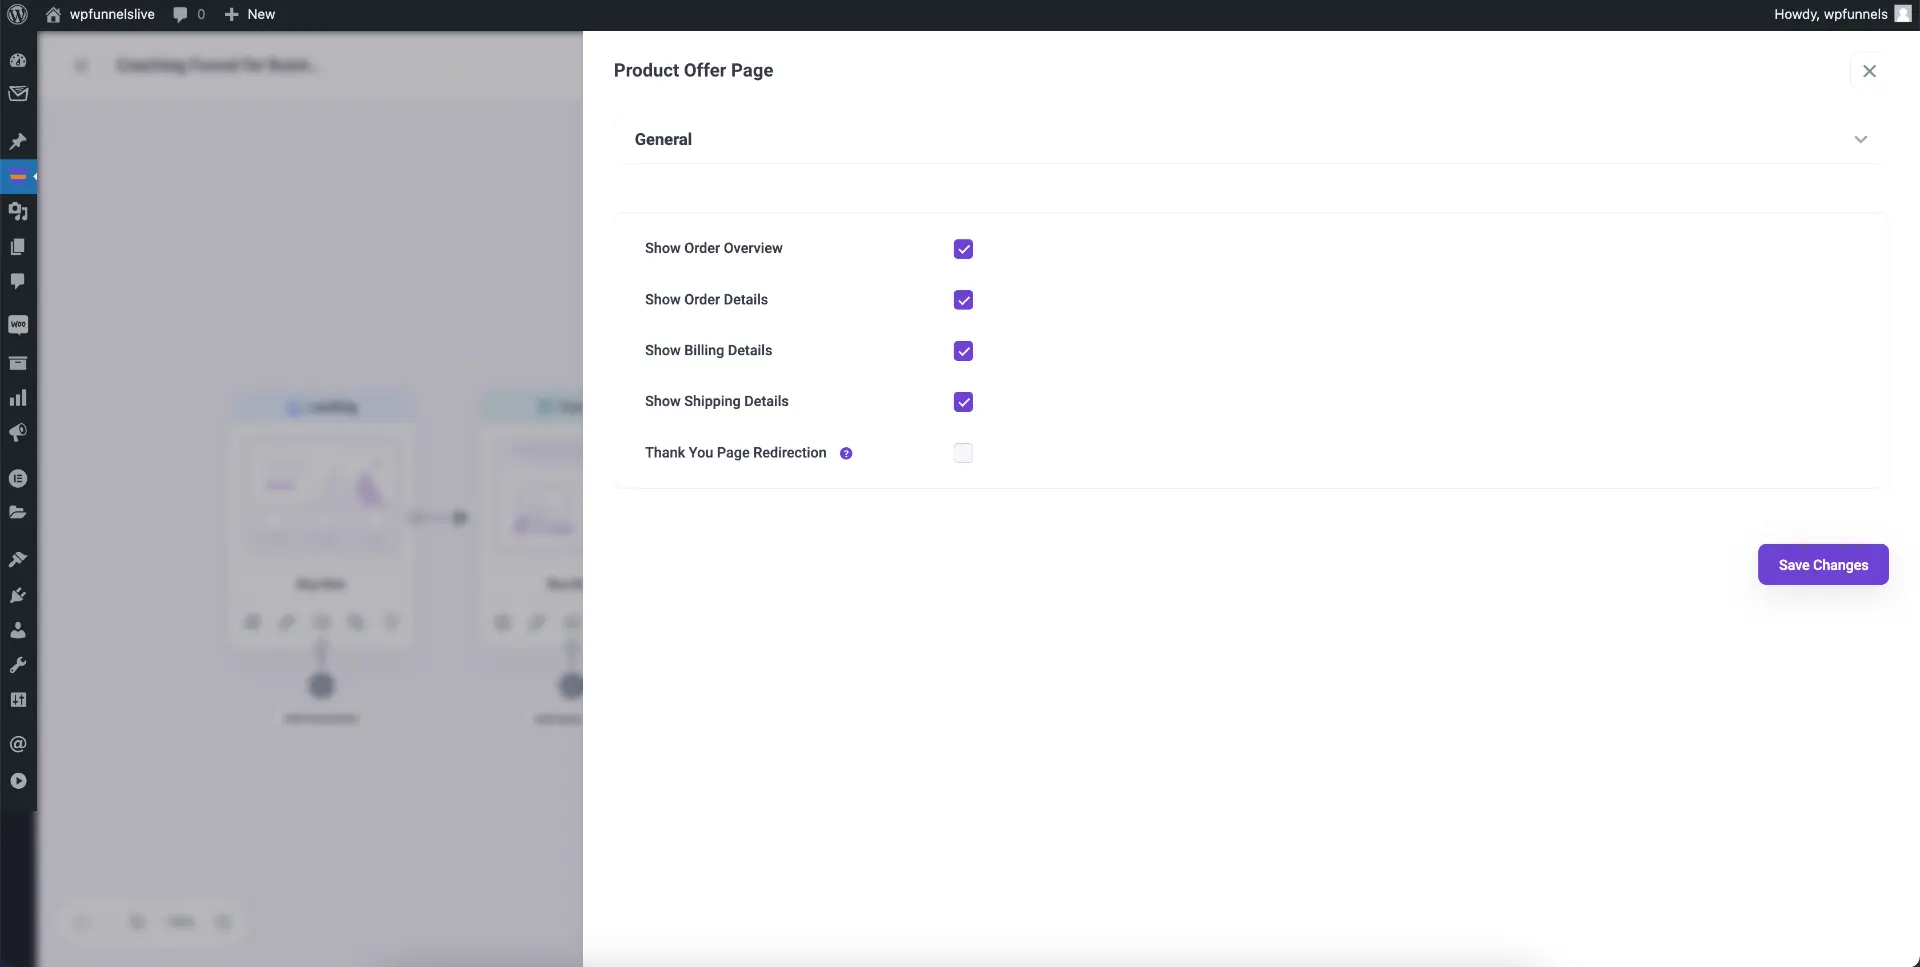
Here, enable the option “Thank You Page Redirection” and then choose “Redirect without viewing Thank You Page.”

And finally, paste the affilaite product link in the field for Redirect URL and click on Save Changes below.
Now, your bridge funnel pages are ready. Next, it’s time to collect the leads and run automation in Mail Mint.
Step 5 – Define Automation Steps To Collect Leads And Send Out Emails
Mail Mint has a special integration with WPFunnels which will allow you to set up automation workflows for your funnels while on the canvas.
Below the Landing step, click on the “+” icon and it will open the automation creator for this step.


Here, add the starting point “Optin Submitted” and add the following actions:
- Create contact (assign as subscribed for it’s settings)
- Assign To List(s) (choose/create a list where you want the contact to be added in Mail Mint.
- Send An Email (design it to confirm subscription and maybe, offer more things.)
Once set up, it will look something like this:
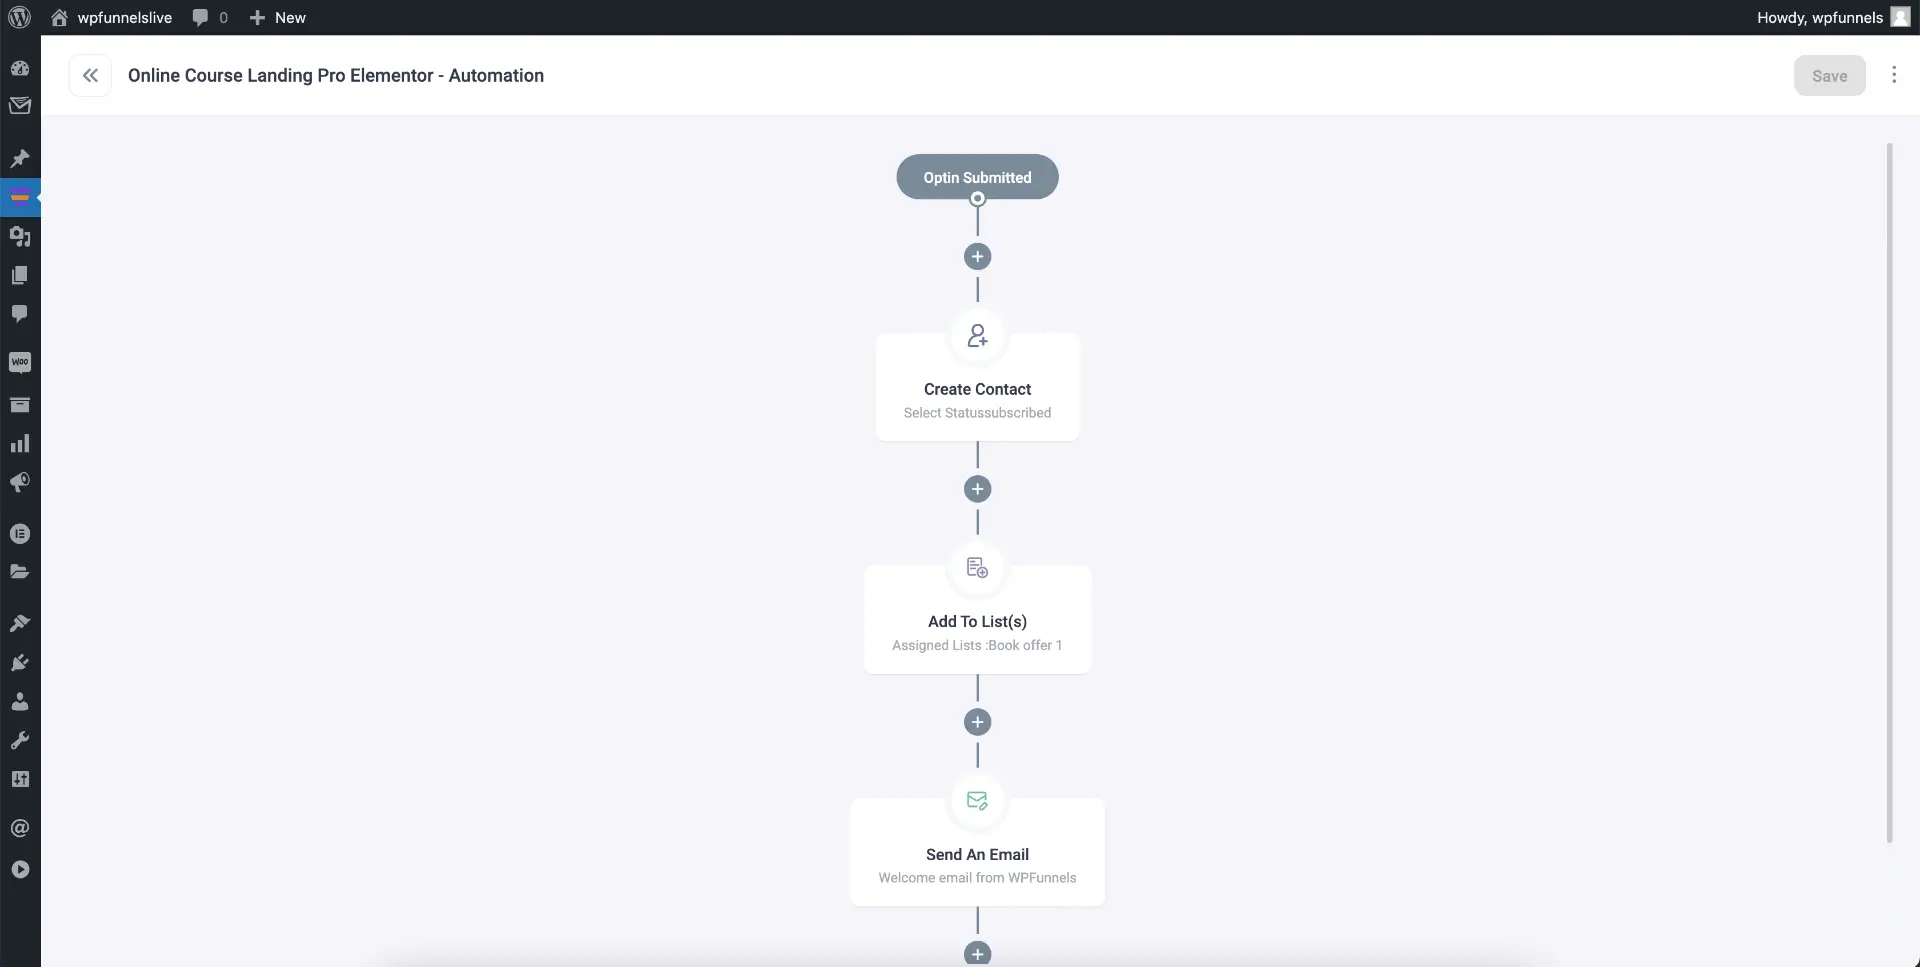
When you are ready, you may save and go back to the canvas. Your squeeze page bridge funnel is ready. When people will subscribe, you will get the leads in Mail Mint where you can set up more automaton workflows or send out email campaigns later. But for the initial automation, you can set up in the same workflow in the funnel.
Step 6 – Start Promoting Your Funnel
Once you are done with creating the funnel & setting up email automation, it’s time to run Paid Ads on Facebook, LinkedIn, Google, or on your preferred channels to bring traffic to the Squeeze page.
So, your Ads will be about the free handbook.
And you may share the squeeze page on your existing social media, mailing list, and groups.
Meanwhile, set up re-targeting Ads for the squeeze page as well so that anyone who visits it but ends up not signing up will get further Ads. Adroll is a great tool to manage re-targeting Ads.
You may also set up re-targeting Ads for people who go to the Bridge Page.
Final Thoughts
As you saw above, it’s super easy to build a bridge funnel in WordPress. And you now have knowledge of 3 ways to use the bridge funnel to get more conversions.
Now, each of the strategies mentioned here has its own perks, and you have to decide which one suits your affiliate products.
But do keep in mind that you need to put some effort into copywriting to ensure the traffic you drive into your funnel gets the right persuasive message.
So go ahead and build your next funnel and make your affiliate marketing business more profitable.
- Get WPFunnels & Mail Mint now to build the best bridge funnels today.
Comments are closed.


![What Is A Splash Page? How to Create One for Your Sales Funnel? [2025] 37 What Is A Splash Page? How to Create One?](https://getwpfunnels.com/wp-content/uploads/2023/08/Splash-Page-To-Kick-Off-Your-Funnel_-Copy.webp)

![The One Page Funnel – Advanced Tactic to Convert Prospects into Clients [2025] 39 One Page Sales Funnel](https://getwpfunnels.com/wp-content/uploads/2022/12/One-Page-Sales-Funnel.png)
![How to Craft an Effective Book Landing Page – Beginner’s Guide [2025] 40 Book Landing Page](https://getwpfunnels.com/wp-content/uploads/2023/12/How-To-Craft-An-Effective-Book-Landing-Page-Beginners-Guide.webp)
Comments (2)
A real article that gives value. It’s very well explained, I just need to put it in place.
Thank you. We are glad you found it useful. If you put it to use, please share what you have created with everyone else as well.
Cheers.