


What happens after a customer adds a product to their WooCommerce wishlist?
Usually, nothing…
They save the product because they like it but aren’t ready to buy yet. Maybe they’re comparing options, waiting for payday, or simply want to come back later.
But once they leave your store, that wishlist item is just sitting there waiting for them to return.
A customer already told you what they want. Why wait for them to come back on their own?
You could keep sending your regular promotional emails and hope they notice that product again. You could spend more on ads to bring them back. Or you could follow up with them based on the exact action they already took: adding something to their wishlist.
And this is where WooCommerce wishlist email automation gets interesting.
If you’re already using Mail Mint, you already have the automation part covered. What you need is a way to tell Mail Mint that someone just added, removed, or saved a wishlist item.
That’s exactly what the free SaveTo Wishlist plugin does.
It comes with a built-in Mail Mint integration that turns those wishlist actions into tags. Mail Mint can then use those tags to trigger follow-up emails and other automations.
No code. No API key. No paid connector.
In this guide, I’ll show you exactly how the SaveTo Wishlist and Mail Mint integration works, how to set it up, and which wishlist automation you should build first.
In this guide:
- What the SaveTo Wishlist and Mail Mint integration does
- Why WooCommerce wishlist activity is worth automating
- How to set up the integration
- Which automation to build first
- Four ways to put wishlist tags to work in Mail Mint
- What the integration leaves to Mail Mint
- Frequently asked questions
Let’s start with what actually happens when a customer adds a product to their wishlist.
Quick Answer
SaveTo Wishlist’s free Mail Mint bridge tags a shopper’s contact the moment they add, remove, or save a wishlist item, with no configuration and no API key required. Because Tag Assigned is a native Mail Mint trigger, that tag can start an automation right away: a delayed reminder, a high-intent segment, or a suppression rule, all inside Mail Mint’s existing builder.
Here’s the fuller picture, starting with what this integration guarantees you.
TL;DR: WooCommerce Wishlist Email Automation
- SaveTo Wishlist creates three tags automatically (Wishlist – Product Added, Wishlist – Product Removed, Wishlist – Saved) and applies them to the shopper’s Mail Mint contact the moment the event happens.
- There’s no settings screen on either side. Having both plugins active is the entire setup.
- The sync runs on your own server through Mail Mint’s own contact functions, with no outbound API call and no added latency.
- A wishlist save is a stronger signal than a page view because it takes a deliberate action, a click and usually an account.
- The bridge only sends behavior, never product data. For order or catalog details, Mail Mint’s native WooCommerce triggers cover that separately.
- Start with one automation, the delayed nudge, before building all four. It has the shortest path to a measurable result.
Now let’s open up the mechanism itself, since knowing exactly what fires and when is what makes the rest of this useful.
How Mail Mint Turns A Wishlist Save Into An Automated Email
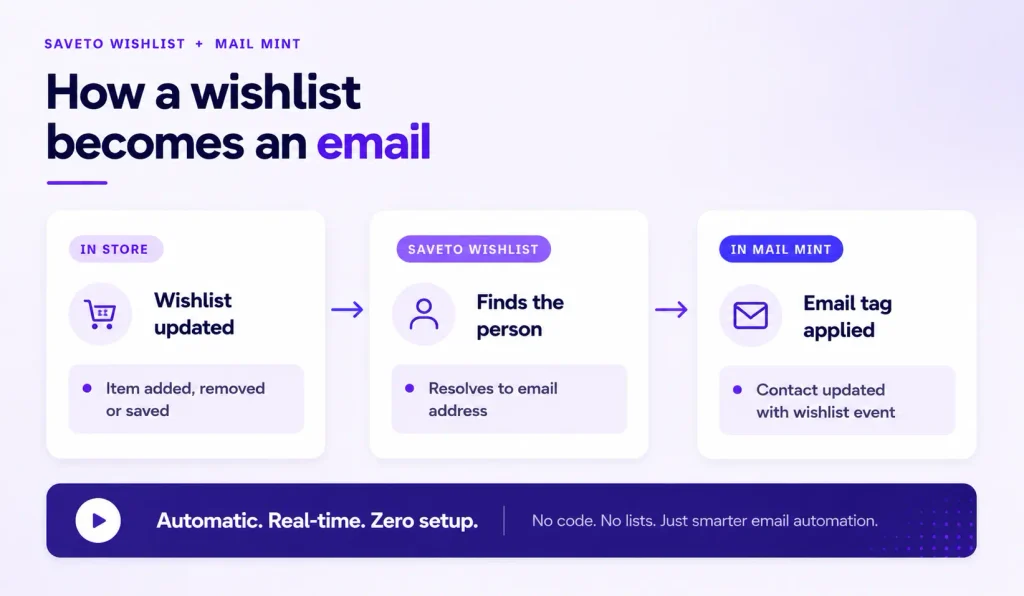
Mail Mint doesn’t know anything about wishlists on its own, and it doesn’t need to. SaveTo Wishlist listens for three wishlist events and hands Mail Mint a tag for each one.
That’s the whole mechanism, and it’s deliberately small.
When a logged-in customer adds a product, removes one, or saves a wishlist, SaveTo Wishlist fires. It first creates or updates their Mail Mint contact, then assigns a tag that matches the event.
| Wishlist event | Tag applied in Mail Mint |
|---|---|
| Product added to a wishlist | Wishlist – Product Added |
| Product removed from a wishlist | Wishlist – Product Removed |
| Wishlist saved | Wishlist – Saved |
You don’t create these tags yourself. SaveTo Wishlist creates each one the first time its event fires.
New contacts arrive with the customer’s first name, last name, and email address, at subscribed status.
From there, it’s entirely a Mail Mint job. Tag Assigned is one of Mail Mint’s standard triggers, so a wishlist action starts an automation exactly the way any other tag does, inside the same automation canvas you already build everything else in.
There’s nothing new to configure on the Mail Mint side.
Two things worth knowing about how it runs
- There is no configuration screen. SaveTo Wishlist has no Mail Mint settings tab and no API key field. Both plugins active is the whole setup.
- Everything happens on your server. The sync calls Mail Mint’s own contact functions on the same WordPress install. No outbound request means no third-party endpoint to wait on.
And when Mail Mint isn’t active, SaveTo Wishlist registers no wishlist hooks at all. The bridge costs nothing, in setup time or performance, on stores that don’t use it. That’s the mechanism. Next is why it’s worth pointing Mail Mint at in the first place.
Why WooCommerce Wishlist Activity Is Worth Automating
Most abandonment isn’t a checkout problem. It’s a timing problem, and wishlist data is the clearest record of it you’ll get.
Baymard Institute has tracked the global average cart abandonment rate for 14 years. It currently sits at 70.19%.
The more useful number sits inside that figure. In Baymard’s abandonment-reasons research, 42% of US online shoppers said they abandoned because they were “just browsing” or not ready to buy yet.
Baymard treats that group as largely unavoidable. It isn’t friction you can design away, because those shoppers were never going to convert on that visit regardless of your checkout flow.
That’s precisely the group a wishlist captures, and it’s the group email was built to reach. Litmus puts email’s average return at $36 for every dollar spent, one of the highest of any marketing channel.
A wishlist tag gives Mail Mint somewhere specific to point that return.
Key Takeaway 42% of shoppers who abandon are simply “not ready yet,” not lost to friction. A wishlist save is the clearest record of exactly who’s in that group, and email, at roughly $36 back per $1 spent, is the cheapest channel built to reach them.
What the tag tells you that a purchase doesn’t
Purchase history tells you what someone already owns. A wishlist save tells you what they still want.
Those are two different lists, and the second one is the one worth emailing.
A wishlist save is also more deliberate than most signals you collect. A page view can be an accident or a bounce.
Saving a product takes a click and, in most stores, a logged-in account, which makes it a sturdier basis for segmenting customers than browsing data ever is.
Remember what we see over and over: stores install a wishlist plugin, watch the saves accumulate, and send no email against them. The wishlist gets treated as a customer convenience instead of a marketing list. The plugin is doing its job. Nobody’s connected in the second half.
In practice, wiring the two together comes down to four concrete gains.
- Segments that build themselves. Your interested-but-not-bought list grows on its own, with no manual list hygiene.
- Timing you didn’t have before. The tag lands at the moment of interest, not on your newsletter’s schedule.
- New contacts from traffic you already have. A logged-in customer who saves a product becomes a subscribed Mail Mint contact, with no extra opt-in form required.
- No data leaving your site. The whole sync runs locally, which is a shorter conversation with your privacy policy than a third-party wishlist-to-email connector would be.
Those are the reasons to bother. Here’s exactly how to turn it on.
How To Set Up The Integration
There’s nothing to configure, so setup really means two things. Confirming the sync runs, and building your first automation.
Before you start, you’ll need
- Mail Mint installed and active. Grab the free version if you don’t have it yet.
- SaveTo Wishlist installed and active. The free version covers this integration in full.
- A test customer account you can log in with.
That last item matters more than it looks. The sync only runs for logged-in customers, because a Mail Mint contact needs an email address to exist.
Step 1: Generate a wishlist event
Log in to your store as the test customer, then add one product to a wishlist. That single action creates the contact and the first tag.
Step 2: Confirm the tag in Mail Mint
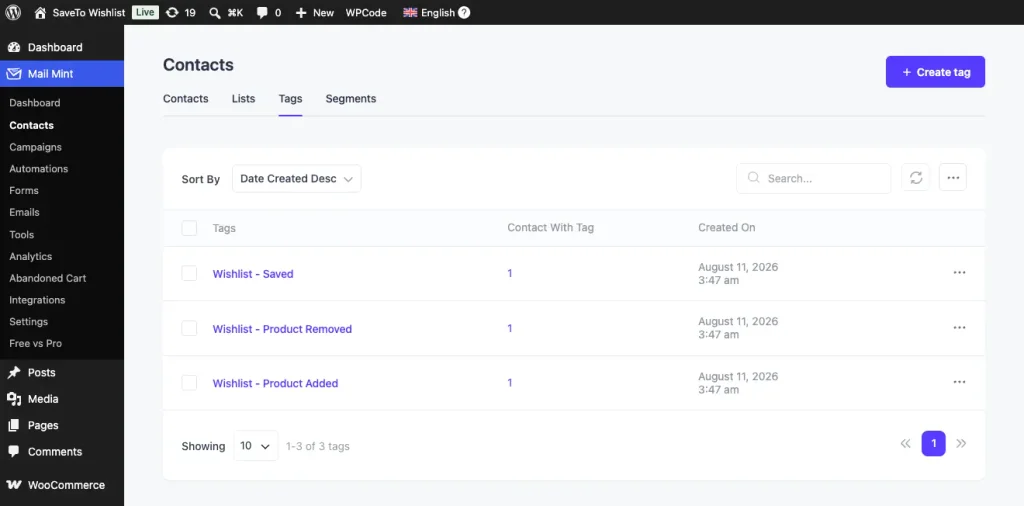
In your WordPress admin, go to Mail Mint → Contacts → Tags. You should see Wishlist – Product Added in the list.
Open the test customer’s record and confirm the tag is attached to them.
Pro Tip: If the tag is missing, the usual cause is a logged-out test. Guest wishlist activity is skipped by design, so log in and try again.
Step 3: Build the automation
From the Mail Mint dashboard, open the Automation tab and click New Automation. Then pick Tag Assigned as your starting point, then select the wishlist tag you want to react to.
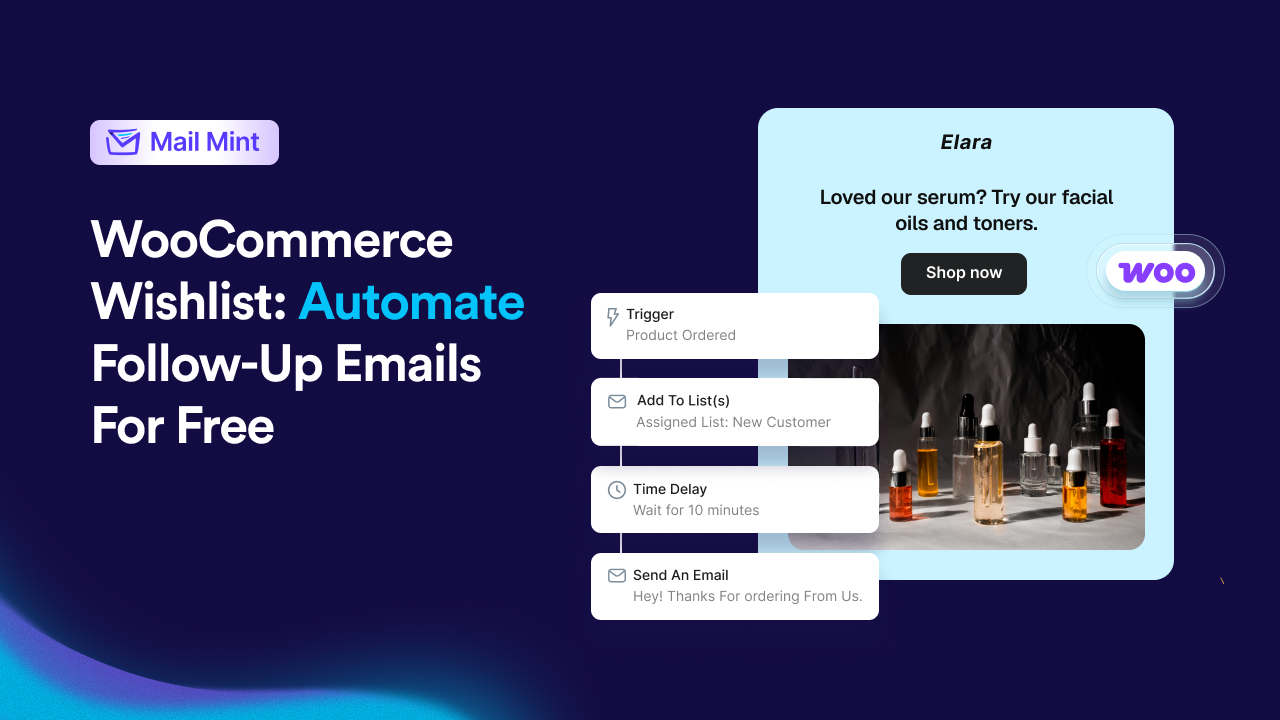
Add your steps after that. A Time Delay followed by Send an Email is the simplest useful version.
Later, you can grow it with conditions, sequences, or an outgoing webhook.
For the full click-by-click walkthrough with screenshots, see the SaveTo Wishlist Mail Mint integration guide.
That’s the entire setup. The real decision is which automation you point it at first, so let’s settle that before getting into all four builds.
Four Ways To Put Wishlist Tags To Work In Mail Mint
Three tags is a small vocabulary, but it covers more ground than it looks like it should. These four are the best places to start, in the order most stores should build them.
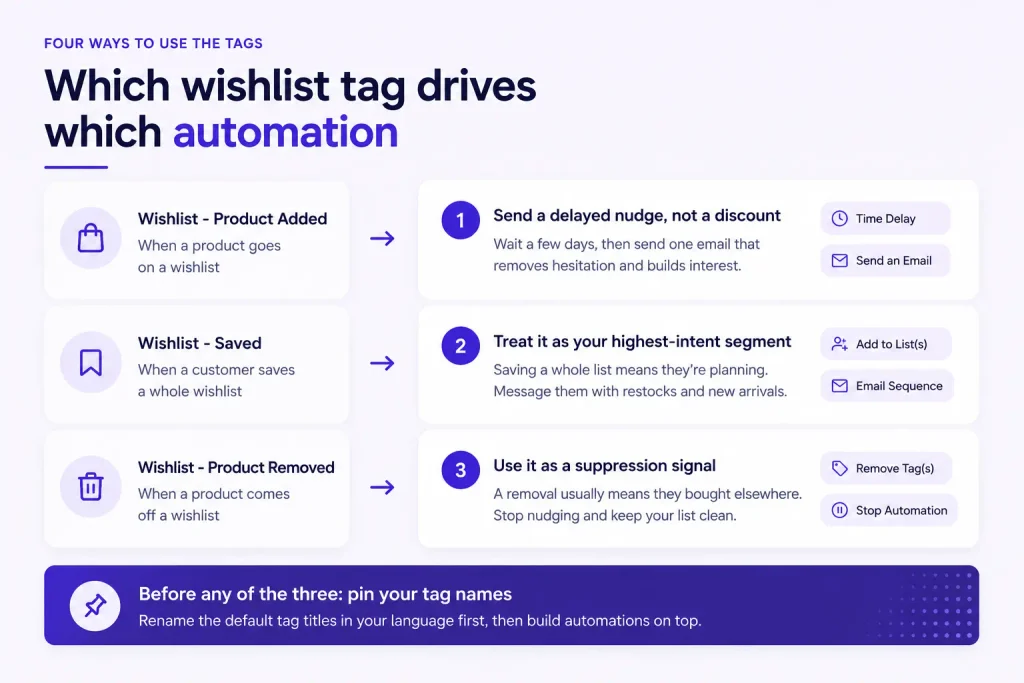
1. Send a delayed nudge, not a discount
Trigger on Wishlist – Product Added, add a Time Delay of two or three days, then send one email.
Make it a reason to come back rather than a coupon, something that removes the specific hesitation that made them save instead of buy. That reason changes by product type, so here’s what it looks like in practice.
For example, a shipping timeline for a large or seasonal item. A sizing guide for apparel. A care guide for anything that needs upkeep. Pick whichever answers the question the customer was actually stuck on.
Whatever you choose, the one thing to avoid is leading with a discount.
Discount-first is the reflex, and it’s usually the wrong one. It teaches your most engaged customers to wait for a coupon on things they already wanted.
If drafting that email is the part you keep putting off, this is exactly the kind of one-off copy Mail Mint’s AI Email Engine (Pro) is built for. Describe the reason you want to give and review the draft it hands back, instead of starting from a blank editor.
2. Treat a saved wishlist as your highest-intent segment
Saving an entire wishlist is a bigger commitment than saving one product. Someone doing that is planning, not browsing.
Use Add to List(s) inside the automation to push those contacts onto a dedicated list, then send them new-arrival and restock announcements first.
It’s the cheapest early-access tier you’ll ever build, because the list built itself.
Related read: Ecommerce Customer Segmentation: The Right Email to the Wrong Person Is Still the Wrong Email, if you want to build segments like this one beyond just wishlist activity.
3. Use the removal tag as a suppression signal
This is the tag most stores skip, and it’s the one that protects your sender reputation. A removal usually means the customer bought elsewhere or lost interest.
Trigger on Wishlist – Product Removed, then use Remove Tag(s) to strip the added tag.
Stop Automation works too, if you need to pull someone out of an in-flight sequence.
Good to know: Remove Tag(s) and Stop Automation are both Mail Mint Pro actions. The delayed nudge and the highest-intent segment above run entirely on Mail Mint’s free plan; this suppression step is the one automation on this list that needs Pro.
Remember, emailing a customer about a product they just deleted from their wishlist is a fast route to an unsubscribe. The suppression step costs you one automation action and saves your sender reputation.
4. Pin your tag names before you build anything on top of them
The default tag titles are translated strings. A site running a different admin locale can produce differently named tags without you changing anything.
On multilingual stores, a developer can pin the names with the stwlite_mailmint_event_tags filter.
The same applies if you want tag names that match your existing Mail Mint naming convention. Decide that before your automations depend on the default names.
Remember what we see happen: an automation gets built against a tag name that later changes, by filter, by translation, or by a well-meant manual edit. The automation doesn’t error, it just quietly stops receiving contacts. Decide your tag names first, then build.
Start with one of these four, measure it, then add the next. Building all four at once is how automations end up shipped and never checked.
Those four cover behavior. Here’s exactly where this integration stops, and what Mail Mint picks up instead.
What The Integration Leaves To Mail Mint
SaveTo Wishlist keeps this bridge deliberately light. It sends the event and nothing more.
Knowing exactly where it stops saves you from building an automation that can’t work, and in every case, Mail Mint already covers the rest of the ground.
It sends behavior, not product details
No product name, SKU, price, or quantity crosses over. Only the tag does.
That’s what keeps the sync local and instant.
For campaigns that need order or catalog data (a price-drop alert, a post-purchase upsell, a review request), reach for Mail Mint’s native WooCommerce triggers instead.
That set includes Product Ordered, Order Completed, Review Received, and a Price Dropped / On Sale trigger that fires when a product’s sale price is set or updated.
The wishlist tags cover behavior. Those triggers cover the catalog.
Between the two, you can run wishlist follow-up and order-based automation from the same Mail Mint dashboard, on the same free-to-start plan, without a second tool.
We’ve covered the WooCommerce side of this in more depth elsewhere: WooCommerce Abandoned Cart Recovery Made Easy & Automated, if a customer’s abandoned cart, not just their wishlist, is the bigger revenue leak on your store right now.
The tags build a history, not a snapshot
Removing a product adds the Wishlist – Product Removed tag. It doesn’t delete the Wishlist – Product Added tag.
So a contact can carry both, and what you get is a running log of what that customer did, not a live mirror of what’s currently on their wishlist.
That log is useful on its own for segmentation. If you’d rather the tags reflect only what’s currently saved, add a Remove Tag(s) step to your automation.
Mail Mint puts that control in the builder, so the behavior is yours to choose.
Guest wishlist activity is skipped
Email automation needs an email address, and a guest hasn’t given you one. A guest save creates no contact and no tag.
If a large share of your saves come from guests, the fix sits upstream of email. Give shoppers a reason to create an account, and a saved wishlist is one of the better reasons you can offer.
Once the account exists, Mail Mint has everything it needs to pick the signal up.
That’s the full picture, from the first tag to the automations built on top of it. Here’s what to actually do with it.
Start With One Automation
Here’s what to do next:
- Activate both plugins, then confirm the tags appear under Mail Mint, Contacts, Tags.
- Decide your tag names before building anything that depends on them.
- Ship the delayed nudge first. It has the clearest payback of the four.
- Add the removal suppression next, so you stop emailing about dropped products.
- Check what the tags carry before writing copy that assumes product details.
You already own the conversion engine. Mail Mint can send the right email at the right moment, to a segment that defines itself, without you touching a list by hand.
What an engine needs is a signal. A wishlist save is one of the strongest your store produces, and at the moment it’s going nowhere.
SaveTo Wishlist is the free piece that hands Mail Mint that signal. Grab SaveTo Wishlist free, activate it next to Mail Mint, and save one product as a test customer. The tag will be waiting in your Contacts when you go and look, ready for the first automation you point at it.
Then go and build that one automation. The delayed nudge is the shortest route to a result you can measure.
Frequently Asked Questions
Do I need to configure the SaveTo Wishlist and Mail Mint integration?
No. There’s no settings screen for this integration and no API key to paste in. Once SaveTo Wishlist and Mail Mint are both active, the sync runs on its own, and the tags are created for you the first time each event fires.
Does the SaveTo Wishlist and Mail Mint integration work with the free version of SaveTo Wishlist?
Yes. The Mail Mint integration ships in the free SaveTo Wishlist plugin, and it isn’t gated behind a Pro license or a paid add-on.
What happens when a customer who already exists in Mail Mint adds a WooCommerce wishlist item?
They’re matched by email address and updated, not duplicated. Their existing lists, tags, and subscription status stay exactly as they were. The only change is the wishlist tag being added on top.
Does the SaveTo Wishlist and Mail Mint integration slow down a WooCommerce store?
No. The sync runs through Mail Mint’s own functions on the same WordPress install, so there’s no external HTTP call to wait on. When Mail Mint isn’t active, SaveTo Wishlist doesn’t register the wishlist hooks at all.
Can I change the subscription status of new Mail Mint contacts created by SaveTo Wishlist?
Yes. New contacts default to subscribed status. A developer can change that with the stwlite_mailmint_contact_status filter if your consent process needs something different.
Does the Mail Mint removal tag apply when an administrator removes a customer’s WooCommerce wishlist item?
Yes. The removal event resolves the wishlist’s actual owner rather than whoever happens to be logged in, so the tag still lands on the customer’s contact. That holds whether the removal comes from the customer, an admin, a bulk action, or a scheduled task.