Selling digital products has become one of the mainstream business modules for several experts today. It helps to create a huge revenue stream without having to worry about inventory and shipping.
Initially, selling digital products might feel tricky as the competition is pretty high. Even if you have great products, you need to put in some extra effort in creating the perfect sales strategy.
The key here is to set up a highly converting sales funnel for digital products that will be focused on selling more to every buyer.
In this article, you will learn how you can plan and set up a powerful sales funnel for WooCommerce digital products and increase your revenue to a significant level.
After reading this article you will be able to:
- Start selling digital products via WooCommerce
- Plan a sales funnel that can deliver results
- Increase the average money spent by every buyer
And eventually, generate the revenue you deserve.
So let’s dive into it.
Planning Your Sales Funnel For Digital Products
When planning a sales funnel, you first need to consider the product you sell and who are these products for. Depending on that, you have to decide how you want to offer your products in a well-planned journey.
For digital products, there are two sales funnels that have proven to deliver more results than other strategies.
- A “lead generation to sales offer” approach
- A traditional sales funnel with several product offers
1. The “Lead Generation To Sales Offer” Approach
In this strategy, you use two web funnels and email automation to generate leads and convert them into sales.
First, you create a funnel to collect leads using an irresistible lead magnet. This could be a free product or a low-priced product (between $1 – $5).
This funnel would be a two-step funnel:
- Landing page to offer the lead magnet upon form submission
- Thank you page for confirmation.
Then, create a second funnel to offer some of your premium products. This could be a four-step funnel:
- Landing page to offer a premium product
- Checkout page to pay for the product
- Upsell step for selling an upgrade to the product (if applicable)
- Thank you page for the order confirmation
Once you have these two funnels ready, here’s how you automate the process.
Step 1 – Run Paid Ads to drive traffic to the lead magnet funnel. The landing page copy should clearly highlight the benefits offered in the lead magnet.
Step 2 – Set up the funnel to send the data submitted to an automation tool on a specific list
Step 3 – Once an email is added to the list, set up an automated email with a link to access the lead magnet.
Step 4 – Create a series of 3 emails containing some tips or references to resources that your prospects will find useful.
Step 5 – After the series is over, send an email to check out your premium product. Here, include a link to the second funnel you created.
Step 6 – In the second funnel, offer one of your premium products as the core offer, and then suggest an upgrade on an upsell offer after checkout. Whether the person purchases the initial product or goes for the upsell, once the payment is complete, assign them a specific tag or add them to a separate list in your automation tool.
Step 7 – Set up an email to be sent to your paying customers with instructions to access their digital products.
Step 8 – For those who did not purchase from the second funnel, send them an email 48hrs later to try and convince them again, (and this time, you may offer a coupon discount to trigger a conversion).
**You may also consider running re-targeting Ads on your leads that did not purchase your products.
Let us look at an example to understand this funnel better:
Let’s say you are a Health & Fitness Coach and you guide people to lead a healthier life. And suppose you have written 3 ebooks that you wish to sell. So the funnel will go as follows:
- First, you may prepare a Fitness Improvement Checklist that most of your target clients will find valuable.
- Then run a lead magnet funnel by offering this free resource to collect leads and drive traffic into this funnel.
- When your prospects submit their information, send their data to your automation tool and trigger an email with instructions on accessing your free resource.
- Once you have the leads, send 3 more emails to them with valuable tips (some of which can be direct quotes from your books) that will be helpful to your prospects. You could send these at 2 days intervals or more.
- Next, in a fourth email, ask them to purchase one of your ebooks via a persuasive email. Here, lead them to your second sales funnel where you initially offer one ebook. The landing copy should be focused on the benefits of reading this ebook.
- Whoever buys this ebook, immediately after checkout, he may be offered to purchase all 3 of your ebooks instead at a discount, let’s say 30%. This discount will trigger a few to take the upsell offer instead.
- And finally, he/she will reach the thank you page and receive an email with instructions to get access to the ebooks.
This funnel is mainly effective for experts or professionals who sell digital products related to their expertise.
The digital products here could be eBooks, PDFs, downloadable/private videos, downloadable/private audio files, etc.
As you can tell, the success of this funnel depends a lot on the copywriting skill of whoever creates the funnel. You have to write persuasive copies to convince your potential clients that your free resource is valuable, and your paid products are worth the investment.
2. A Traditional Sales Funnel With Several Product Offers
The traditional sales funnel is more appropriate for digital eCommerce businesses that sell various digital products.
For example, let’s say you own a website that sells various courses related to marketing and business growth. In this case, the more courses you can sell to a single buyer, the more sales you can trigger. (Though you have to try and avoid annoying users with too many offers.)
For this scenario, a traditional sales funnel is more appropriate.
The funnel involves the following steps:
- Landing page with an offer on a single product
- Checkout page to pay for the product.
- Order bump offer for another product right on the checkout page, which can be added to the order.
- Upsell offer after checkout which the buyer can purchase as well
- Thank you step for the order summary and confirmation
And these steps themselves make up the funnel journey.
Let us look at an example to understand this funnel better:
Taking the idea of the course website above, let us assume you have multiple courses on Digital Marketing which include “Customer Persona Guide,” “Keyword Research Guide,” and “Content Planning Guide.”
- First, you may prepare a landing page with a persuasive copy, to highlight “The Customer Persona Guide” and how it is beneficial.
- Whoever agrees to get the course, will be directed to the checkout page to pay for the course.
- On the checkout page, there will be an order bump offer for the course “Keyword Research Guide” with a 10% discount. The buyer can choose to add it to the order with just one click and then proceed to payment.
- Immediately after checkout, he may be offered to purchase “all 3 of your ebooks instead at a discount “The Content Planning Guide” as well at, maybe, a 20% discount.
- And finally, he/she will reach the thank you page and receive an email with instructions to get access to the courses.
So, this approach is pretty straightforward. You have many digital products, and you create sales funnels for the ones that are likely to sell together.
This could be a site for selling various eBooks, courses, page templates, email templates, premium music, paid images, etc.
Your main goal here is to make a buyer purchase more products than he initially intended to. So the use of the right products as offers, offering discounts, and using the right hook in the copy will increase the success rate.
How To Build A Sales Funnel For WooCommerce Digital Products
To create the funnels you just learned here, you will need the following tools:
- WooCommerce
To manage products, payments, and orders.
- WPFunnels
To create the funnel journey visually and launch the funnel campaigns.
- A Reliable Email Automation Tool (such as FluentCRM, ActiveCampaign, etc.)
To send out the emails involved in the funnels.
In the next few steps, you will learn how you can create a digital product sales funnel in WordPress easily.
Step 1 – Creating Digital Products In WooCommerce
The first thing to do is, obviously, to get a good domain and set up your own website. The next thing to do is to install & activate WooCommerce and configure the payments and other necessary settings.
Once you have WooCommerce set up, it’s time to add your digital products to the store.
- Go to Dashboard > Products > Add New
- Give a product title and description
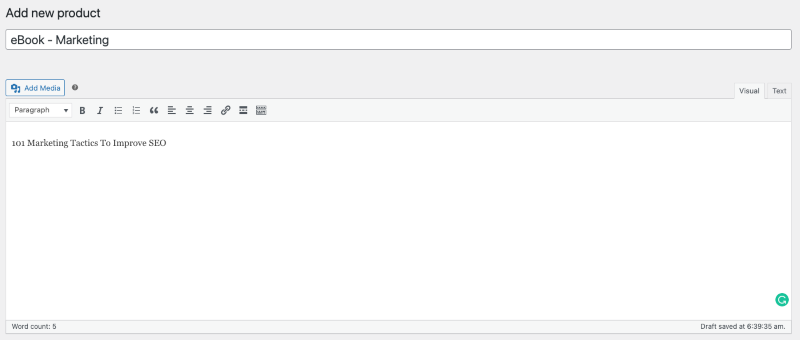
- Create A Simple Product
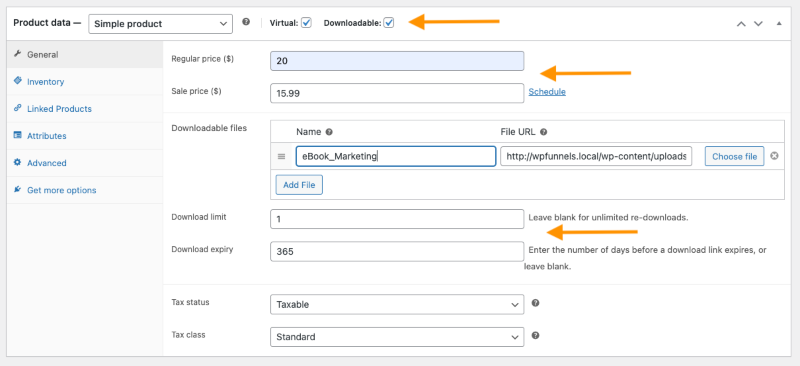
- Then scroll down and select the product type as Simple Product. And then select the option Virtual. If you want your user to download your digital product from your store, you can enable the Downloadable option as well.
**If you select Downloadable, then you can attach the file to the product, which the buyer can get access to after payment.
- Then assign a category, upload a featured image, set the product price, and update the slug.
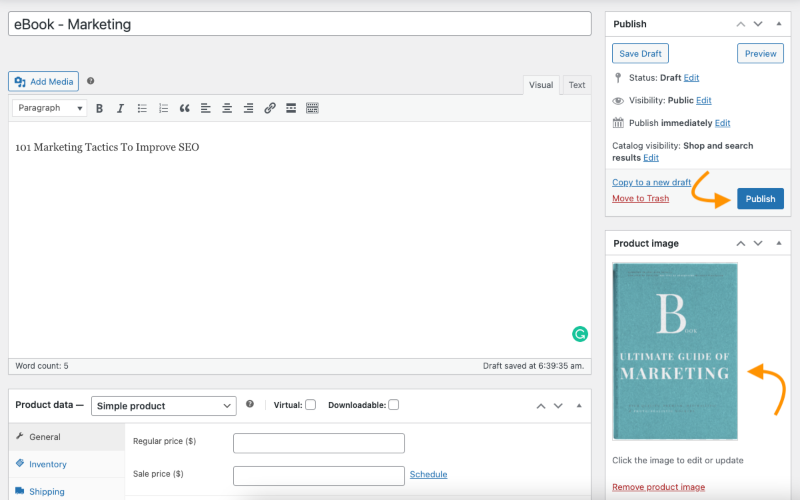
Finally, Publish the product. That’s it. You have just learned to create a digital product in WooCommerce.
Here is a more detailed guide on adding digital products on WooCommerce.
Step 2 – Building Your Own Digital Product Sales Funnel Using WPFunnels
Now it’s time to create the sales funnel journey that you want your customer to go through.
- Create A 5-Step Sales Funnel For Your eBook
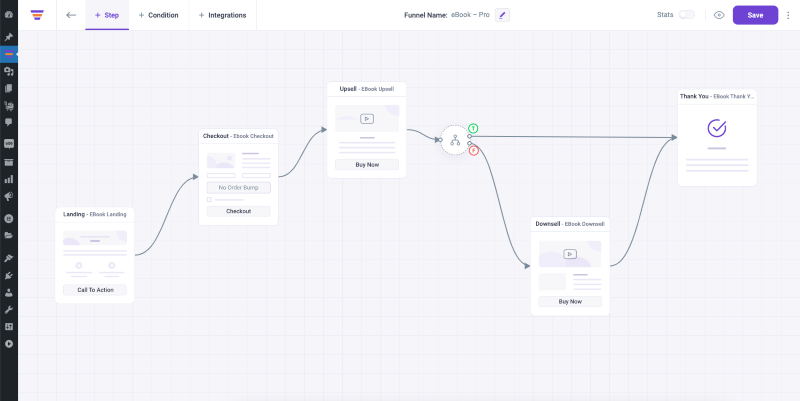
Here, you can see that I have planned 5 steps for the whole sales journey for my eBook Store.
- Design A Landing Page That Will Convert
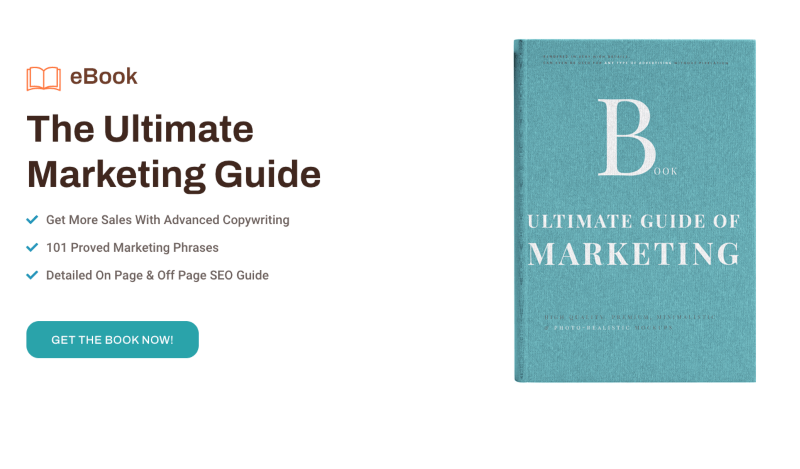
Make sure to invest enough time in writing good copy where you should focus more on the benefits of buying your product(s).
- Assign the Product To Your Checkout Page
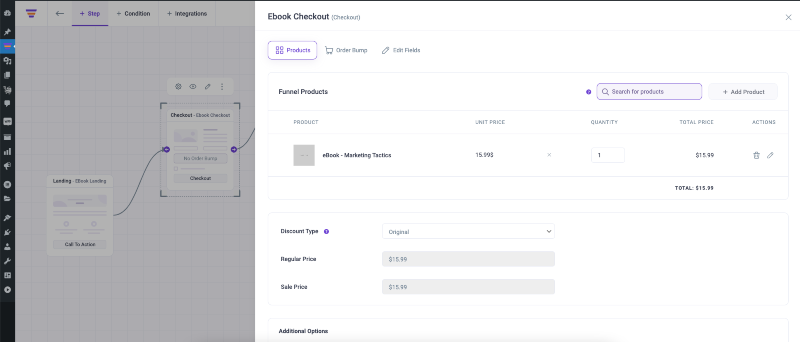
I’ve added the “Marketing Tactics eBook” as the main offer product.
**You may also add order bump offers from the settings of the checkout step.
- Choose suitable upsell & downsell offers.
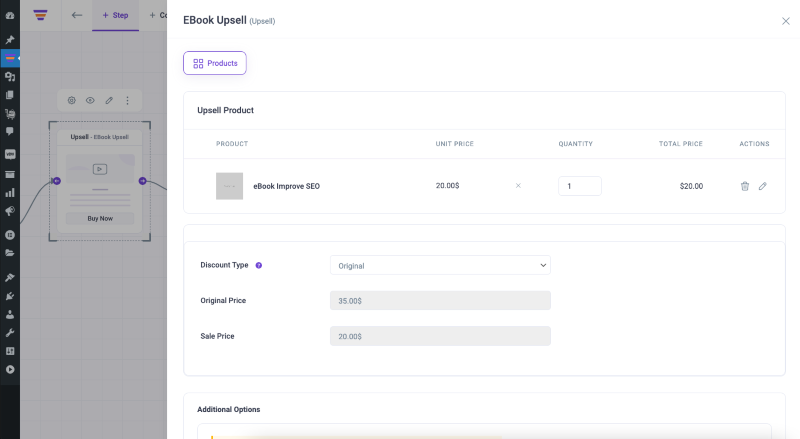
I have added the eBook on Improving SEO as an upsell offer which costs $20.
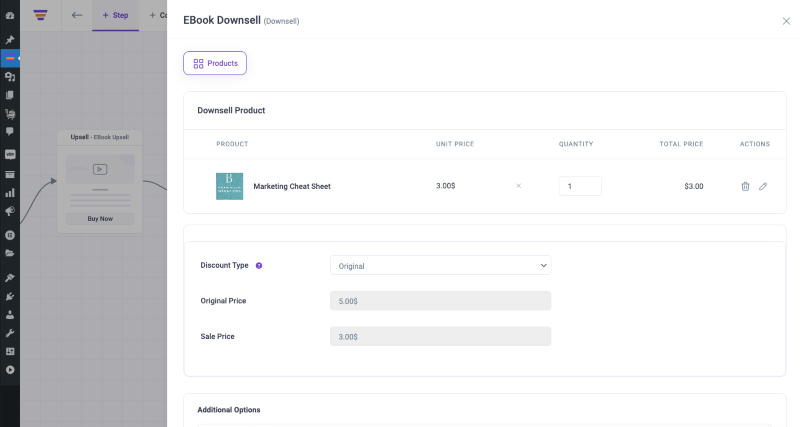
Add I have added a much cheaper “Marketing cheat sheet eBook” as the Downsell Offer.
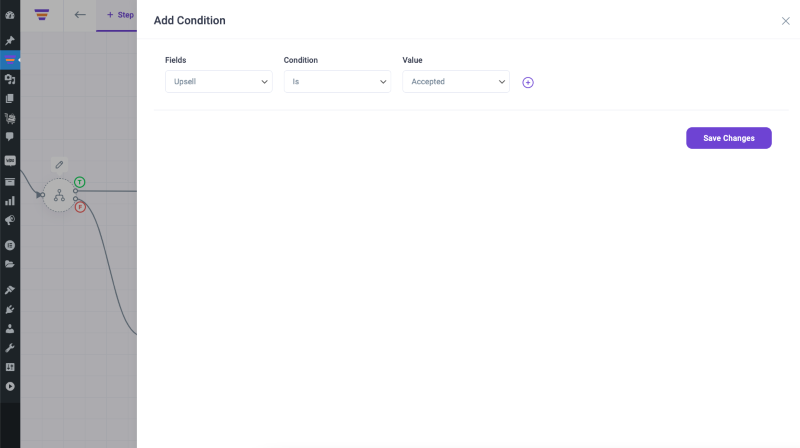
And I have set up a condition so that if someone doesn’t accept the upsell offer, only then he will go to the downsell offer. Else, he will directly go to the Thank you page.
- Design the checkout, upsell, downsell, and thank you pages
And that’s it. Your funnel is pretty much ready.
Now, even though I have used random design and content for showing you how it works, the process is the same.
**If you follow the 1st approach, then you will need to create two funnels using WPFunnels. But the whole funnel creation process is the same.
Step 3 – Set Up Automation With Fluent CRM
Based on your funnel journey, you can easily set up automation by combining WPFunnels and FluentCRM.
You may watch the following guide to achieve this easily:
Step 4 – Drive Traffic To Your Sales Funnel
Once you are ready with your funnel, the next thing to do is to drive traffic into your funnel.
Here are some of the ways you can bring relevant traffic to your sales funnel.
The best approach would be to
- Run Paid Ads on Facebook and Google
- Share on social media
- Email to your existing mailing list
- Ask affiliates to share with their audience
and many more.
Read this guide to learn more ways to drive traffic into your sales funnels.
Final Thoughts
As you can see, creating sales funnels for digital products is super easy and affordable with all the amazing tools out there.
The combination of WPFunnels, WooCommerce, and FluentCRM can help you start your own business with digital products.
But, obviously, you need to put some effort into improving your copywriting skills, and determining the problems you can solve with your products. Only then you will be able to get the best results out of your sales funnels.
And in WordPress, WPFunnels is the easiest funnel builder that helps you both plan and launch funnel campaigns real quick without any demanding technical requirements.
So go ahead and start building your own business with digital products.





![How to Create a Landing Page Using Gutenkit Block Editor for Your Funnel [2025] 32 How To Create a Landing Page Using Gutenkit Block Editor For Funnels](https://getwpfunnels.com/wp-content/uploads/2024/05/Create-a-Landing-Page-Using-Gutenkit-Block-Editor-For-Funnels.webp)
![8 Steps To Write A Compelling Landing Page Copy That Converts [2025] 37 landing page copy](https://getwpfunnels.com/wp-content/uploads/2024/09/landing-page-copy-.webp)
![How To Create A Sales Funnel To Automate Your E-Commerce Sales Process [2024] 42 Create a sales funnel to automate your business](https://getwpfunnels.com/wp-content/uploads/2023/03/Automated-Sales-Funnel-1.png)
![How To Introduce A New Product To Your Customers - 10 Key Steps [2025] 47 How To Introduce A New Product](https://getwpfunnels.com/wp-content/uploads/2024/04/106.-How-To-Introduce-A-New-Product-To-Your-Customers-Tips-Best-Practices.webp)
![7 Best Types of Marketing Models for High Success Rate [2025] 56 Marketing Models](https://getwpfunnels.com/wp-content/uploads/2024/04/47.-Best-Types-of-Marketing-Models-for-High-Success-Rate-1.webp)