

Running a WooCommerce store isn’t just about getting more visitors. It’s also about making sure the people who reach your checkout actually complete their purchase.
One small obstacle, like asking every customer to create an account before checking out, can be enough to lose a sale.
According to the Baymard Institute, 26% of shoppers abandon their cart because they’re asked to create an account before they can check out.
That’s why many WooCommerce store owners enable Guest Checkout. It removes that extra step, making it easier for customers to place an order while giving you a better chance of converting more visitors into buyers.
But there’s one question that often comes up:
“If I enable guest checkout, will I lose customer leads?”
The short answer is no…if you set it up the right way.
In this guide, you’ll learn:
- What WooCommerce Guest Checkout is and why it matters
- How to enable WooCommerce Guest Checkout in just a few steps
- How to keep collecting customer leads without forcing account creation
Let’s get started.
TL;DR: WooCommerce Guest Checkout
- Guest checkout removes forced account creation, one of the top documented causes of cart abandonment.
- It’s the right fit for most physical-product, digital, and one-time-purchase stores. Membership and subscription stores need a slightly different approach.
- You can still collect leads while guest checkout is on, just by adding a consent checkbox at checkout.
- Consider pairing it with “Create an account during checkout” and “Allow login during checkout” for your returning customers.
- A few drawbacks exist (less data, fewer repeat logins, slightly more support questions), but none of them are hard to manage.
Bottom Line: Guest checkout removes friction and grows your sales, without costing you your list, as long as you set up the right email tool alongside it.
What is WooCommerce Guest Checkout?
WooCommerce guest checkout simply means customers can place an order without creating an account.

Normally, a customer adds a product to the cart, heads to checkout, enters their details, pays, and leaves. But if your store asks them to register before they can pay, some people won’t bother finishing the purchase.
Let me give you a simple example.
Let’s say you sell phone accessories on your WooCommerce store. A customer finds a charging cable, adds it to the cart, and is ready to check out. But before they can pay, they’re asked to create an account.
Some customers will go ahead and register. Others will think, “It’s just one cable. I don’t want another account.” They leave without completing the order.
If Guest Checkout is enabled, that same customer can complete the purchase immediately without registering. The order goes through, and you’ve made the sale.
It’s a small change, but for stores that get a lot of first-time or one-time buyers, it can make checkout feel much quicker.
That doesn’t automatically mean every WooCommerce store should enable it, though. The right choice depends on what you sell and who you’re selling to.
Why Should You Allow Guest Checkout?
You might be thinking, “If WooCommerce already asks customers to create an account, why should I change it?”
That’s a fair question.
The answer really depends on how your store works. But for most WooCommerce stores selling physical products or one-time purchases, guest checkout usually makes the buying process easier for customers.
Here’s why it’s worth considering:
- Recover more sales at checkout. If a customer has already added products to the cart and reached your checkout page, they’re already close to buying. Asking them to stop and create an account gives them another reason to leave. Enabling guest checkout is one of the simplest ways to fix common WooCommerce checkout revenue leaks.
- Make checkout easier on mobile. A lot of WooCommerce shoppers buy from their phones. Filling in billing details is already enough work on a small screen. Asking them to create and remember another password only makes checkout longer than it needs to be.
- Help first-time buyers place their first order. If someone is visiting your store for the first time, they’re interested in your product…not creating another online account. Guest checkout lets them complete the purchase first. You can always encourage them to create an account afterward.
- Create a faster buying experience. The fewer steps customers have to go through, the sooner they can complete their purchase. A shorter customer buying process often leads to a smoother checkout experience.
- Support your efforts to reduce cart abandonment. Guest checkout won’t solve every checkout problem, but it does remove one common reason customers leave before paying. Combined with other checkout improvements, it can help you reduce cart abandonment and recover more completed orders.
However, it won’t be the best choice for every WooCommerce store.
If you sell memberships, subscriptions, online courses, or products where customers need access to downloads, renewals, or order history, customer accounts are part of the buying experience.
In that case, it’s usually better to let customers create an account during or after checkout instead of making it mandatory before they place an order.
Now that you know where guest checkout works best, let’s see how to enable it on your WooCommerce store.
How to Enable Guest Checkout in WooCommerce?
If you want to win back your sales or recover your abandoned cart, you need to follow some major steps by enabling WooCommerce quick checkout options to streamline the buying process for your customers.
To enable guest checkout in WooCommerce, go to WooCommerce > Settings > Accounts & Privacy, check “Allow customers to place orders without an account,” and save changes.
Here’s the full walkthrough:
1. Go to WooCommerce > Settings.
2. Here, go to the Accounts & Privacy tab.

3. Now, you will find the guest checkout option, “Allow customers to place orders without an account.” Enable it.

4. Scroll down and click on “Save changes.”
That’s it. You now have WooCommerce guest checkout enabled in your store.
Pro Tip: It’s always a good idea to test it yourself. Open your store in an Incognito window and go through the checkout as a guest. You can temporarily enable Cash on Delivery, so you don’t have to make an actual payment.
Special Note: Allow Option to Log in or Create an Account During Checkout
You have already established how to enable WooCommerce guest checkout. However, you can go one step further by using two more additional features that WooCommerce comes with.
i. Create an Account During Checkout
Guest checkout doesn’t mean customers can only check out as guests.
Let’s say someone likes your store and knows they’ll probably come back. They may want an account to track orders or save their details for next time.
That’s exactly what this option is for.
Instead of asking customers to register before they buy, WooCommerce shows a simple checkbox during checkout. If they tick it, their account is created automatically after the order is placed.
So customers who just want to buy can check out as guests, while those who want an account can create one without going through a separate registration process.
You’ll find this option under the same WooCommerce > Settings > Accounts & Privacy page.

ii. Allow Logging in During Checkout
Now think about your returning customers.
If someone has already created an account and comes back to buy again, asking them to check out as a guest doesn’t make much sense. They already have an account, so let them use it.
When you enable Allow Logging In During Checkout, existing customers can sign in directly from the checkout page. Once they log in, WooCommerce automatically fills in their saved details, making checkout much faster.
The best part is that you don’t have to choose between guest buyers and returning customers. New customers can still check out as guests, while existing customers can sign in and enjoy a quicker checkout experience.
You’ll find this option in the same WooCommerce > Settings > Accounts & Privacy section.

Allowing Guest Checkout Only for Specific Products
Guest checkout doesn’t have to be enabled across your entire WooCommerce store.
If different products serve different customers, you can enable guest checkout only where it makes sense. That way, you get the benefits of a faster checkout without changing the buying experience for every product.
Here are a few situations where selective guest checkout works well:
- High-demand or seasonal products: During seasonal campaigns or limited-time promotions, customers usually want to place an order as quickly as possible. Removing the account requirement helps them check out without unnecessary delays.
- Products that attract first-time buyers: If a product brings in lots of new customers, guest checkout makes it easier for them to complete their first purchase. You can always encourage them to create an account after the order is placed.
- Low-cost or promotional products: For smaller purchases, customers often expect a quick checkout. Requiring an account can feel like an unnecessary step for a product they’re buying on impulse.
- Digital products and downloads: Customers buying ebooks, templates, software, or other digital products usually expect instant access after payment. Guest checkout helps keep that experience simple and straightforward.
- Gift purchases: Someone buying a gift isn’t necessarily planning to become a repeat customer. Letting them check out as a guest keeps the process quick and hassle-free.
- Bulk or corporate orders: Some business buyers only purchase when they need to replenish stock or place a one-off order. If they don’t need an ongoing account, guest checkout can make purchasing easier.
If you want that level of control and flexibility, plugins like Flux Checkout for WooCommerce and AIO Checkout are built for exactly that. You can choose which products or categories should offer guest checkout instead of applying it storewide.
In the next section, let’s look at a few trade-offs you should know before enabling guest checkout.
Potential Drawbacks of Enabling Guest Checkout
Guest checkout has a lot of benefits, but it’s not the right answer to every checkout problem. There are a few trade-offs you’ll want to think about before turning it on.
- You won’t know as much about your customers. Since guest buyers don’t create an account, you miss out on some information that can be useful later, especially if you’re trying to build better customer retention strategies.
- Returning customers don’t get the same convenience. Without an account, they can’t log in to see previous orders, save their details, or manage everything from one place. For some stores, that’s not a big deal. For others, it can affect the overall customer experience.
- Fewer people will create an account. If growing your registered customer base is important to your business, guest checkout naturally means fewer people will sign up during their first purchase.
- You may get a few more support questions. Customers without an account sometimes reach out to check their order status or ask for information they could have found themselves from an account dashboard.
None of these are reasons to avoid guest checkout. You just need a plan for them.
The good news is that WooCommerce already gives you a few ways to encourage account creation without making it mandatory, and we’ll cover those next.
How to Improve Your Checkout Once Guest Checkout Is On
Enabling guest checkout is a great start, but it’s only one part of the checkout experience.
If your checkout page is still long, confusing, or full of unnecessary fields, customers can still leave without completing their order. Spending a few minutes improving the checkout page itself can make a big difference.
Here are a few simple changes worth making:
1. Keep your checkout form as short as possible.
Only ask for the information you actually need to process the order. In most cases, the customer’s name, email address, billing details, shipping address, and payment information are enough. Every extra field gives customers another reason to stop halfway through.
If you’re using WPFunnels, you don’t have to edit WooCommerce code or install another field editor. You can remove unnecessary fields, rearrange the checkout layout, and build a cleaner checkout page from one place. If you want to go further, you can also add order bumps and create a distraction-free checkout without switching between multiple plugins.
2. Make returning customers’ lives easier.
Even if someone checked out as a guest before, browser autofill and payment methods like Apple Pay or Google Pay can speed up their next purchase. The less information customers have to type, the quicker they can complete the order.
3. Remove distractions from the checkout page.
The checkout page has one job: helping customers finish their purchase. Large banners, pop-ups, and unnecessary navigation links can pull attention away from that goal. A clean checkout page helps customers stay focused until the order is complete.
4. Offer faster payment options.
Payment methods like Apple Pay, Google Pay, and PayPal Express Checkout remove the need to enter card details manually. That’s especially helpful for customers shopping from their phones.
5. Ask customers to create an account after they buy.
You don’t have to ask for an account before checkout. Once the order is complete, invite customers to create one from the thank-you page. At that point, they’ve already decided to buy, so asking them to save their details or track future orders feels much more natural.
6. Test your checkout yourself.
Every time you make changes, place a few test orders on both desktop and mobile. It’s one of the easiest ways to catch small issues that are easy to miss while building the checkout page.
One last thing…
Guest checkout makes buying easier, but many store owners worry about losing future marketing opportunities when customers don’t create an account.
The good news is that you don’t have to choose between a faster checkout and growing your email list. Let’s look at how you can do both.
How To Collect Leads Even with WooCommerce Guest Checkout Enabled?
One of the biggest concerns with guest checkout is lead generation.
If customers don’t create an account, it’s easy to assume you’ve lost the opportunity to stay in touch with them. Thankfully, that’s not the case.
As long as customers agree to hear from you, you can still collect their email address during checkout and continue building your email list.
One of the easiest ways to do that in WooCommerce is with Mail Mint.
It adds an opt-in checkbox to your checkout page, giving customers the choice to subscribe while they’re placing an order. No account creation is required.
Let’s see how it works.
- After installing Mail Mint, go to Mail Mint’s Settings > WooCommerce
- Enable the box ”Opt-in on Checkout” and put on the subscription confirmation message into the ”Checkbox Label”
- Now, add them to the lists and tags to onboard your guest users and finally press ”Save Settings”
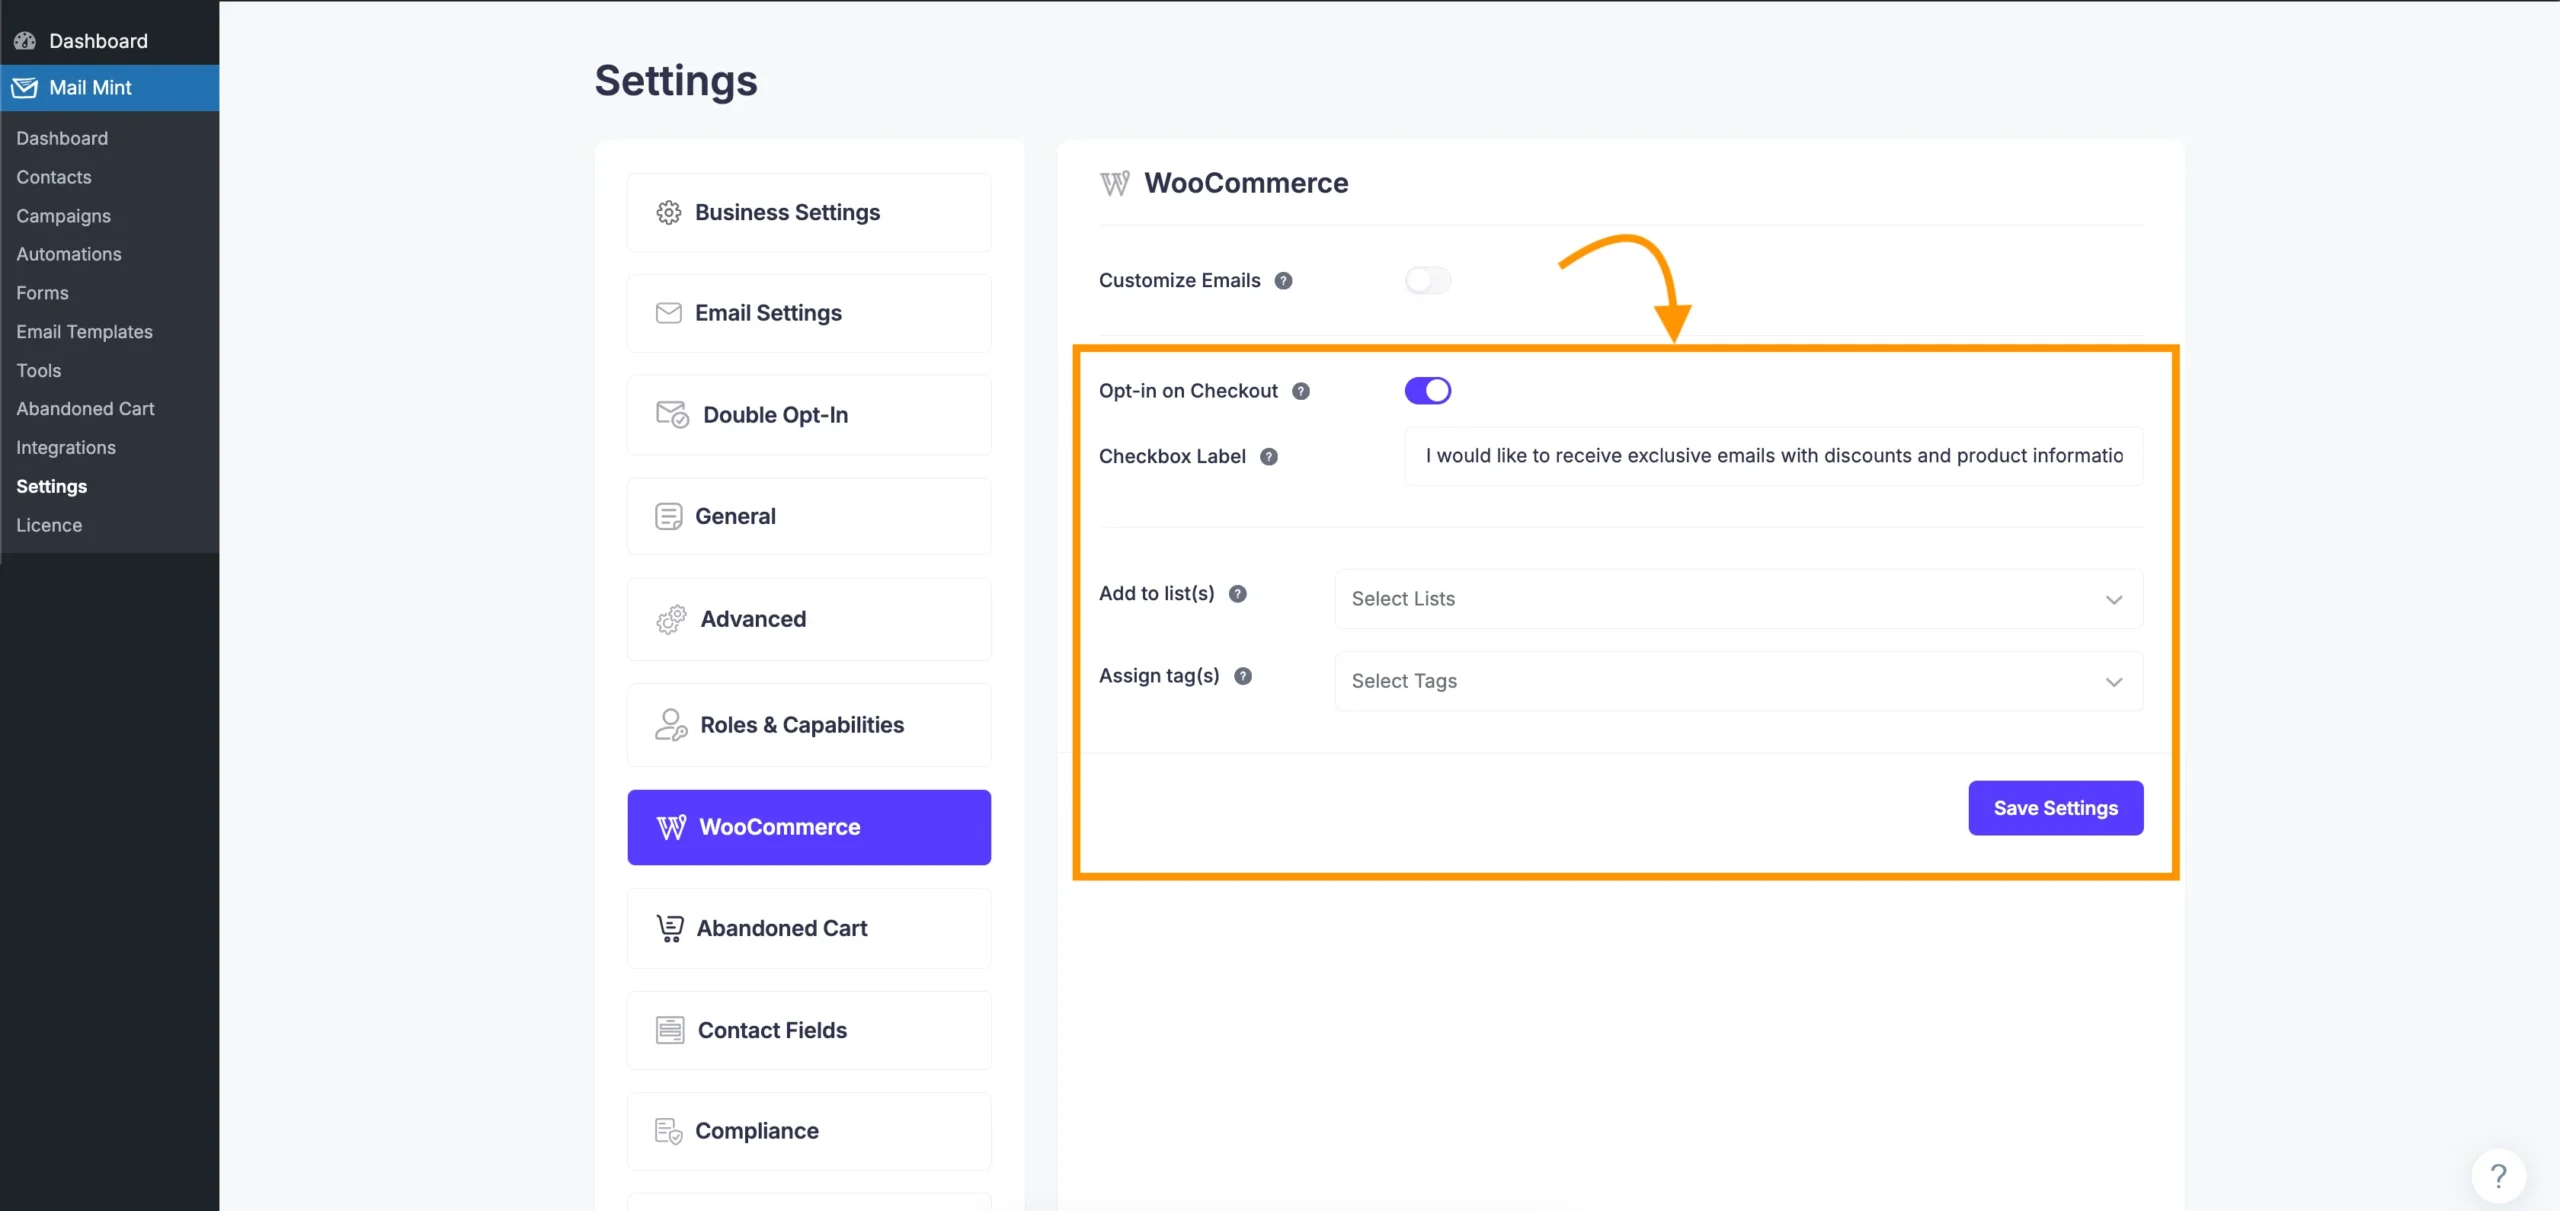
When someone checks that box during guest checkout, their name and email will be added to a list inside Mail Mint.
That’s it.
Now, whenever someone places an order and ticks the checkbox, Mail Mint automatically adds them to your email list.
From there, you can:
- Welcome new subscribers with an automated email.
- Share product updates and special offers.
- Recover abandoned carts.
- Build any email automation you need.
Guest checkout doesn’t have to come at the expense of your email list. With a simple opt-in checkbox, you can give customers a faster checkout experience while continuing to grow your audience.
Good to Know: You don’t need a separate plugin just to collect emails at checkout. Since Mail Mint already handles email marketing and automation, the opt-in checkbox fits naturally into the same workflow.
Conclusion
WooCommerce Guest Checkout isn’t about removing customer accounts altogether. It’s about making it easier for people to complete their purchase.
For many WooCommerce stores, that small change can lead to a smoother checkout experience, more completed orders, and a better first impression for new customers.
If you decide to enable it, don’t stop there. Keep your checkout page simple, give customers the option to create an account if they want one, and add an email opt-in so you can continue building your email list without slowing down the buying process.
That’s exactly where Mail Mint comes in. It helps you collect subscriber consent during checkout and automatically add new contacts to your email list, so you don’t have to choose between a faster checkout and future marketing opportunities.
If you’re ready to improve your WooCommerce checkout, start by enabling guest checkout, test the experience yourself, and make small improvements as your store grows.
Frequently Asked Questions
How do I enable guest checkout in WooCommerce?
Go to your WordPress dashboard and navigate to:
WooCommerce > Settings > Accounts & Privacy
Check the box next to “Allow customers to place orders without an account” and click Save changes. This lets users complete their purchase without registering.
How to allow WooCommerce existing customers to checkout without being logged in?
In most cases, you should enable it. If you’re selling physical products or one-time purchases, guest checkout makes it easier for customers to complete their order. If your store relies on customer accounts for subscriptions, memberships, or order management, it’s better to encourage account creation during or after checkout instead of requiring it upfront.
How do I turn off WooCommerce guest checkout?
To turn off WooCommerce guest checkout:
Go to WooCommerce > Settings > Accounts & Privacy
Uncheck the box that says “Allow customers to place orders without an account”
Click Save changes
This will force all customers to either log in or create an account before completing a purchase.
How do I get guest customer emails in WooCommerce?
WooCommerce already collects a guest customer’s email address for order confirmations. If you also want to use that email for marketing, you’ll need the customer’s permission. A plugin like Mail Mint adds an opt-in checkbox to your checkout page, so customers can subscribe while placing their order. Once they opt in, they’re automatically added to your email list.
Is WooCommerce guest checkout secure?
Yes. Guest orders go through the exact same payment gateway encryption and processing as account-based orders. Security comes from your payment gateway and site setup, not from whether the buyer has an account.
Will I lose valuable customer data with guest checkout enabled?
Not if you pair it with an opt-in checkbox. You’ll collect less automatic account data, like saved addresses or order history tied to a login, but a tool like Mail Mint still lets you collect the one thing that actually matters for marketing: the email address, given willingly.

Comments are closed.



Comments (1)
I found your content incredibly insightful—it sparked new ideas and helped me see WooCommerce through a more strategic lens. Inspired by your work, I created a localized version tailored to my fellow Filipinos navigating the eCommerce space here in the Philippines.