Running a directory website is quite fruitful at times. You can easily set up a platform where people can find links to their local businesses, relevant service providers, a list of tools, etc.
It will be especially useful if you want to run a directory website where people will find everything they need related to a service or niche in one place.
Plus, if you can tie it to email marketing, you could easily start converting visitors and earning money via referrals and affiliate commissions while also selling services and products of your own.
And guess what? You can easily set up such a directory website in WordPress.
In this article, you will learn about the right tools required and how you can use them to build an advanced directory website along with email marketing within WordPress.
So, let’s begin.
Benefits Of Running An Advanced Directory Website
While the idea of having a directory website seems less popular nowadays, it still has the potential to help you earn good revenue if done right.
Besides the earnings, you will also get several great benefits.
1. Increased visibility with niche-specific audience
Nowadays, a directory website is usually targeted towards a single niche or user base. That’s what makes more sense for you to rank organically and attract more businesses that want to list their products or services in your directory.
As a result, you and other business that list on your site will get to present their services or products to a more targeted audience that are more likely to take action.
2. Everything For A Solution In One Place
Similar to business value, it also adds value for prospects as they are likely to find everything they need in one place.
For example, you could have a directory of apartments for rent, homes for sale, properties for lease, etc. At the same time, you could have a listing of realtors that prospects could contact locally. Here, if a potential customer enters the website, he will get all the options he needs and may not need to look elsewhere.
3. Highly Scalable For Any Niche
If you plan it well and put some effort into reaching the right people to list their products/services/businesses on your website, it is possible to grow into a large credible directory that people may trust.
4. A Good Way To Earn In The Long Run
A good directory website has the ability to generate high revenue through affiliate commissions and advertisement placement earnings.
Once you grow to become credible, you will see that people will start reaching out to you to list their products/services/businesses on your directory site.
At that point, you may plan to monetize your efforts by charging for advertisement placements, asking for premium placement in the list, and affiliate commissions.
This will ensure you get continuous earnings in the long run.
5. Unique Strategy To Promote Your Business
Most people think that only individuals run directory websites to make money out of commissions or sponsorship fees. But that is not the only way you can make money out of them.
As a business in the same niche, you will be able to control how much exposure you get when people visit the website.
Let’s go back to the example of a real estate directory website.
If you are a realtor, then you could have a directory of several listings of other realtors. At the same time, you could include your property listings as well. Then, allow the option of sorting according to the location that you serve. This will help people to filter out other listings and find houses in your area. Since you are in control of this site, you can easily prioritize showcasing your listings to prospects more often than others.
6. Opportunity To Collect Leads Actively
A wise thing with your directory site would be to reshuffle and update the listings every now and then. This will ensure people are interested to visit more often to find out what’s new.
You could take advantage of this by insisting people subscribe to a weekly or monthly digest where you will give them updates on the listings on a regular basis. All you have to do is initiate a pop-up to humbly as the visitor to subscribe and tie it to an email automation tool to send out regular emails with updated listings and valuable content – a great way to collect leads in a targeted niche.
7. A Chance To Turn It Into A Private Community
In the long run, you would want to get in a position where people will trust your listings with confidence.
At that time, you may start compiling the directory with additional valuable content, such as hosting podcasts on the niche, arranging webinars with industry experts, and even adding a section to list courses from niche experts.
When you have these going, you could easily turn this into a member-only community and even charge a small monthly fee for people to be part of the community.
Now that you’ve learned the benefits of creating an advanced directory let us see how you can create one yourself in WordPress easily.
How To Create An Advanced WordPress Directory Website Powered By Email Marketing
First, you will need to have the right tools that are reliable and can ensure longevity (as this is a website you would want to maintain for a long time).
= Tools Required To Build A Directory Website In WordPress =
- Directorist – a renounced WordPress directory plugin
It is an easy-to-use plugin that comes with several amazing features that will help you give you full control in planning an advanced WordPress directory website easily. The plugin is developed by the brilliant WPWax team and has over 10k users.
- Mail Mint – easy-to-use email marketing automation plugin for WordPress
This is one of the easiest email marketing plugins you will find in WordPress and is perfect for helping you collect leads and send well-planned emails to your prospects with your best listings and promotions.
Once you have these tools, now let us get into the step-by-step process of creating a WordPress directory site.
1. Creating A Directory Website In WordPress
To help you understand this guide better, let’s assume you are creating a car directory website.
Follow the steps below to craft a good directory site.
Step 1 – Planning Your Target Niche
The first step to creating a directory website would be planning the structure of your site.
In that regard, you need to define the niche you are targeting,
As per our example, we are targeting the automotive industry – cars directory to be more specific.
Next, you need to define which category of listings you want to aim for, i.e., who do you want to list from your niche.
So, it could be
- Car Brands
- Car Models
- Car Dealers & sellers
- Car Rental Services
- Automotive Repair services
- Reviews Of Cars From Experts
Step 2 – Install And Activate Directorist
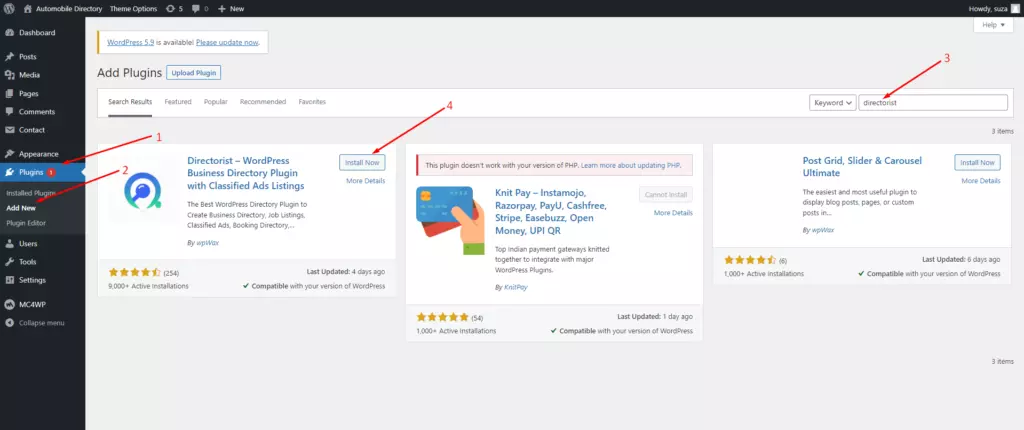
Now, go to your WordPress Dashboard > Plugins > Add New and search for Directorist (free version).
Then, install and activate it.
Step 3 – Configure Your Directory Plugin
Now, go to the settings of your directory plugin and configure it according to your requirements, such as the directory layout, search options, and submission guidelines.
Step 4 – (Optional) Use A Recommended Theme To Optimize Appearance
Directorist is compatible with almost all themes, but you may consider using one of the recommended themes by the WPWax team for the best output.
Step 5 – Create Categories & Tags For Your Directory Site
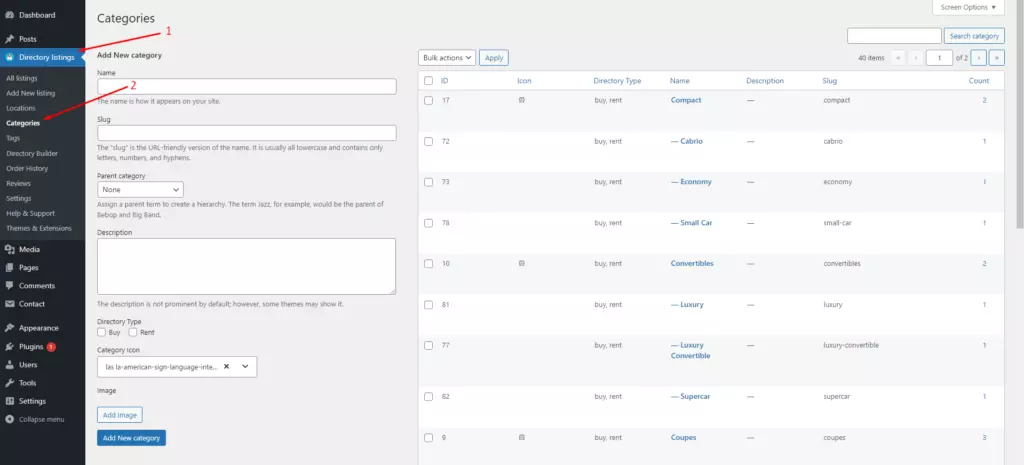
As discussed earlier, you now have to create categories so that you can organize your listings.
Directorist will allow you to define tags and categories, create child categories, and add descriptions to these categories.
You would want to add the categories you decided earlier.
To add categories, go to Directory Listings > Categories.
Here, first, fill out the fields and then click on Add New Category.
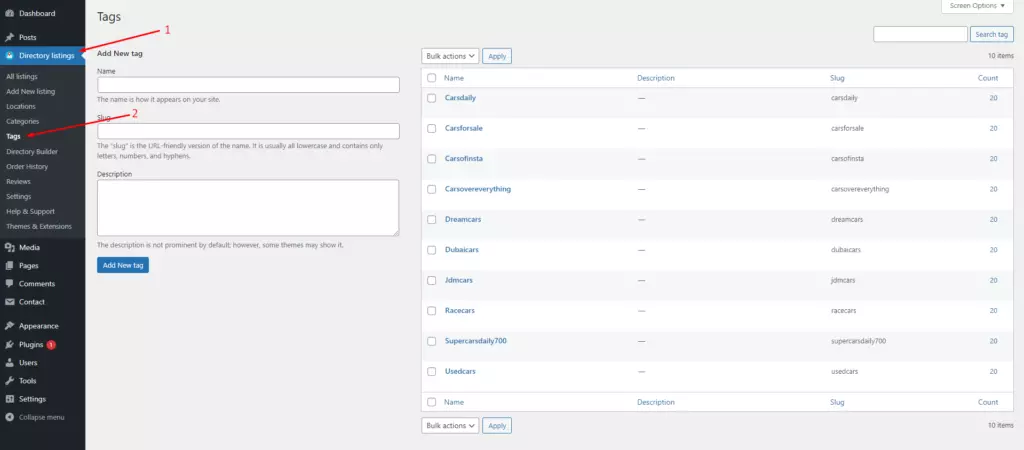
Next, to add tags, go to Directory Listings > Tags.
Fill out the fields and then click on Add New Tag.
Step 6 – Add Target Locations That Your Directory Is Applicable For
This is an important step because you would want the right prospects to be able to find your directory website.
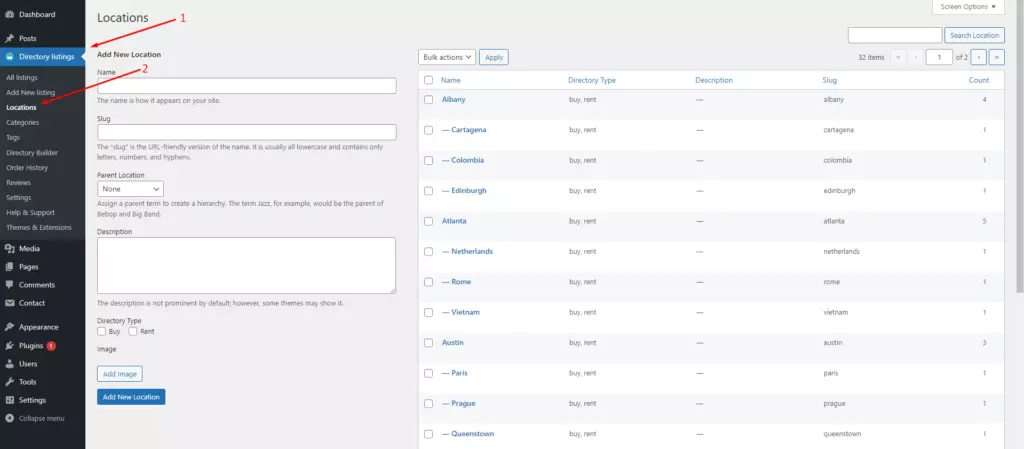
Navigate to Directory Listing > Locations
Fill out the required fields and click on Add New Location.
Step 7 – Enable listing submission
The basics are set up. Now, create a way for people to submit listings to your directory.
You would want to use an “Add Listing” on your website where people will get a form to submit their listings.
This you can customize to make it optimized for submitting the listing on the various categories (you defined earlier for your cart directory site).
Here’s how it works:
Step 8 – Determine Ways To Monetize
You will be able to monetize your directory listings in various ways. Here are a few ideas:
- Charge for listings
- Featured listings
- Paid branding with listings
- Paid private listings
- Sponsored advertising
- Paid memberships
- Affiliate links on listings (for commission)
- Sponsored articles/guest posting
- Integrated booking forms
- Paid Ads placement
- Host sponsored webinars/interviews/live sessions
- List and sell your own products/services
Step 9 – Add Payment Gateway For Directorist
In the free version of Directorist, you will be able to enable offline bank transfer method to receive payments.
To do so, go to Directory Listings > Settings
Here, go to the Monetization tab and select Offline Gateways Settings.
Then, insert your details and click on Save Changes.
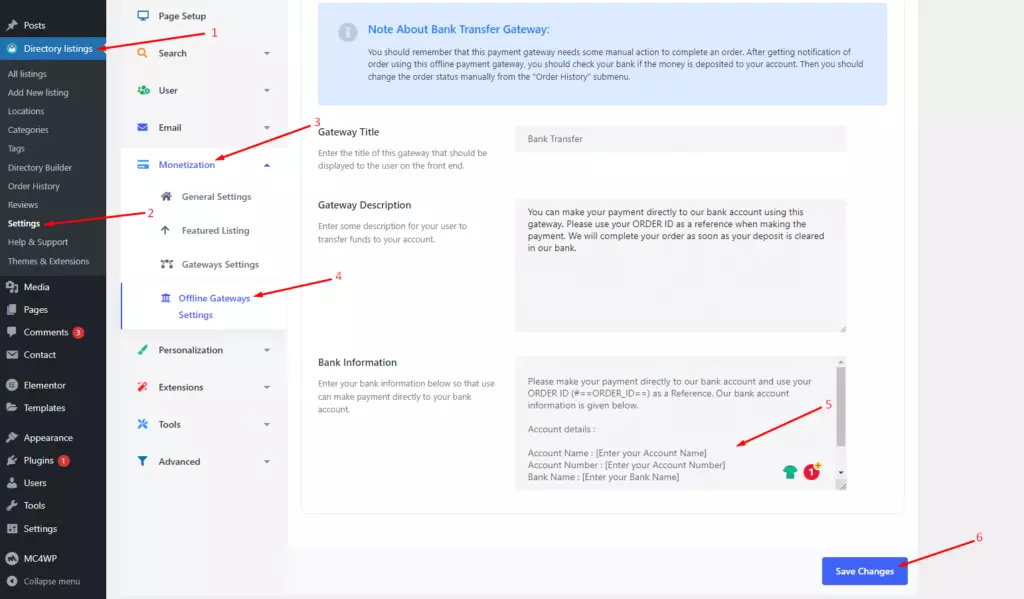
To use online payment methods, you will need Directorist Pro. Then, you will have to go to the Gateway Settings tab to set up the payment options.
Step 10 – SEO Optimize Your Directory Website
Now, your car directory website is ready.
You need to start planning to optimize the website for SEO to get organic traffic.
Make sure to optimize the whole website around keywords related to your target niche and the categories you are targeting.
For example, the keyword “car dealers,” specific car brand names, terms describing cart types, etc.
You may write articles, optimize each listing with the keywords (keyword-specific title, meta tag, URL), and outreach to get backlinks from relevant websites.
An SEO plugin such as RankMath, Yoast SEO, or All In One SEO would be a great help here.
2. Setting Up Your Directory Site For Email Marketing
As mentioned earlier, collecting leads would be one of the best ways to enhance the performance of your site.
You will be able to promote more listings and have a ready set of leads who are interested in your niche. So you will have the option of promoting your business as well.
Let us see how you can use Mail Mint to collect leads and run email marketing campaigns to increase revenue & engagements in your WordPress directory site.
Step 1 – Install and Activate Mail Mint
For basic lead collection and email campaigns, you can use Mail Mint (free version).
Go to Dashboard > Plugins > Add New and search for Mail Mint.
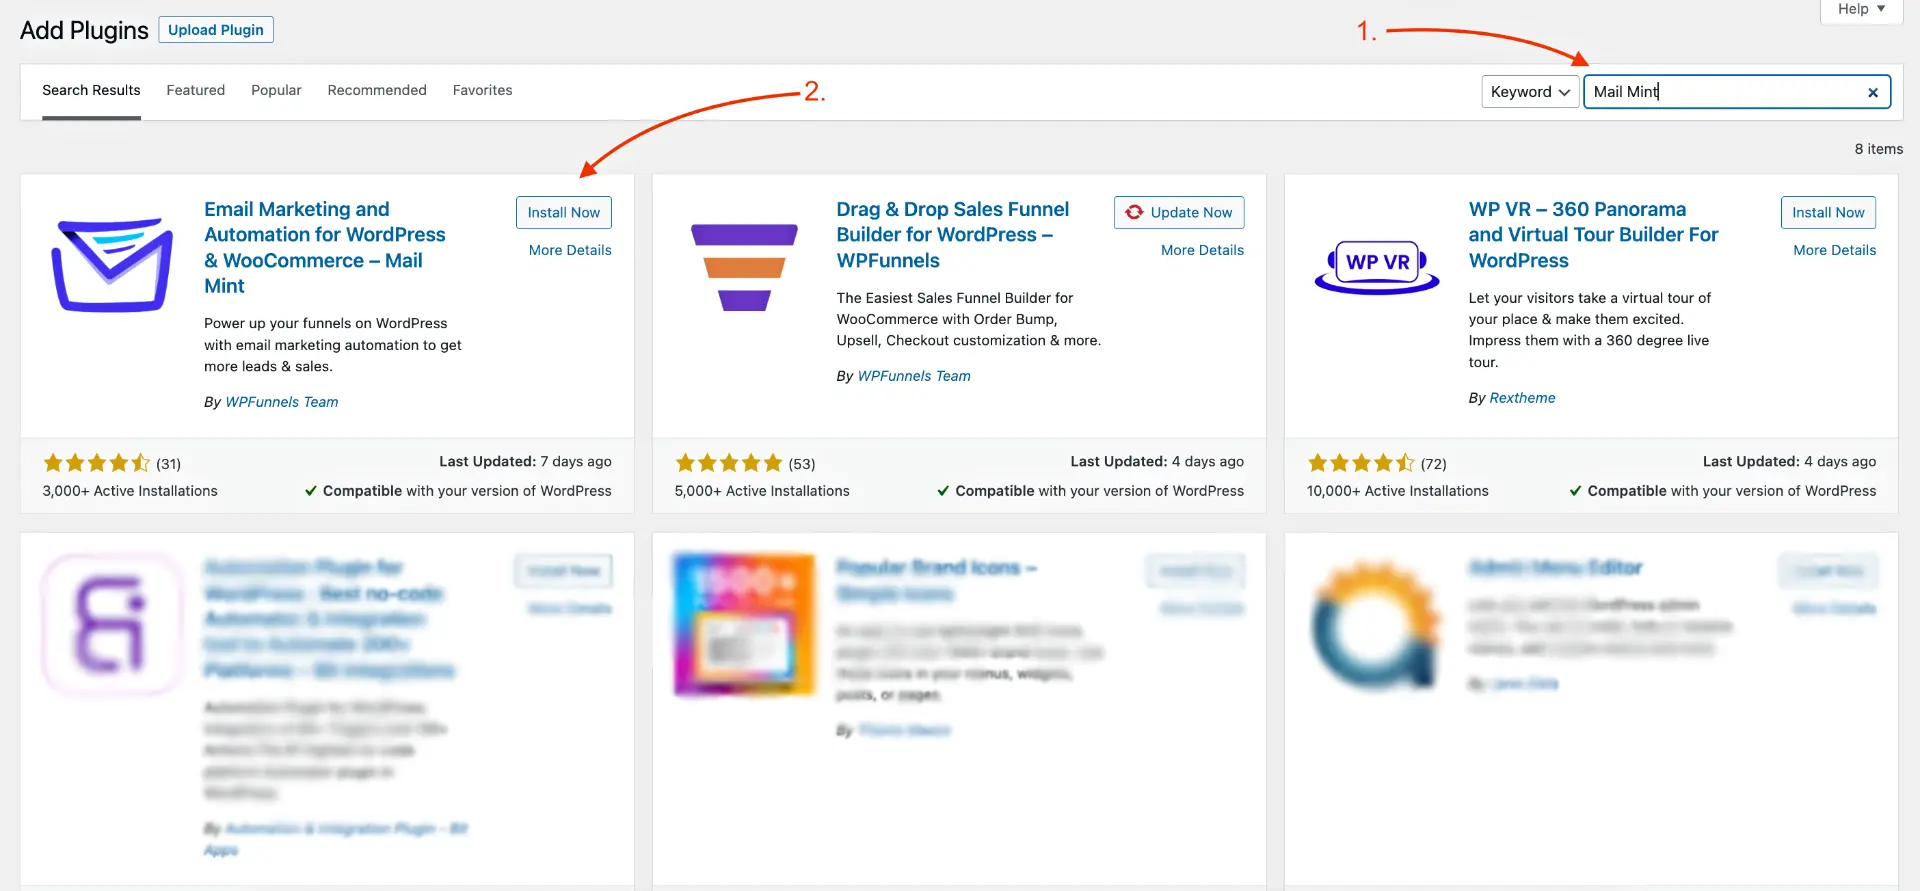
Go through the setup wizard to configure it.
**In some areas of the following steps, I will be using Mail Mint Pro in some areas. I’ll make sure to point it out when it’s a Pro future.
Step 2 – Create Tags & Lists In Preparation For Collecting Leads
You would want to collect leads and segment them so that you can run personalized email campaigns.
So, before you set up your lead form, create tags and lists with titles that refer to the categories you created in your directory plugin.
For example, you could create a list for people who are looking for Car Dealers with the list title “Looking For Car Dealers.”
To do so, go to Mail Mint > Contacts and go to the Lists tab.
Here, click on “Add New,” define it’s title & description, and then Click on Save.
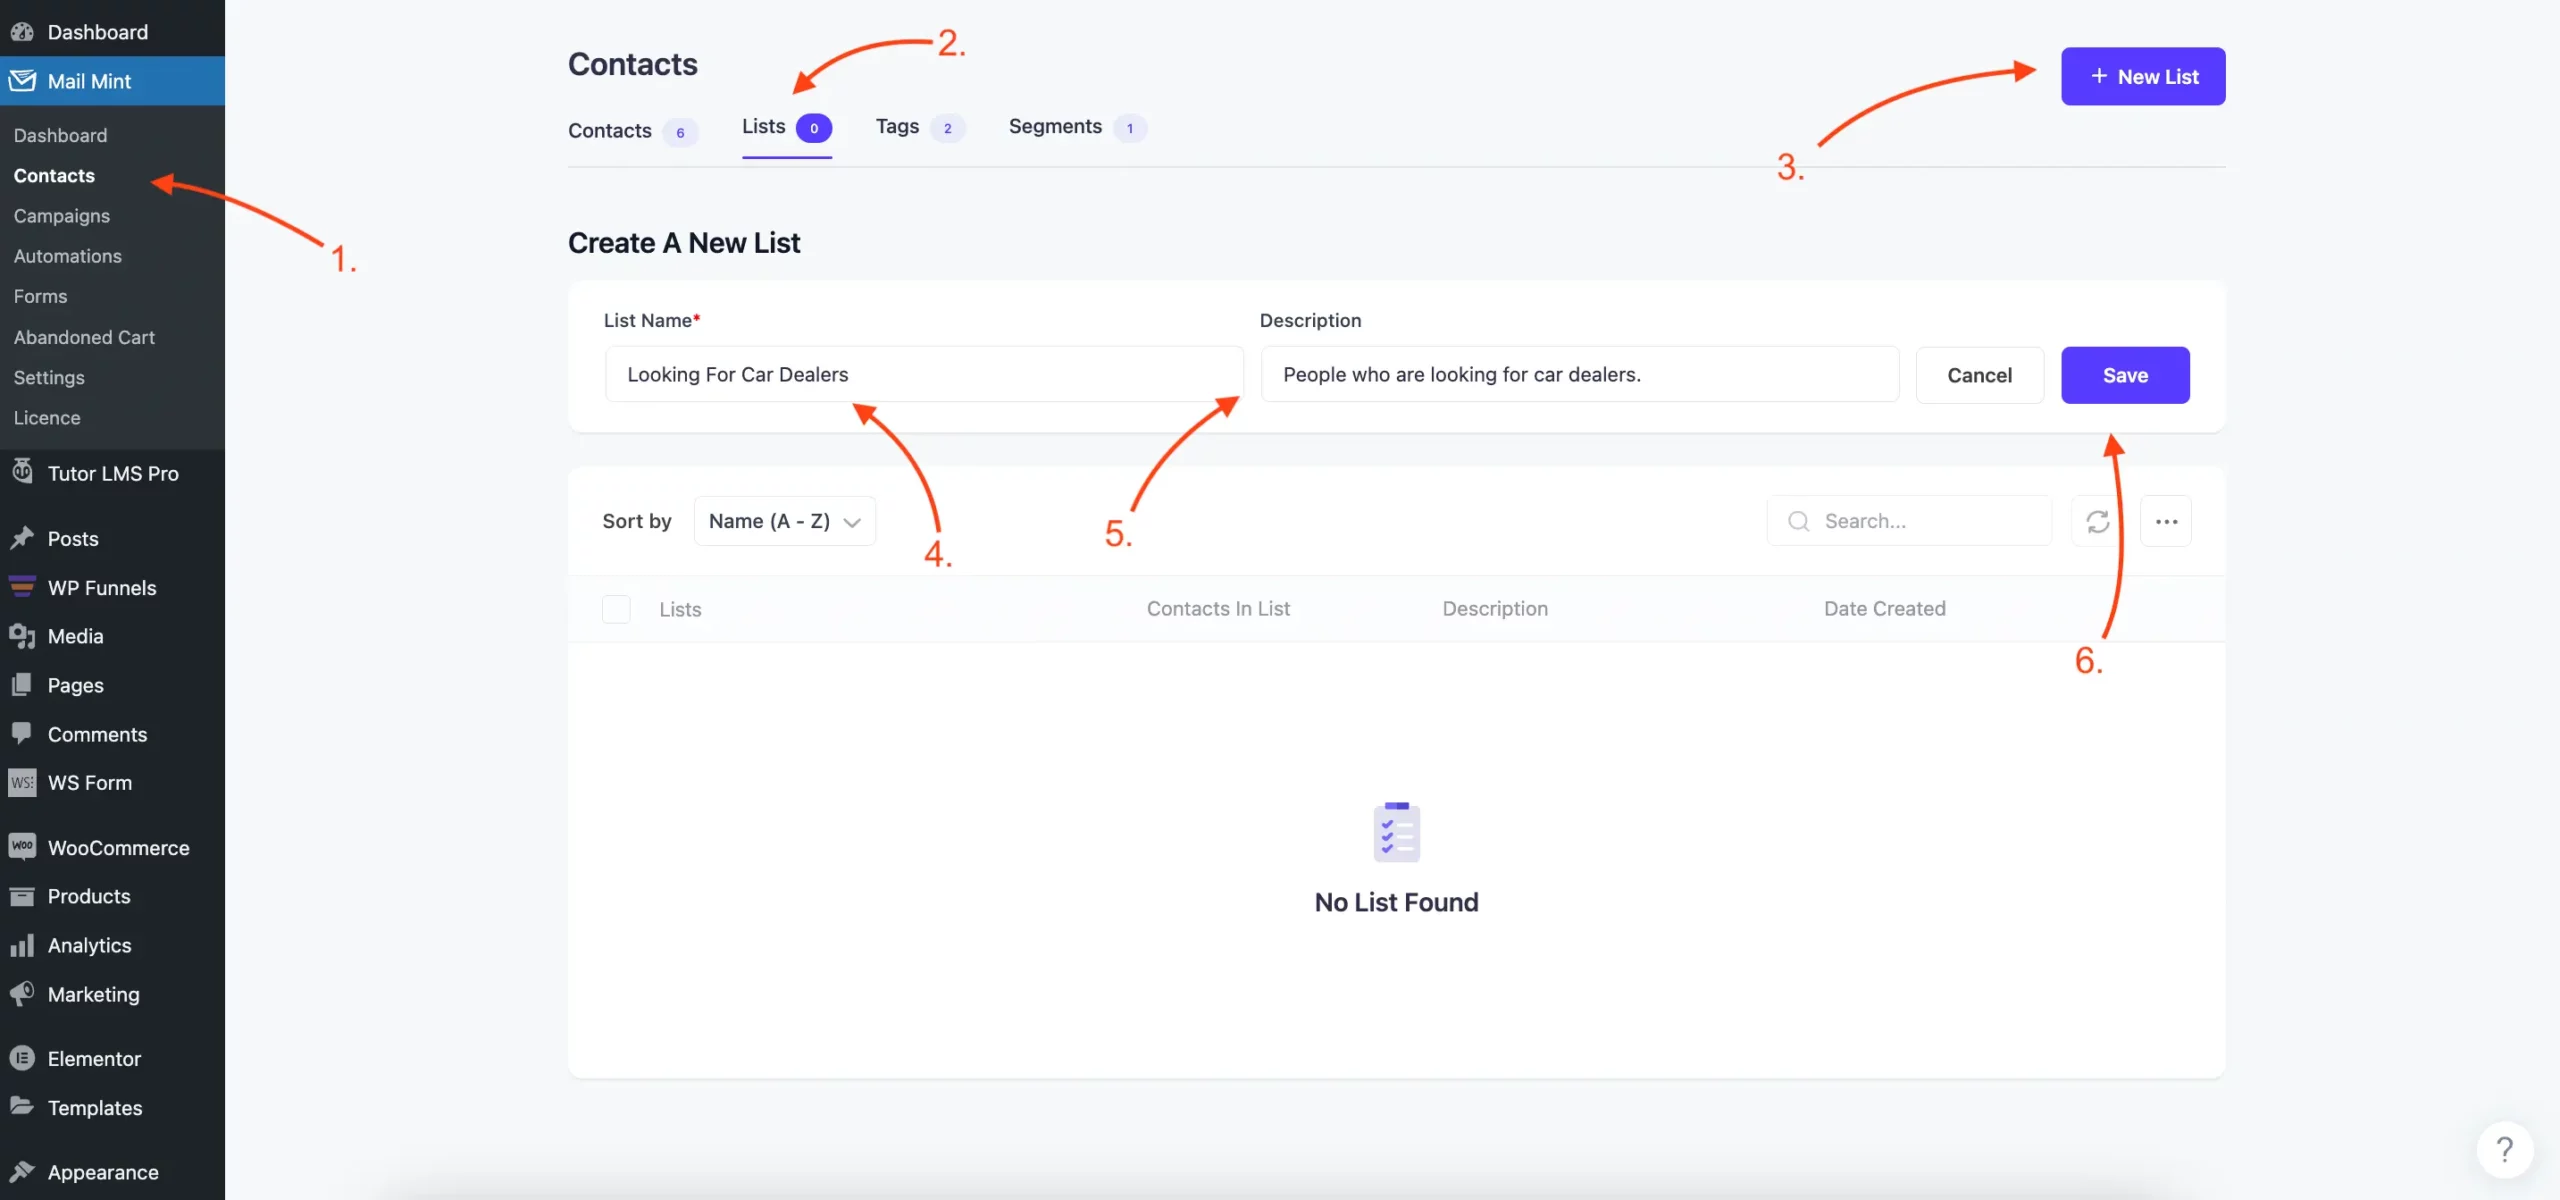
Similarly, you can add tags in the Tags tab.
Step 3 – Create Lead Forms To Collect Leads For Each Listing Categories
Now, create suitable lead forms in Mail Mint to collect your leads.
Go to Mail Mint > Forms and create a lead form.
Here, give a name to the form and design it however you want
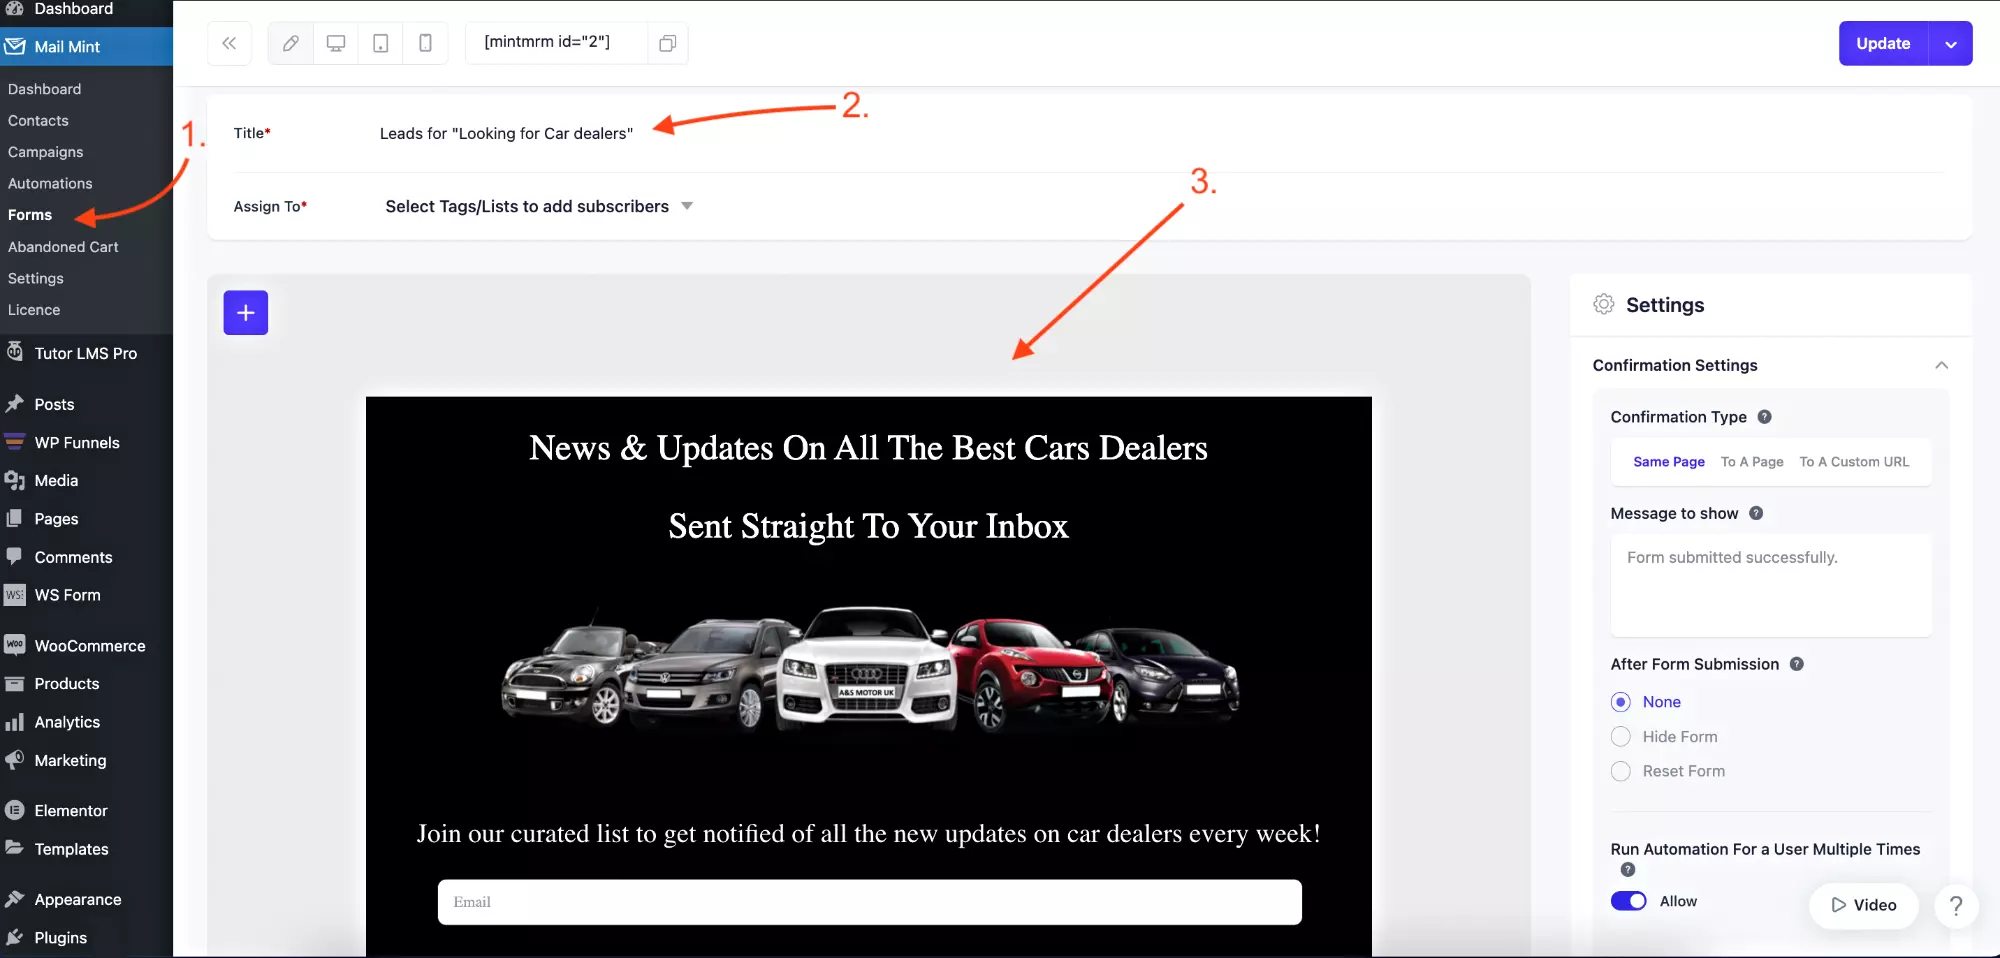
Then, assign it its respective category to design which list the leads will be added to after submitting the form.
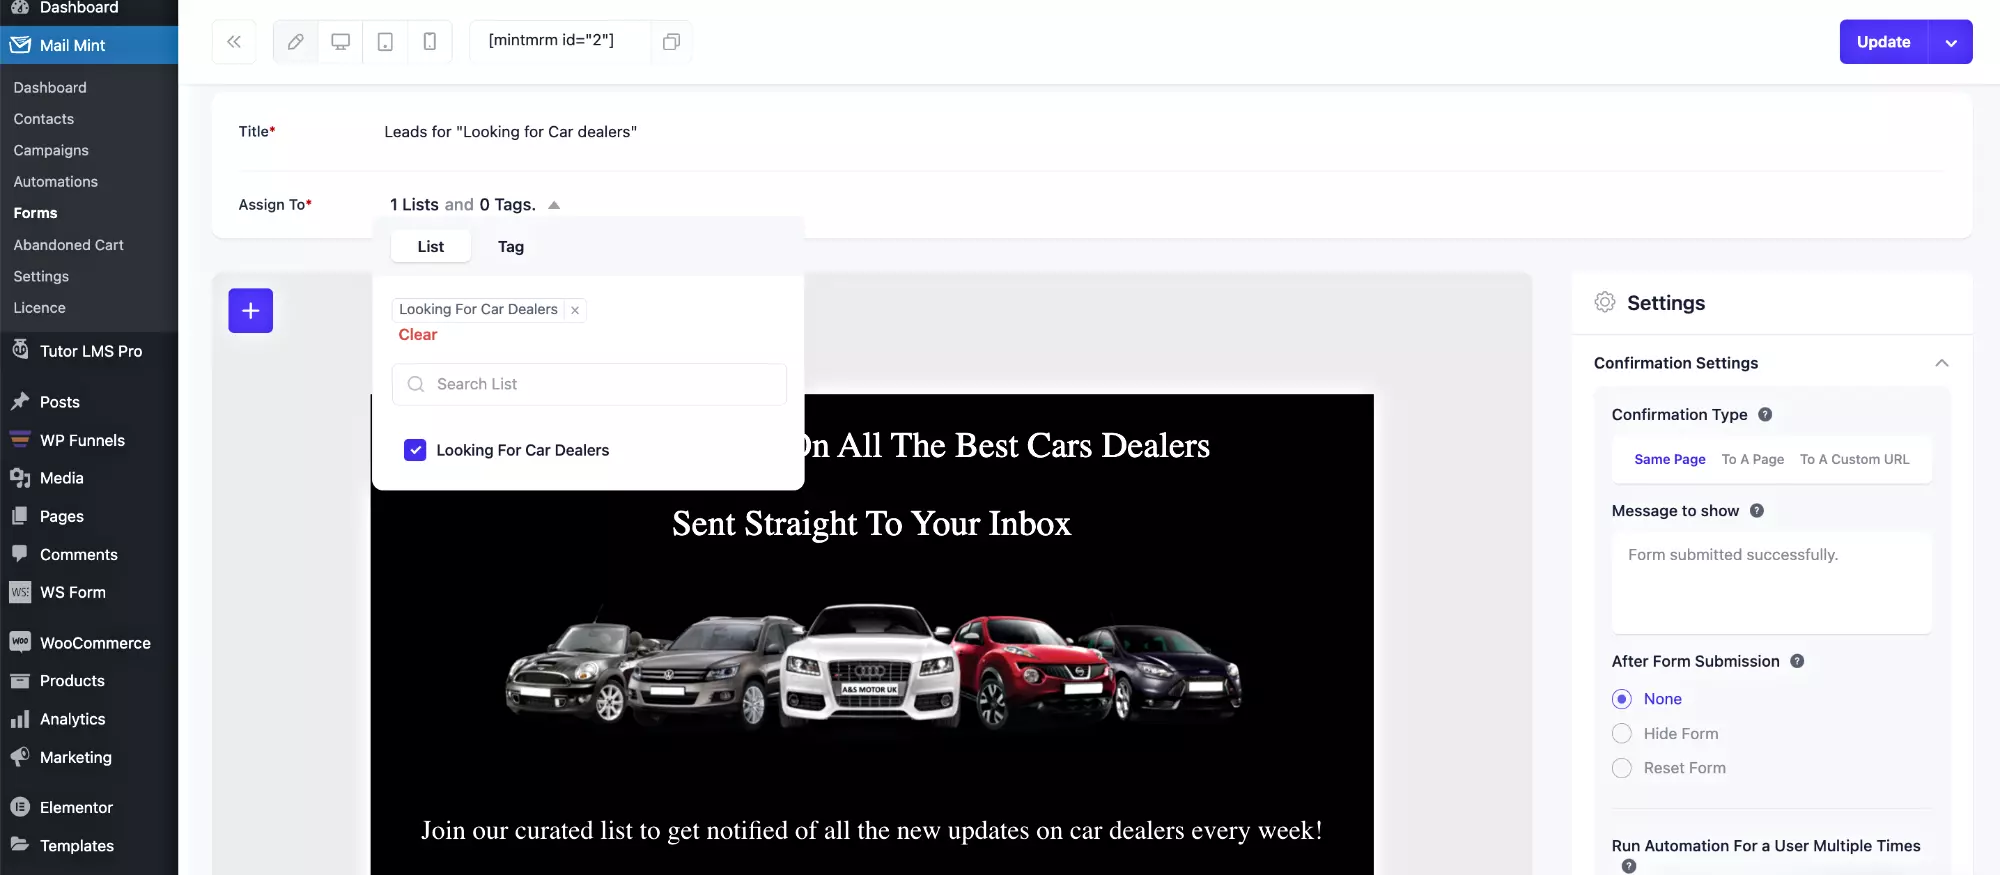
On the right, scroll down and assign form type to “Pop up.” Then click on Update.
Similarly, you may create forms for each of the categories.
Step 4 – Embed The Form On Relevant Listing Pages And Directories
Now, go to a directory page or a listing page and edit it.
There, embed the form using a shortcode (or, if you use Gutenberg, using the Mail Mint Form block) to embed the form.
When someone visits the page, this form will appear as a pop up.
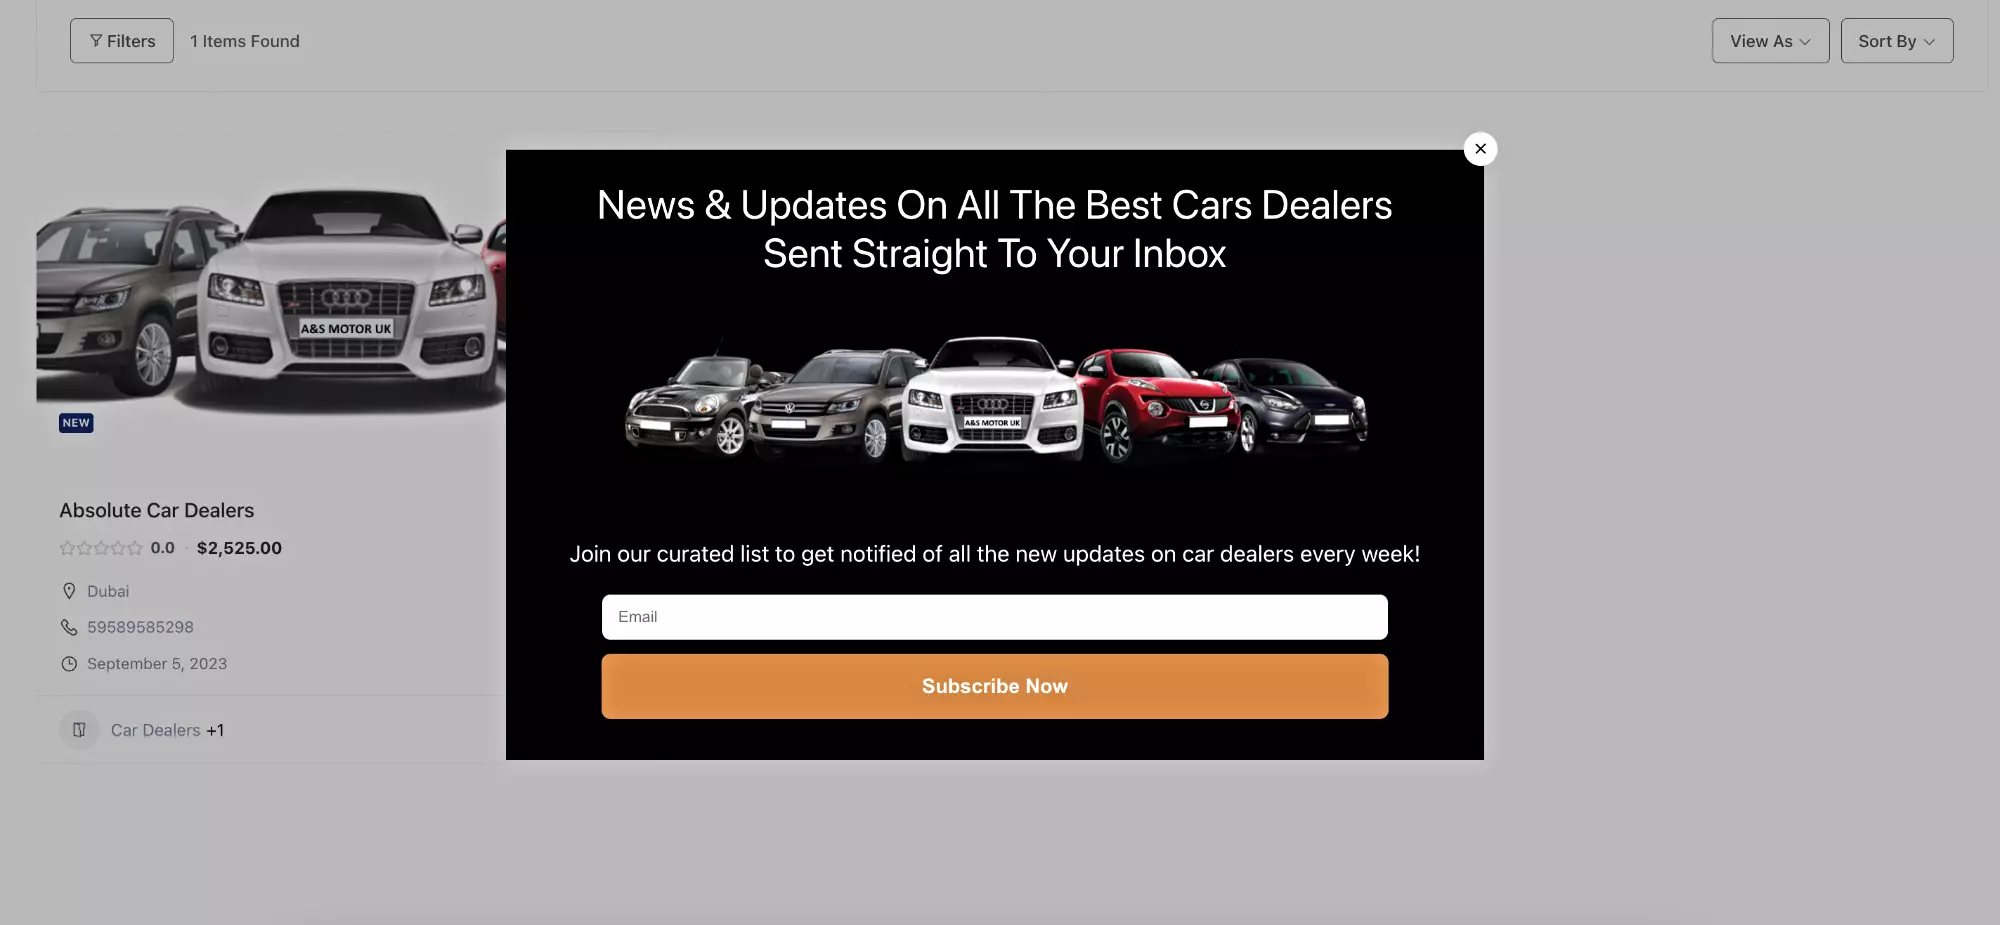
So, embed every form you create on the pages you want the form to appear. If it’s a meaningful form, people will subscribe.
Step 5 – Send Out Specialized Email Campaigns From Your Directory Website
Once you start getting leads, they will be added to specific lists on Mail Mint.
You can then run special email campaigns to highlight your best collaborations or partnerships for the listings.
For example, let’s say you had 3 car dealers who agreed to go for the featured listing sponsorship. In this case, you could highlight these dealers in an email campaign as an extra privilege.
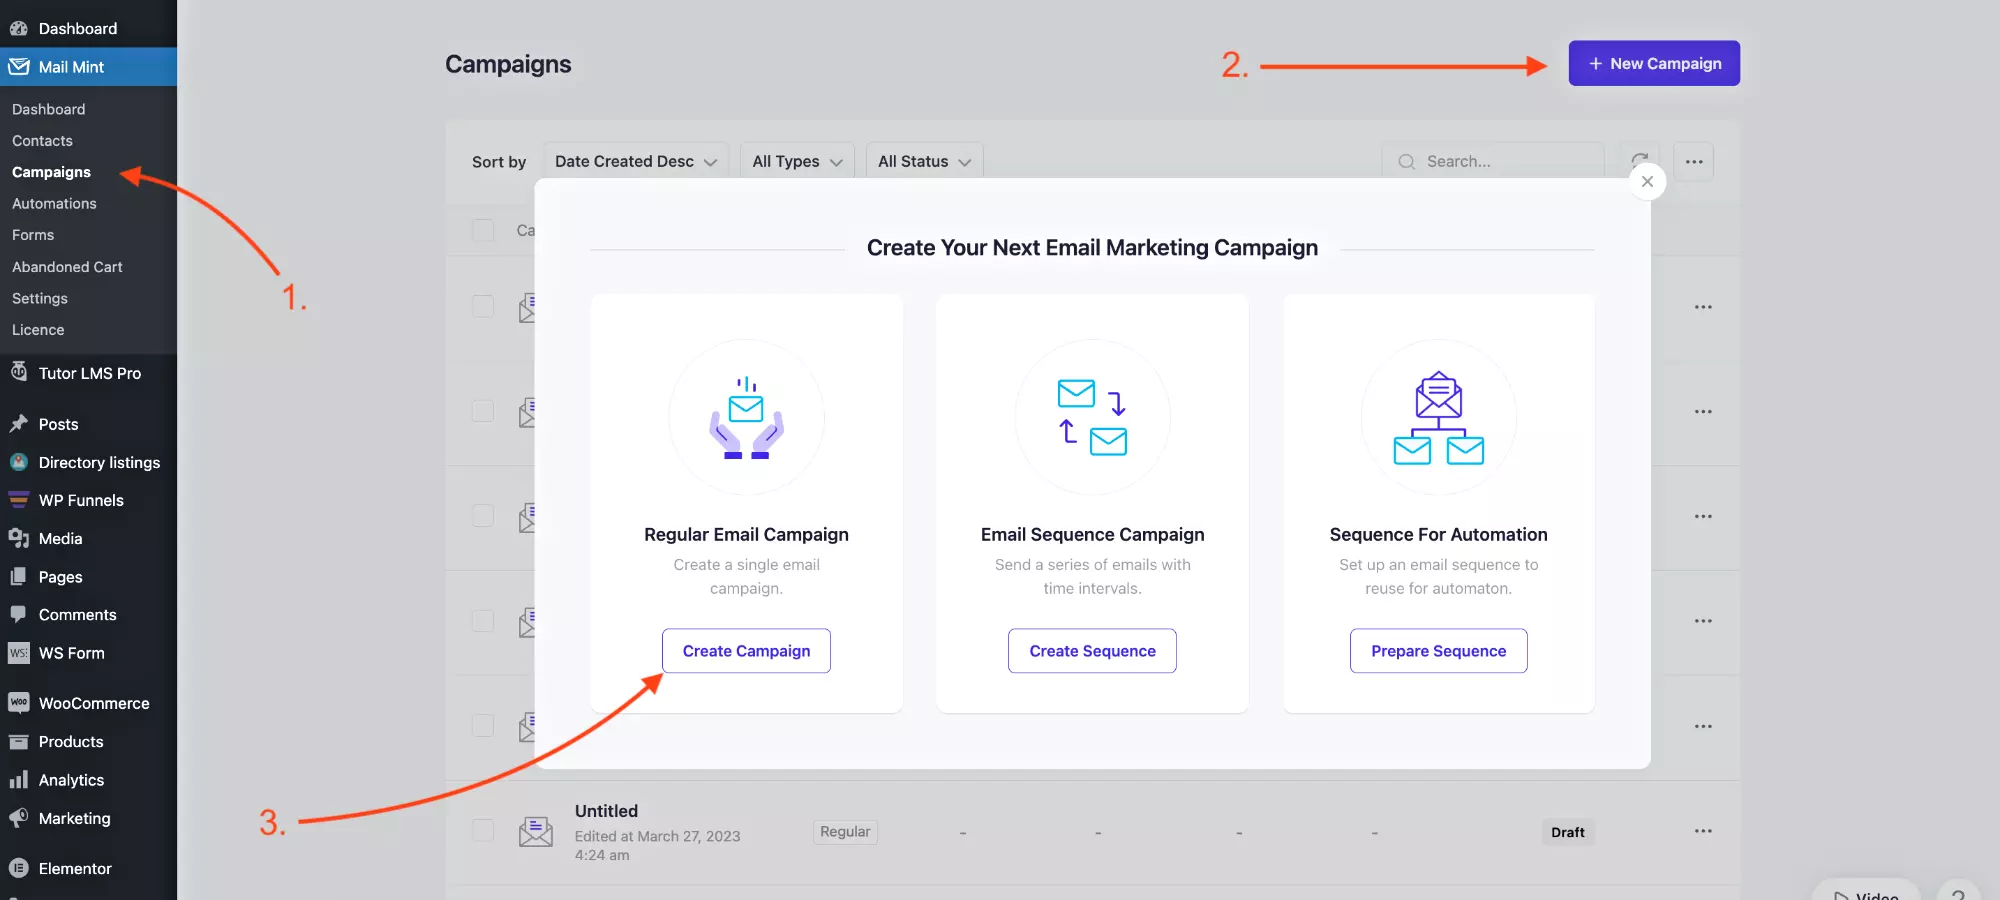
Simply go to Mail Mint > Campaigns and create a new Regular Campaign.
Now, configure the email. Set a campaign title and then assign the list where you want to send this email. Next, set a good subject line & preview text.
Also, assign the correct name and email for “From” & “Reply To.” (This should already be configured correctly if you have gone through the setup wizard of Mail Mint.)
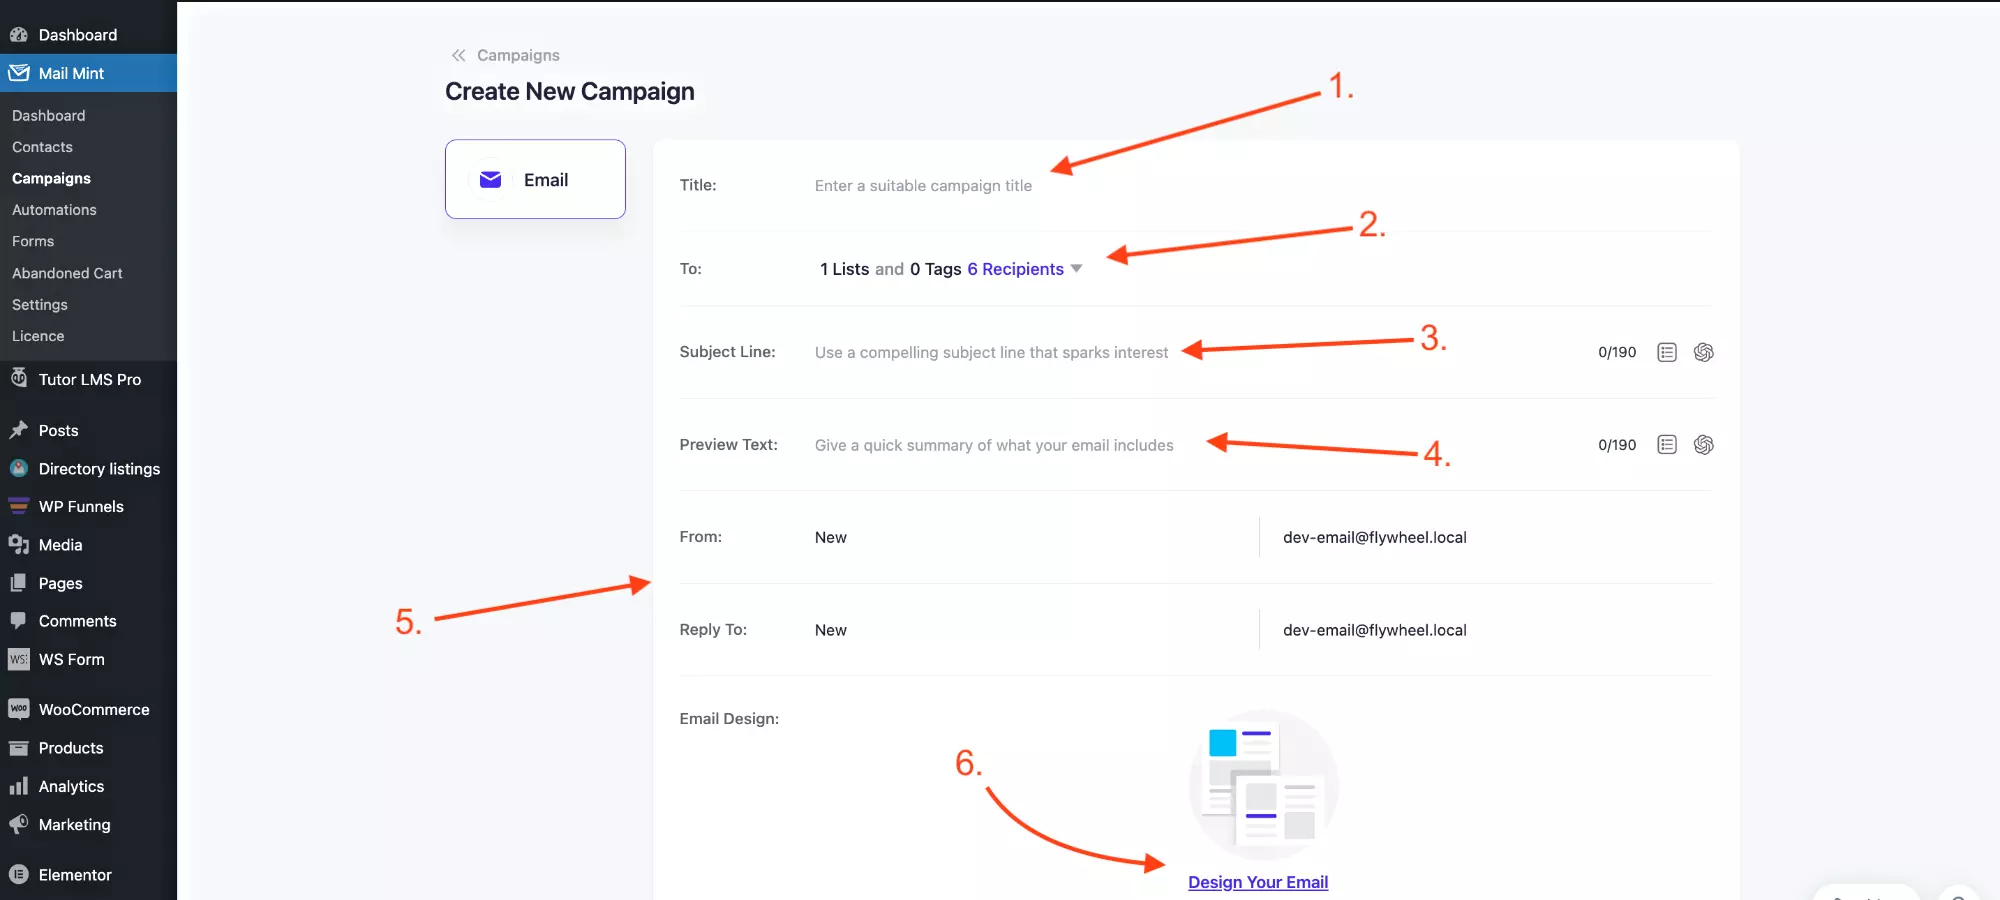
Click on Design Your Email and choose a template, or start from scratch.
Then, design the email using a visual block editor.
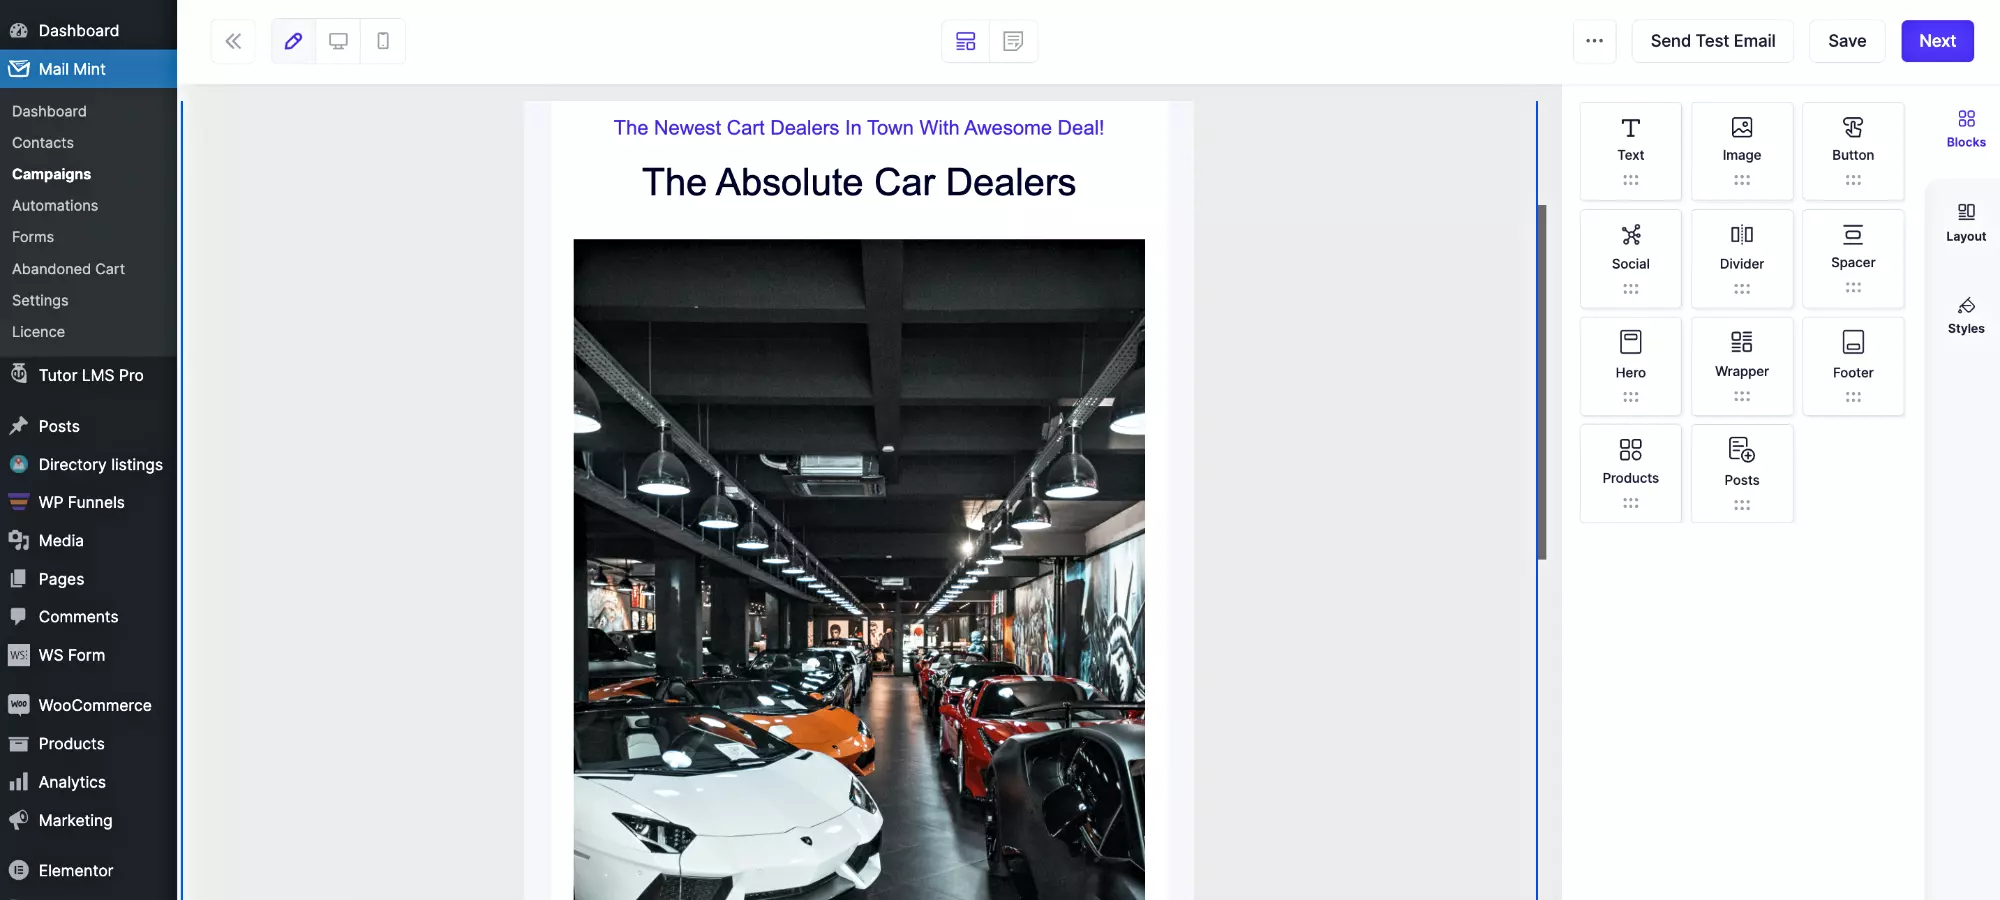
Once ready, click on the “Next” button on the top right corner to send test emails to yourself to confirm.
And then send or schedule the email.
Step 6 – Set Up Promotional Welcome Emails Upon Form Submission (requires Mail Mint Pro)
In Mail Mint Pro, if you go to the Automation tab, you will notice a lot of pre-built recipes or the option to create one from scratch.
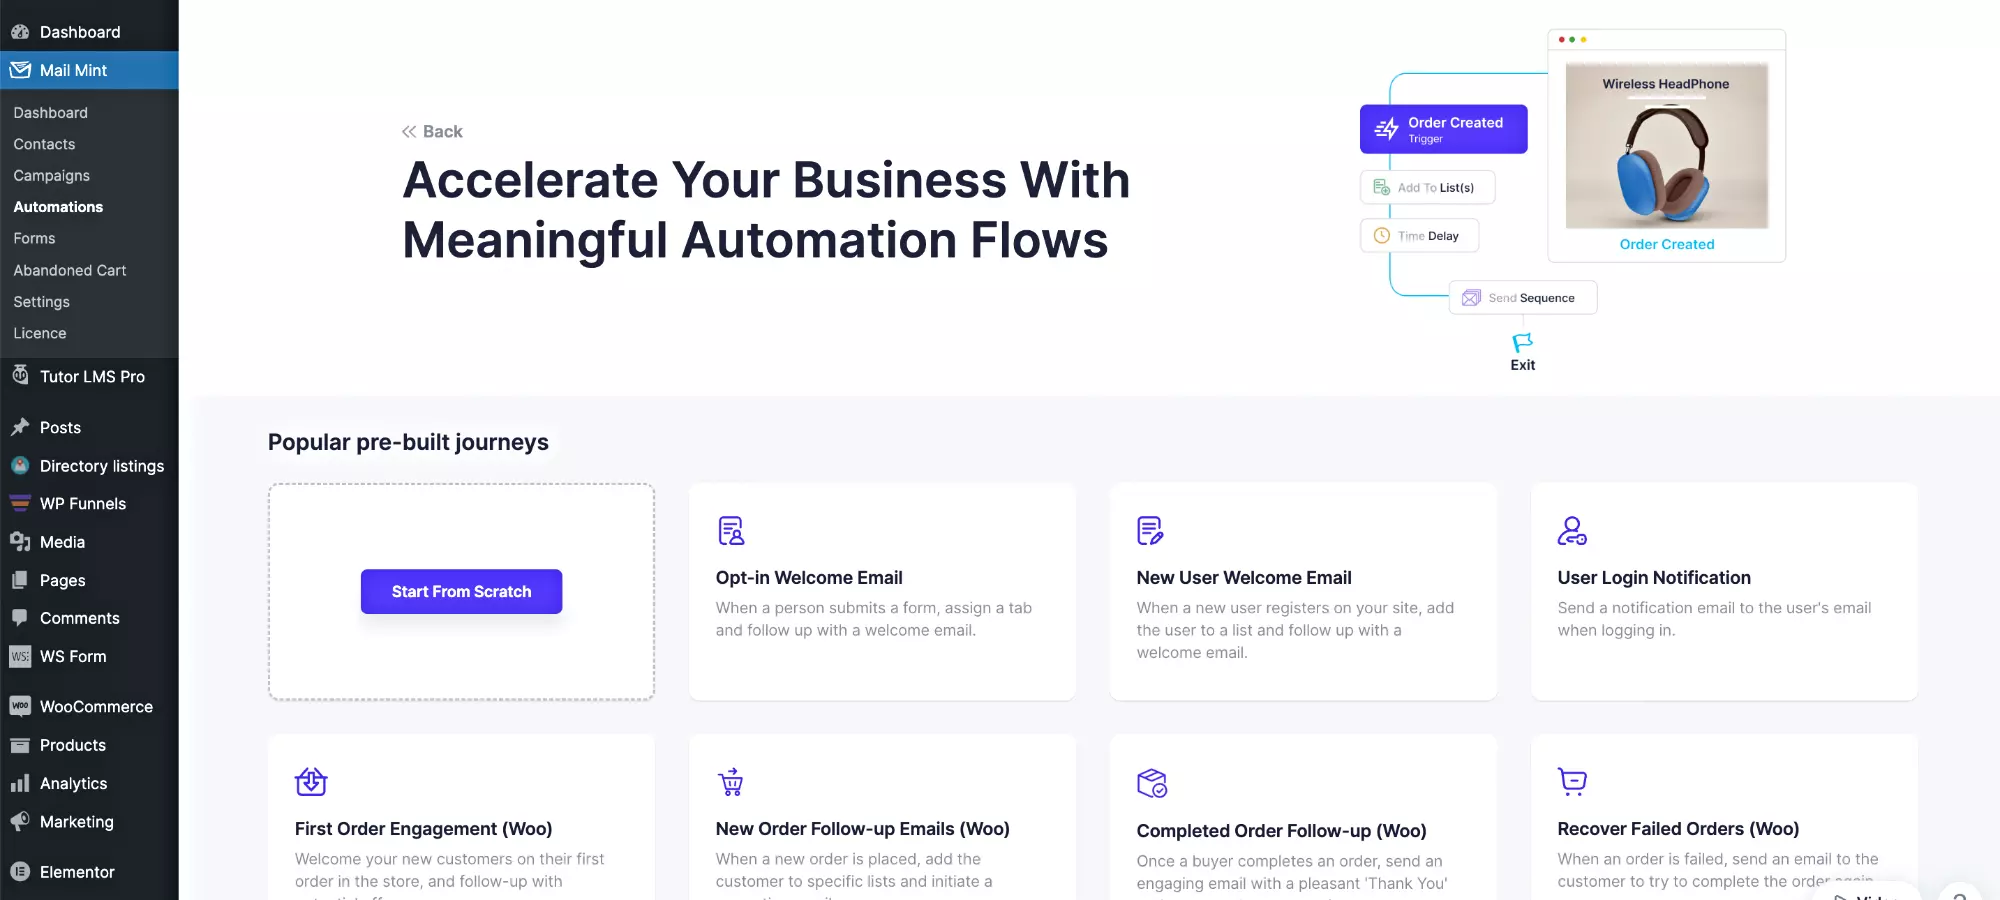
Whichever you choose, you will be taken to an automation flow creator. Let’s import the Opt-in Welcome email recipe.
Here, you have to configure the Form Submitted trigger by assigning the Form you created earlier. Simply select the trigger, and the option to choose your form will appear on the right.
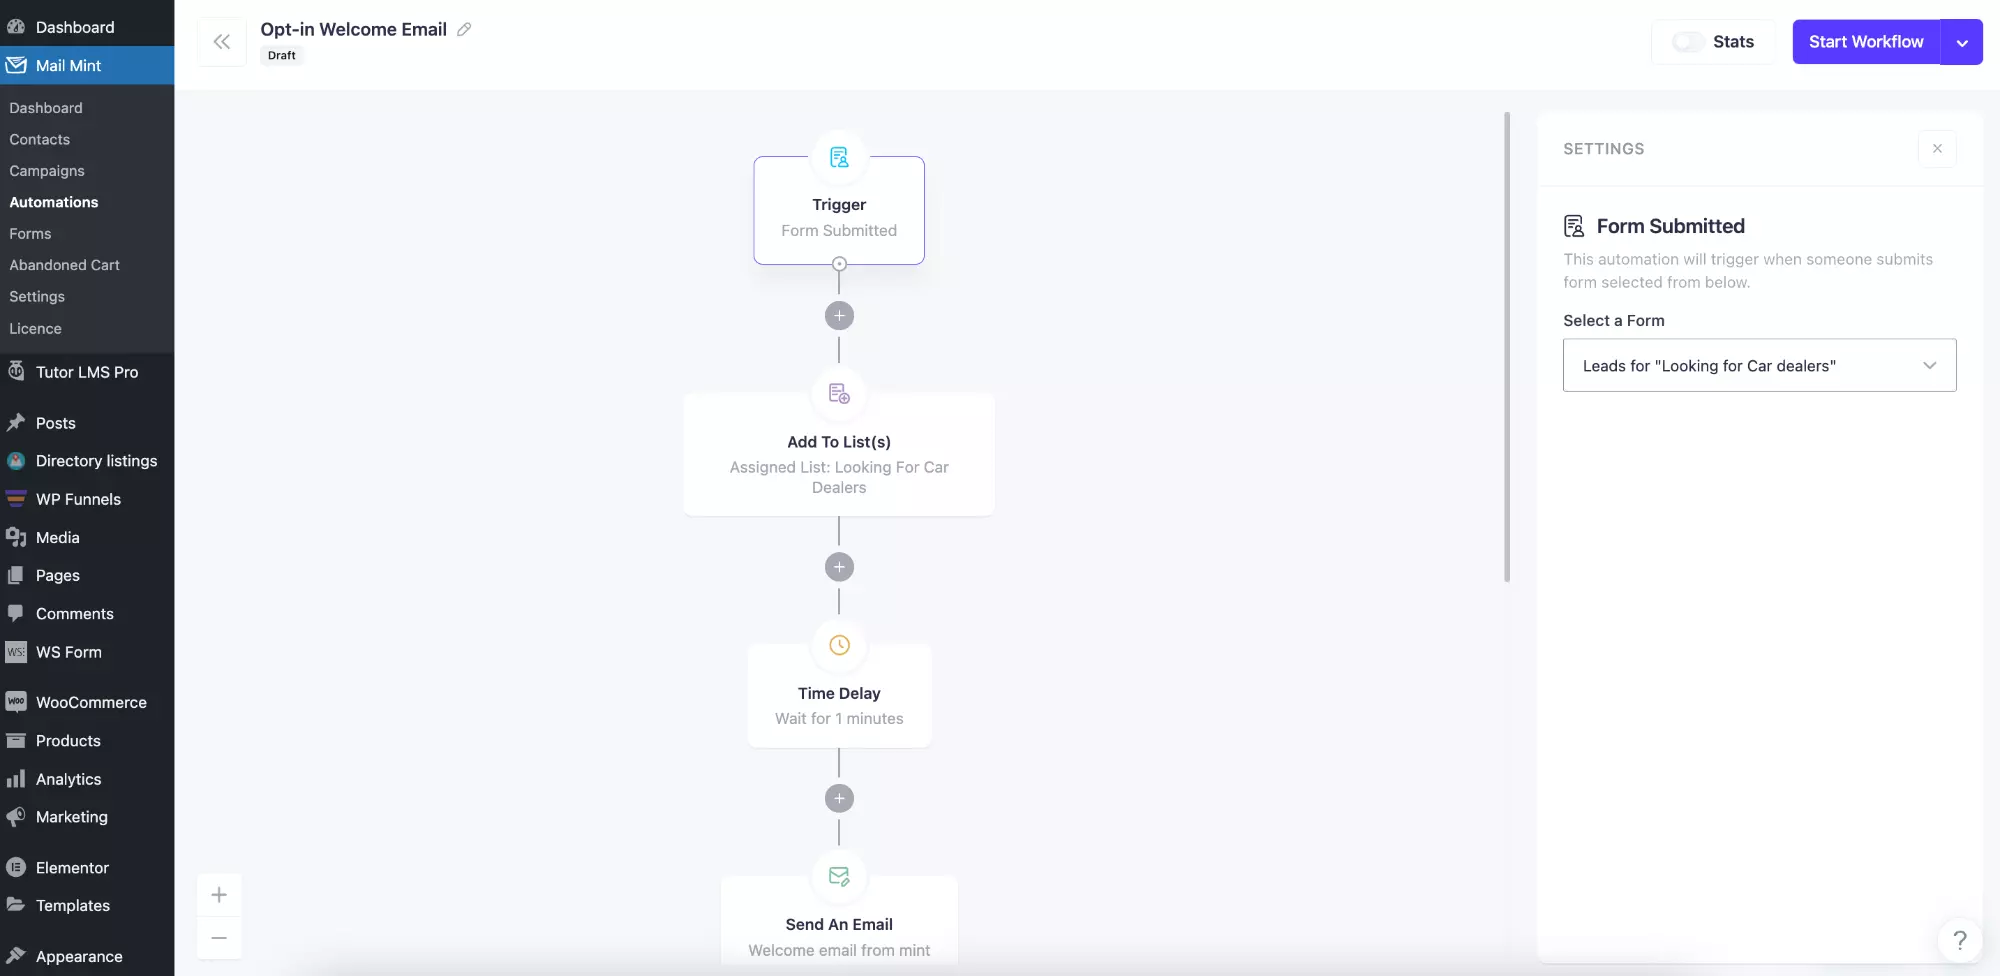
This indicates that this automation will be triggered whenever that form is submitted.
And then, you have to configure the actions and emails to craft a proper automated flow for your WordPress directory website. Following is a glimpse of a two-email welcome series I have created.

And that’s it.
Do the same for the rest of the listing categories as well.
Final Thoughts
There you go. You just saw how easily you can create a directory website in WordPress and enhance conversions using email marketing.
Do keep in mind you have to work on updating your directory list on a regular basis if you want the best results. So, make sure to invest in reaching out to popular businesses or services to have them listed to get some early traction. Once you become a credible directory site, you will start getting queries from others automatically. That’s when the real business will begin.
Also, you just saw that Directorist and Mail Mint work together quite well. Hence, we recommend you try using these to plugins to create your next WordPress directory site.
- Get Mail Mint
We’re excited to offer you a coupon code, CODEREX20
If you use this during the checkout, you’ll get an exclusive 20% discount on Directorist!


![Complete Guide To Email Marketing Analytics - What to Measure and Why It Matters [2024] 39 email marketing analytics](https://getwpfunnels.com/wp-content/uploads/2023/09/email-marketing-analytics.webp)

![Essential Parts Of An Email - Anatomy & Best Practices [2024] 49 Essential Parts Of An Email - Anatomy & Best Practices](https://getwpfunnels.com/wp-content/uploads/2023/12/Essential-Parts-Of-An-Email-Anatomy-Best-Practices.webp)

