

If you’ve been doing email marketing for your WooCommerce store, you’ve probably realized one thing…
Sending more emails doesn’t always mean more sales.
You might have a campaign that brings in a great response, and then the next one barely gets any clicks. After a while, it starts feeling like you’re guessing more than you’re growing.
Can you relate…?
From what I’ve seen working with WooCommerce email marketing, the stores that consistently generate revenue from email aren’t necessarily sending more campaigns.
They’ve built the right email marketing funnels, so customers receive the right email at the right time.
So if you’re here, I’m guessing you want to know which funnels are worth building first and how to set them up.
That’s exactly what this guide is about.
In this guide, I’ll break down the email marketing funnels that actually matter for WooCommerce stores, explain when to use each one, and show you where to start. By the end, you’ll have a clear roadmap instead of another list of ideas to test.
So, let’s begin.
Quick Answer: The most important email marketing funnels for a WooCommerce store are the Welcome Funnel, Cross-Sell & Upsell Funnel, Abandoned Cart Funnel, Post-Purchase Funnel, Product Restock Funnel, and Win-Back Funnel. Each funnel serves a different purpose, helping you engage customers at the right stage of their journey and generate more revenue from your email marketing.
TL;DR Ecommerce email marketing funnel
- Learn the 6 email marketing funnels every WooCommerce store should build.
- Understand when each funnel should be triggered.
- See which funnel to build first based on your goal.
- Avoid the common mistakes that reduce email conversions.
- Follow a practical setup process you can implement with any WooCommerce email marketing plugin.
How Do I Choose the Right Email Marketing Funnel Based on My Goal
Before we break down the six funnels one by one, here’s the approach I’d take.
If I were starting from scratch, I wouldn’t build every funnel just because it’s on the list.
I’d start with the one that’s solving my biggest revenue problem. Once that’s working, I’d move on to the next one.
A simple way to figure that out is to ask yourself one question:
What’s stopping my store from making more revenue right now?
Your answer will usually tell you which funnel deserves your attention first.
| If your goal is… | Start with… |
|---|---|
| Get more first-time purchases | Welcome Funnel |
| Recover abandoned checkouts | Abandoned Cart Funnel |
| Increase average order value | Cross-Sell & Upsell Funnel |
| Turn one-time buyers into repeat customers | Post-Purchase Funnel |
| Sell products as soon as they’re back in stock | Product Restock Funnel |
| Bring inactive customers back | Win-Back Funnel |
For example, if your store gets plenty of traffic but shoppers keep abandoning their carts, I’d focus on an Abandoned Cart Funnel before anything else. But if customers are already buying and rarely coming back, I’d put my effort into a Post-Purchase Funnel or a Win-Back Funnel.
There’s no perfect order that works for every WooCommerce store. It all comes down to the problem you’re trying to solve.
Once you’ve identified that, picking your first funnel becomes much easier.
Now let’s go through each funnel one by one so you can see when to use it and what role it plays in your email marketing.
6 Types of Email Marketing Funnels for Your WooCommerce Store
Every email funnel has a different purpose. Some help you recover lost sales, others build trust, increase repeat purchases, or bring inactive customers back. You don’t need to build all 6 on day one. Start with the one your store needs most, then add the rest as your email marketing grows.
1. Welcome New Customers
The first few days after someone places their first order are when they’re most likely to open your emails and interact with your brand. It’s the perfect time to reassure them that they made the right decision and start building a long-term relationship.
Instead of sending only an order confirmation, use this opportunity to introduce your brand, set expectations, and make the customer feel confident about buying from you again.
A simple three-email sequence could look like this:
Email 1: Welcome & Order Confirmation
Send: Immediately after the purchase
Thank the customer for their order, confirm the purchase, and let them know what to expect next.
Example:“Thanks for your first order! We’re getting everything ready and will send you another email as soon as it ships.”
Email 2: Build Trust
Send: 2–3 days later
Share your brand story, customer reviews, or helpful resources related to what they purchased.
Example:“While we’re preparing your order, here’s how other customers are using our products, along with a few tips to help you get the best results.”
Email 3: Encourage the Next Purchase
Send: Around Day 7
Invite customers back with personalized recommendations or a limited-time offer for their next order.
Example:“Based on your recent purchase, we thought you might also like these products. Here’s 10% off if you’d like to complete your collection.”
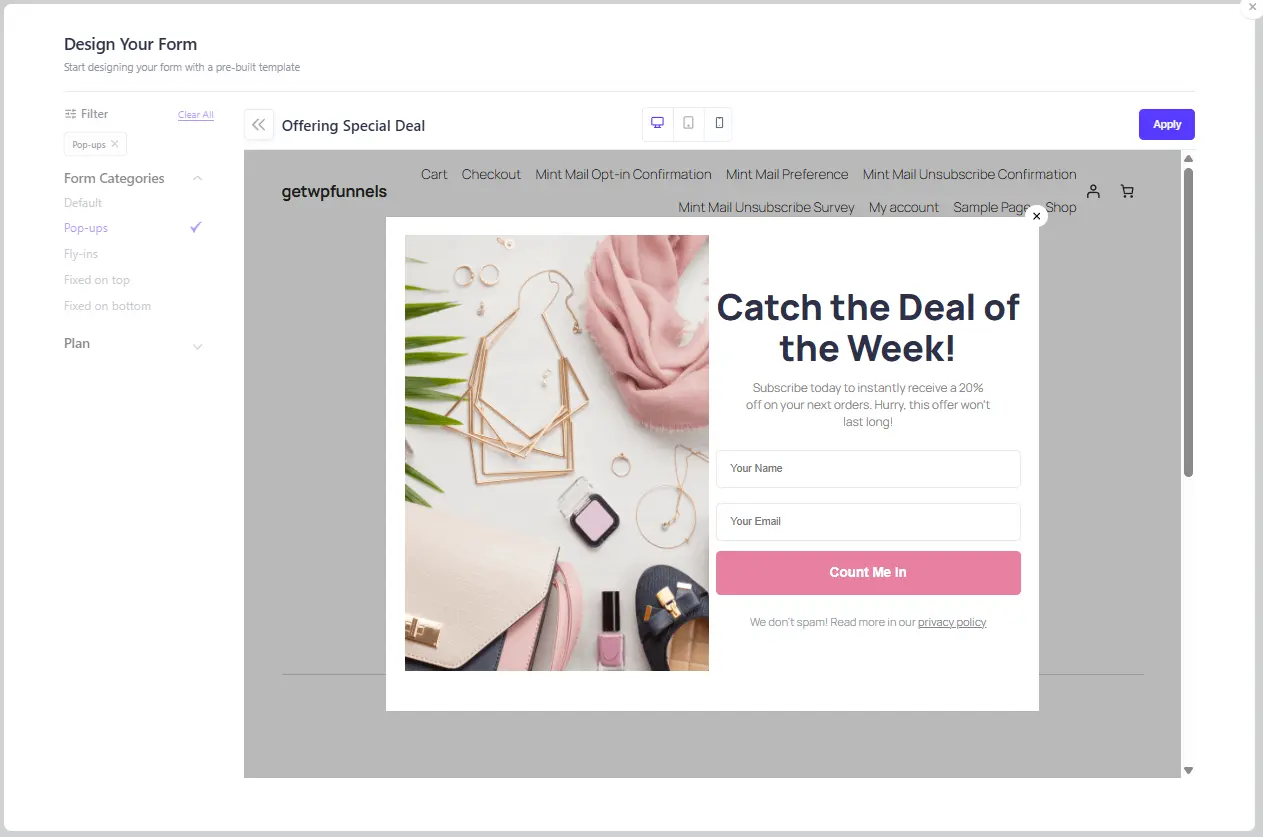
Pro Tip: Keep your welcome sequence to three emails over the first week. In my experience, engagement usually starts dropping after that. Instead of adding more emails, focus on making those first three genuinely helpful and give subscribers a clear reason to make their first purchase.
Related read: 10 Types of Email Marketing Campaigns – Use Cases & Effectiveness
Once you’ve earned a customer’s trust, the next goal is increasing the value of each relationship. That’s where a Cross-Sell & Upsell Funnel comes in.
2. Upselling to Existing Customers
Instead of hoping they come back on their own, use what you already know about them to recommend products they’re actually likely to buy.
After all, you know what they purchased, how much they spent, and what they might need next.
One thing I’ve found useful is segmenting customers by order value before deciding what to recommend.
For example, someone who spends $150 will probably respond differently than someone who spends $20. One customer may be interested in premium products, while the other is more likely to buy a smaller complementary item.
Once you’ve decided how to segment your customers, a simple sequence could look like this:
Email 1: Recommend Complementary Products
Send: 3 days after the purchase
Recommend products that naturally go with what the customer already bought.
For example, if someone purchased a camera, you could recommend a memory card, camera bag, or tripod.
Email 2: Recommend Similar or Premium Products
Send: 5 days after the purchase
Show products from the same category that match the customer’s interests or encourage them to upgrade.
For example, if they bought a basic coffee machine, recommend the premium model with more features. Or if they purchased a pair of running shoes, show other styles designed for different terrains or training needs.
Email 3: Reward Them With an Exclusive Offer
Send: 7 days after the purchase
Send a personalized offer on products that are relevant to their previous purchase to encourage another order.
For example, if someone bought skincare products, they offer 15% off their next moisturizer or serum. If they purchase camping gear, give them an exclusive discount on your best-selling tents or sleeping bags.
Pro Tip: Start by segmenting customers based on order value before you segment by product. Purchase value often tells you more about the type of offers a customer is likely to respond to than the product alone.
Some customers will place another order after these emails, others won’t, and that’s perfectly normal.
It doesn’t always mean they’re no longer interested. Sometimes they’re simply not ready to buy again yet.
That’s where your Post-Purchase Nurture funnel comes in.
3. Post-Purchase Nurture
By this point, you’ve welcomed new customers and encouraged them to make another purchase with relevant product recommendations.
Now the focus shifts from selling to building a better customer experience.
The days after a purchase are a great opportunity to answer questions, help customers get the most from their order, and gradually build the trust that leads to repeat business.
A review request is part of that journey, but it shouldn’t be the only email your customers receive after buying from you.
A simple post-purchase sequence could look like this.
Email 1: Help Customers Get Started
Send: Immediately after the order is delivered.
Help customers get the most out of what they purchased.
Example: If you sell skincare, share a simple routine using the products they ordered. If you sell electronics, include a quick setup guide or a short video showing the key features.
Email 2: Check In
Send: 2–3 days after delivery.
Check whether everything arrived safely and ask if they need any help.
Example:“Just checking in to make sure everything arrived safely. If you have any questions, simply reply to this email and we’ll be happy to help.”
Email 3: Ask for a Review
Send: Around a week after delivery, once they’ve had enough time to use the product.
Keep the request short and make it easy to leave a review.
According to CommerceV3, products with five or more reviews convert 270% better than products with no reviews.
Email 4: Thank Them
Send: The day after they leave a review.
Thank them for sharing their experience and, if it fits your business, reward them with a small incentive for their next purchase.
Common mistake: Don’t think of your post-purchase emails as another sales campaign. Use them to answer questions, reduce buyer’s remorse, build trust, and collect feedback. When customers have a great experience after buying, they’re much more likely to come back without needing constant discounts.
Whoever completes their order here moves into the next two stages.
4. Abandoned Cart Recovery
So far, we’ve focused on customers who completed a purchase. Now let’s recover revenue from shoppers who almost did.
According to Baymard Institute, the average cart abandonment rate is 70.22%. While not everyone intended to buy, many shoppers leave because they get distracted, face unexpected costs, or simply don’t finish the checkout process.
A simple three-email sequence is usually enough:
Email 1: Friendly Reminder
Send: 1–4 hours after cart abandonment
Remind shoppers about the products they left behind and include a direct link back to their cart.
Example:“Looks like you left a few items in your cart. They’re still waiting for you, and you can complete your order with just one click.”
Email 2: Reinforce the Purchase
Send: 24 hours later
Highlight why the products are worth buying and address any hesitation they might have.
Example:“Still thinking it over? Here’s why customers love our Bamboo Cutting Board: durable, easy to clean, and backed by a 30-day money-back guarantee.”
Email 3: Final Reminder
Send: 48 hours later
Give shoppers one last reason to complete their purchase.
Example:“This is your final reminder. Complete your order today and enjoy 10% off before your cart expires.”
Common mistake: Don’t lead with a discount in your first email. Many shoppers simply need a reminder, and saving discounts for the final email helps protect your profit margins.
Related read: 50 Best Abandoned Cart Email Subject Lines Examples
Cart abandonment isn’t the only revenue you’ll miss. Sometimes customers are ready to buy, but the product they want is temporarily out of stock. That’s where a Product Restock Funnel comes in.
5. Product Restock
Running out of stock doesn’t always mean losing a sale. Many shoppers are happy to wait as long as they know when the product is available again.
A simple restock funnel automatically notifies interested customers the moment an item returns, bringing them back while they’re still interested.
A simple three-email sequence could look like this:
Email 1: Back in Stock
Send: As soon as the product is available again
Let customers know the item they’ve been waiting for is back.
Example:“Good news! The Linen Summer Shirt is back in stock. If you’ve been waiting to grab one, you can order it now before it sells out again.”
Email 2: Why It’s Worth the Wait
Send: 24 hours later
Remind shoppers why the product is popular and reinforce the value of buying it.
Example:“Thousands of customers love our Linen Summer Shirt for its lightweight fabric and comfortable fit. Stock is limited again, so don’t wait too long.”
Email 3: Last Availability Reminder
Send: 48 hours later
Send one final reminder while inventory is still available.
Example:“Just a quick reminder, your requested item is still in stock, but quantities are running low. Grab yours before it’s gone again.”
Remember: Avoid using discounts as the main reason to come back. Customers joined the restock list because they wanted the product, not because they were waiting for a coupon. In most cases, a simple notification is enough.
Related read: Product Launch Email Strategy
Some customers come back as soon as the right product is available. Others gradually stop visiting your store altogether.
A Win-Back Funnel helps you reconnect with those inactive customers before they’re gone for good.m back.
6. Win-Back Campaign
Sometimes even your best customers can go quiet.
Life gets busy, people try new brands, or they simply don’t need your products for a while. That doesn’t mean they’re gone forever. A well-timed win-back funnel gives them a reason to come back before they forget about your store completely.
The first step is deciding when someone is considered inactive. For some stores, that might be 30 days after their last purchase. For others, it could be 60 or 90 days, depending on how often customers typically reorder.
A simple three-email sequence could look like this:
Email 1: We’ve Missed You
Send: 30–90 days after the customer’s last purchase
Keep it personal and remind them what they previously bought.
Example:“It’s been a while since your last order. We just wanted to check in and let you know we’re here whenever you need us again.”
Email 2: Show What’s New
Send: 3–5 days later
Give customers a reason to come back by highlighting new arrivals, best sellers, or products related to their previous purchases.
Example:“Since your last visit, we’ve added a few new products we think you’ll love. Take a look and see what’s new.”
Email 3: A Final Incentive
Send: One week later
If they still haven’t returned, offer a limited-time incentive to encourage one last visit.
Example:“Here’s 15% off your next order. It’s our way of saying thanks for being a customer—we’d love to have you back.”
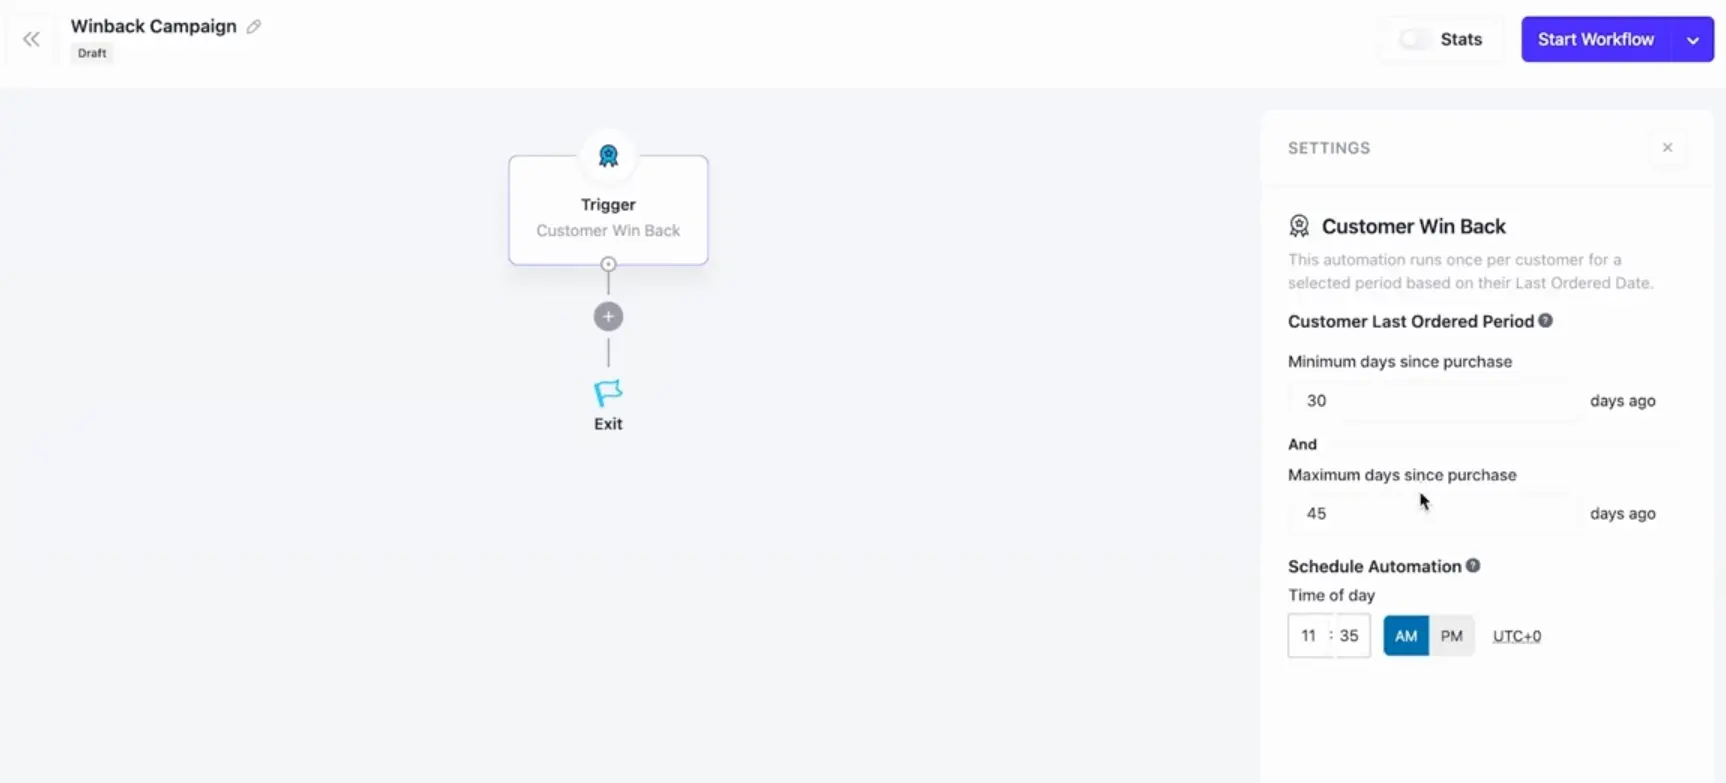
Pro Tip: Segment your win-back emails based on purchase history whenever possible. A customer who bought skincare shouldn’t receive the same recommendations as someone who only purchased kitchen accessories. Personalized emails are far more likely to bring inactive customers back.
Now that you’ve seen the six email funnels, the next step is putting them into practice.
You don’t need to build all of them at once. Start with the funnel that solves your biggest revenue gap, get it running, and then build from there.
Here’s a simple process you can follow.
How to Build Your Email Funnel, Step by Step
To build an email marketing funnel in WooCommerce, you’ll need a tool that supports customer segmentation, automated email sequences, and WooCommerce events such as purchases, abandoned carts, and product restocks.
For this guide, we’ll use Mail Mint because it includes all the features needed to build the six email funnels covered above, from welcome emails and post-purchase follow-ups to abandoned cart recovery and win-back campaigns.
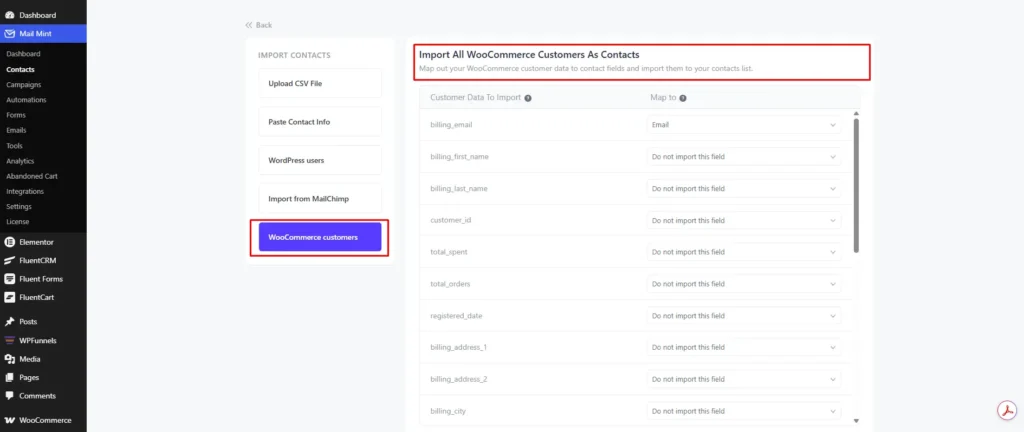
The setup is straightforward. Once you’ve imported your WooCommerce customers, you’ll choose a trigger, create your email sequence, and activate the automation.
Let’s walk through the process step by step.
1. Import your WooCommerce customers so your automations can use their order history and purchase data.
2. Build one funnel first. If abandoned carts are costing you sales, start there. If new subscribers aren’t buying, begin with your welcome sequence.
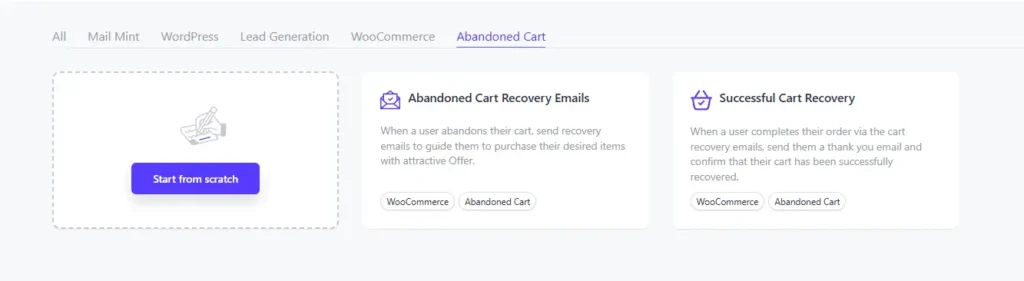
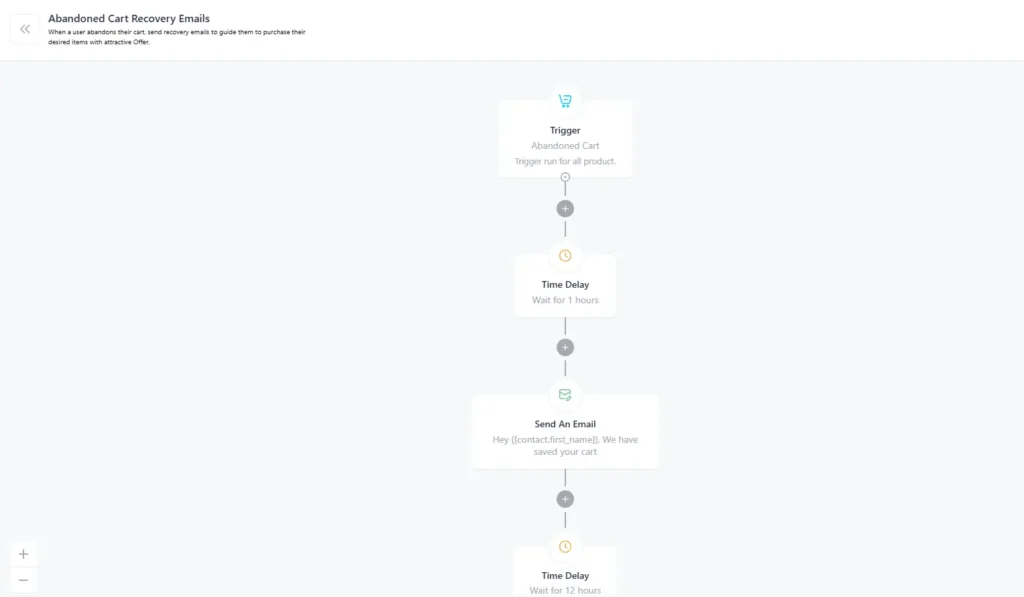
3. Set the trigger, delays, and emails for that funnel. Each one works on a different timeline, so avoid using the same delay across all of them.
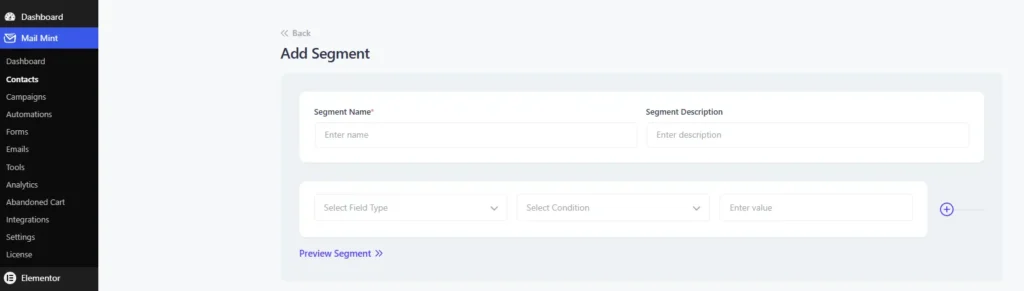
4. Create segments for customers who should receive different offers, such as high-value buyers or shoppers from a specific product category.
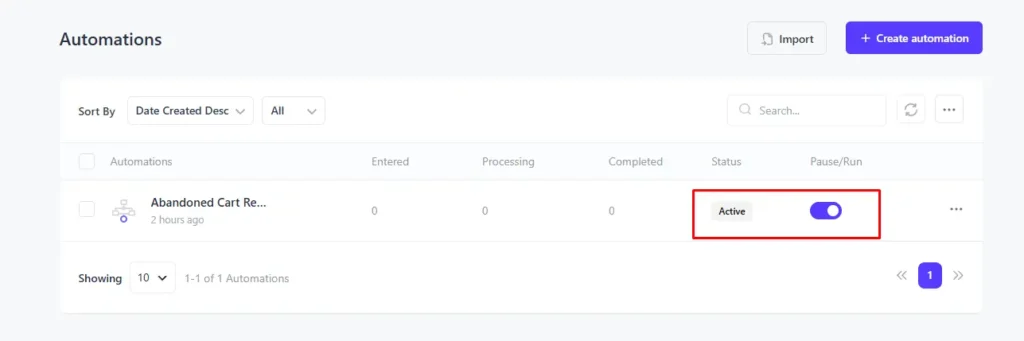
5. Publish the automation and let it run long enough to collect meaningful data.
Review the results each month and make one improvement at a time. A new subject line, a different delay, or a better offer is usually enough to learn what drives better results.
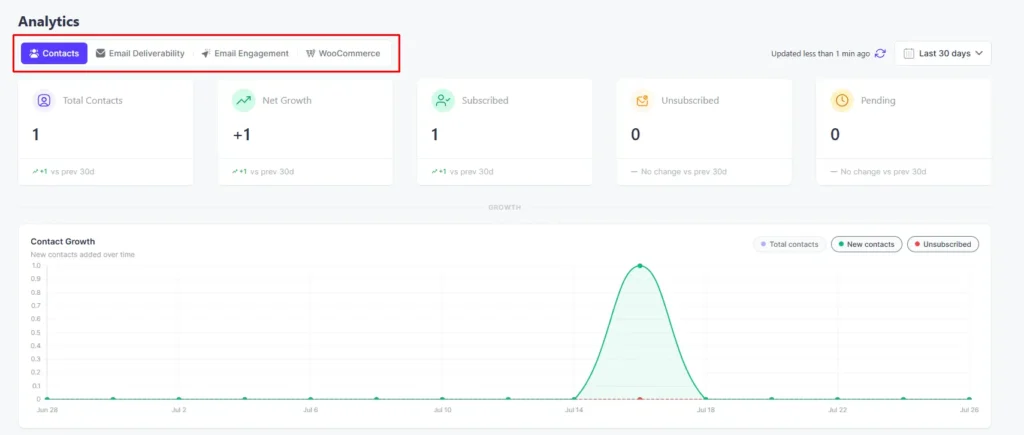
Building the automation usually takes less time than writing the emails. If staring at a blank screen is the part you dread, the next section will help you get past it.
If you’re following along while building your funnel, this video will walk you through the complete setup in Mail Mint.
AI Action: Draft Your Email Sequence Before Opening the Automation Builder
Before you start creating your automation, spend a few minutes drafting the emails.
It doesn’t have to be perfect. You just need a solid first draft that you can review, edit, and personalize before adding it to your automation.
The prompt below will generate a complete email sequence based on your WooCommerce store, the funnel you’re building, and your customers. Replace the placeholders with your own information, then paste it into ChatGPT, Claude, or another AI assistant.
You are helping me write an email sequence for my WooCommerce store.

STORE CONTEXT:
- What I sell: [e.g. handmade leather wallets]
- Average order value: $[e.g. 65]
- Typical monthly orders: [e.g. 300]
- My customer's biggest hesitation before buying: [e.g. price vs. quality tradeoff]

FUNNEL TYPE TO WRITE (choose one):
[Abandoned Cart Recovery / Welcome & First-Purchase Nurture / Cross-Sell & Upsell / Post-Purchase Review Collection / Win-Back for Dormant Customers / Product Launch]

SEQUENCE REQUIREMENTS:
- Write exactly 3 emails (unless the funnel type needs more, explain why before writing them)
- For each email, include:
  1. Send timing
  2. Two subject line options (under 50 characters each)
  3. Email body (under 150 words)
  4. One clear call to action

TONE AND STYLE:
- Write in second person ("you," "your order")
- Use short sentences and short paragraphs
- Keep the reading level around Grade 6
- No em dashes
- Avoid phrases like "unlock," "seamless," "game-changer," or "don't miss out"
- For win-back and post-purchase emails, don't lead with a discount
- If a discount is included, base it on the average order value instead of using the same offer for everyone

OUTPUT:
Label the emails as "Email 1," "Email 2," and "Email 3."
Under each one, include:
- Send timing
- Two subject line options
- Email body
- CTA

Return only the sequence.
One last step: Read through the draft before adding it to your automation. Adjust the wording, examples, and offers so they sound like something your brand would actually send. AI gives you a strong starting point, but your own voice is what makes the emails feel genuine.
Best Practices for Building a High-Performing Email Funnel
Building the automation is only part of the process. These best practices will help you get better results from every email funnel you create.
- Solve one problem at a time. Don’t build all six funnels at once. Start with the biggest opportunity in your store, whether that’s cart abandonment, repeat purchases, or inactive customers. Once that funnel is working well, move on to the next one.
- Segment customers using their purchase history. What someone bought, how much they spent, and how recently they ordered usually tell you more than basic demographic information. The more relevant your emails are, the better they’ll perform.
- Match every email to the customer’s last action. If someone leaves products in their cart, remind them about those products. If they just placed an order, help them get the most from their purchase before trying to sell again.
- Design for mobile first. Most people will read your emails on their phones. Keep paragraphs short, make buttons easy to tap, and always preview your emails on a mobile device before sending them.
- Test one change at a time. Whether you’re experimenting with a subject line, send time, or offer, changing one variable makes it much easier to understand what actually improved your results.
- Review your funnels every month. Track metrics like recovered revenue, click rate, repeat purchases, and customer reactivation. Small improvements made consistently usually outperform one big redesign.
Final Thoughts
If you’ve made it this far, don’t feel like you need to build all six email funnels this week.
Start with the one your store needs most.
If you’re losing sales to abandoned carts, begin there. If customers buy once and never come back, focus on a win-back or post-purchase funnel. Pick one problem, solve it, then move on to the next.
One thing I’ve learned is that good email marketing isn’t about sending more emails. It’s about sending the right email at the right time. When your messages match what customers are already doing, they feel helpful instead of promotional.
And don’t worry if your first funnel isn’t perfect. Mine certainly wasn’t. You’ll learn far more by launching one simple automation and improving it over time than by trying to build the perfect funnel from day one.
If writing the emails is the part that’s slowing you down, use the AI prompt from this guide to create a first draft. Then tweak it until it sounds like something you’d actually send to your customers.
And if you’re looking for a WordPress plugin to put everything together, Mail Mint gives you the tools to build every funnel covered in this guide from customer segmentation and email automation to WooCommerce integration all from one dashboard.
Good luck, and I hope your first funnel brings in plenty of extra sales. Instead of juggling multiple plugins, give Mail Mint a try. It was built to help WooCommerce store owners create the same types of email funnels you’ve just learned about without making the setup more complicated than it needs to be.
Frequently Asked Questions
What is an email marketing funnel?
An email marketing funnel is a series of automated emails sent based on a customer’s actions or stage in the buying journey. It helps guide subscribers from their first interaction with your brand to repeat purchases by sending the right email at the right time.
Is a WooCommerce email marketing funnel the same as a sales funnel?
Not quite. A sales funnel usually describes the path to a first purchase. This funnel keeps narrowing past that, through repeat purchase, cross-sell, and win-back.
How many of these seven do you need to get started?
Three cover most of the impact: abandoned cart recovery, post-purchase follow-up, and win-back. The other four add depth once those three are running.
Do you need a large email list before this works?
No. These automations trigger off order and cart events, not list size. A few hundred orders a month generates enough activity to make all seven worth building.
How long before someone qualifies for the win-back stage?
Base it on your average reorder interval. If customers typically reorder every 30 days, 60 to 90 days without an order is a reasonable signal.
Does this work with Easy Digital Downloads instead of WooCommerce?
Mail Mint supports EDD customer imports, though the order-triggered types here are built around WooCommerce events specifically.

Comments are closed.




Comments (2)
It was a little over my head at times, but we are a small business owner and trying to learn more and more about marketing. I love the funnel concept. Thanks so much for the help you have provided.
Thanks for sharing.
Funnel Marketing Expert
Hi Kennie,
Thank you so much for your kind words! We’re glad to hear you found value in the funnel concept.
Can you please specifically mention the points you found confusing? We’d be more than happy to help clarify any points for you.
And, I wish your business all the best as you continue to grow and thrive.
You’re doing great, and we’re cheering you on!