

Did you know email drip campaigns can generate a big part of your email revenue without increasing your ad spend or bringing more traffic?
According to Klaviyo’s 2026 benchmark data, automated flows generate 41% of total email revenue from just 5.3% of email sends.
So, you might think running more drip campaigns means you can generate more revenue, right?
But that’s not necessarily true.
There are plenty of drip campaign types you can use for different businesses. Welcome campaigns, educational series, promotional emails, milestone campaigns, and many more. But that doesn’t mean every one of them will work for your WooCommerce store.
In fact, you may not even need all of them.
So, which drip campaigns should you actually run?…
Well, let’s dig a bit deeper and look at three email drip campaign examples for a WooCommerce store. By the end of this article, you’ll know exactly which campaigns to run, what emails to send, and how each sequence works.
Quick Answer An email drip campaign is a pre-written sequence sent automatically based on time delays or user actions. For WooCommerce, the most effective drips are: abandoned cart (3 emails), post-purchase onboarding, and win-back for lapsed buyers.
TL;DR: WooCommerce Drip Campaign Examples
- Cart abandonment recovery pays back fastest. You’re not creating demand here. You’re trying to bring back someone who already wanted to buy but didn’t complete the purchase.
- Post-purchase onboarding helps after the sale. It can reduce refund requests and support tickets while also giving you a chance to bring the customer back for a second purchase.
- Win-back campaigns help you get more from customers you’ve already acquired. Instead of spending more on new traffic, you can try to bring back customers who stopped buying from you.
- All three are backed by real benchmark data. So, you can use the conversion rates and numbers to get an idea of the potential return before you build the campaigns.
- If you’re starting from scratch, build them in this order: cart abandonment first, win-back second, and post-purchase onboarding third.
- You don’t need to follow those generic “10 drip campaign types” lists. Many of them are built around business models that don’t really match how a WooCommerce store works.
Why Most Drip Campaign Lists Don’t Fit a WooCommerce Store
The assumption most of these lists run on: more campaign types means more coverage, So a longer list is automatically a better resource.
But that doesn’t really work for a store like yours.
A welcome series for a fitness app assumes someone may spend weeks engaging before they buy. Your store doesn’t work that way.
Someone either has a product in their cart right now, bought from you recently, or bought from you before but hasn’t come back.
Those are the customer moments you should be paying attention to.
And here’s a number that makes the point pretty clear. 70.22% of online shopping carts are abandoned, according to Baymard Institute’s compilation of 50 studies from 2006 to 2025.
So, if someone is already leaving products in their cart, why spend your time building drip campaigns that don’t address that behavior?
That’s where cart recovery comes in.
The 3 Drip Campaigns That Actually Move Revenue
Each of these campaigns focuses on a different customer situation: someone who left products in their cart, someone who just made their first purchase, and someone who bought from you before but hasn’t come back.
No theory here, just what each one looks like in practice, with the subject lines and the math behind them.
1. Abandoned Cart Recovery Drip Campaign
You’ve probably heard “set up an abandoned cart email” more times than you can count. But if you’re running a WooCommerce store, this is probably the first drip campaign I’d build.
Here’s why it’s not just another item on the list: everyone in this sequence already decided to buy. They picked a product, got most of the way through checkout, and something (price, shipping cost, a distraction) stopped them.
You’re not convincing a stranger. You’re removing whatever got in the way of someone who was already sold.
A three-email sequence covers this without turning into spam:
- Sent 1 hour after abandonment: “Still deciding? Your cart’s saved for you.” No discount yet. This one just shows the item again and removes the “did it actually save?” doubt.
- Sent 24 hours later: “10% off if you check out today.” Urgency and an incentive earn their place here, since a plain reminder rarely moves someone twice.
- Sent 48 to 72 hours later, final send: “Last call, your cart clears out tonight.” Keep it short. This is the close, not another pitch.
For example, let’s put a number on it. Imagine a WooCommerce store completing 800 orders a month at a $60 average order value, the rough middle of the $20 to $150 range most stores sell in. At Baymard’s 70% abandonment rate, that store generates roughly 1,867 abandoned carts a month. Omnisend’s analysis of 470 million automated sends puts abandoned cart recovery conversion at 1.72%. That’s about 32 recovered orders a month, close to $1,920 in monthly revenue, or $23,000 a year, from one automated sequence.
Run that math on your own numbers. Your abandonment rate and order volume will differ, but the mechanism doesn’t.
Abandoned Cart Recovery automation workflow
Trigger: Cart abandoned
↓
Wait: 1 hour
↓
Email 1: Cart reminder
↓
Wait: 24 hours
↓
Condition: Order placed?
↓
No → Email 2: Discount reminder
↓
Wait: 24–48 hours
↓
Condition: Order placed?
↓
No → Email 3: Final reminder
↓
Yes (at any point) → Stop automation
2. Post-Purchase Onboarding
Here’s another thing you might overlook after getting an order: you assume the customer will come back on their own if they liked what they bought.
That assumption is quietly expensive. Nobody wakes up thinking about your store between orders, no matter how good the product was, and “they’ll remember us” isn’t a retention strategy. It’s a hope.
That’s where a post-purchase drip campaign can help.
It can do two things at the same time: help the customer get more from what they bought and give you another chance to bring them back for a second purchase.
- Sent immediately on order completion: “Your order’s confirmed, here’s what happens next.” Set expectations on shipping or delivery.
- Sent on day 3: “Getting the most out of [product].” Real usage guidance, not a generic thank-you. This is the email that prevents the support ticket.
- Sent on day 10 to 14: “How’s it going? (plus something you might like).” A light review request paired with one relevant product recommendation.
For Example: Let’s use the same store we looked at above. Say around 480 of its 800 monthly orders are from first-time buyers. Omnisend’s welcome and onboarding automation benchmark shows a 2.11% conversion rate toward a next action. That could mean around 10 additional orders a month, or roughly $600 in revenue from this one sequence.
The bigger opportunity here is getting those customers to come back again.
Frederick Reichheld’s research for Bain & Company, cited by Harvard Business Review, found that a 5% increase in customer retention can increase profits by 25% to 95%.
So, post-purchase onboarding isn’t just about what happens after the order. It’s also about giving that first-time customer a reason to become a repeat customer.
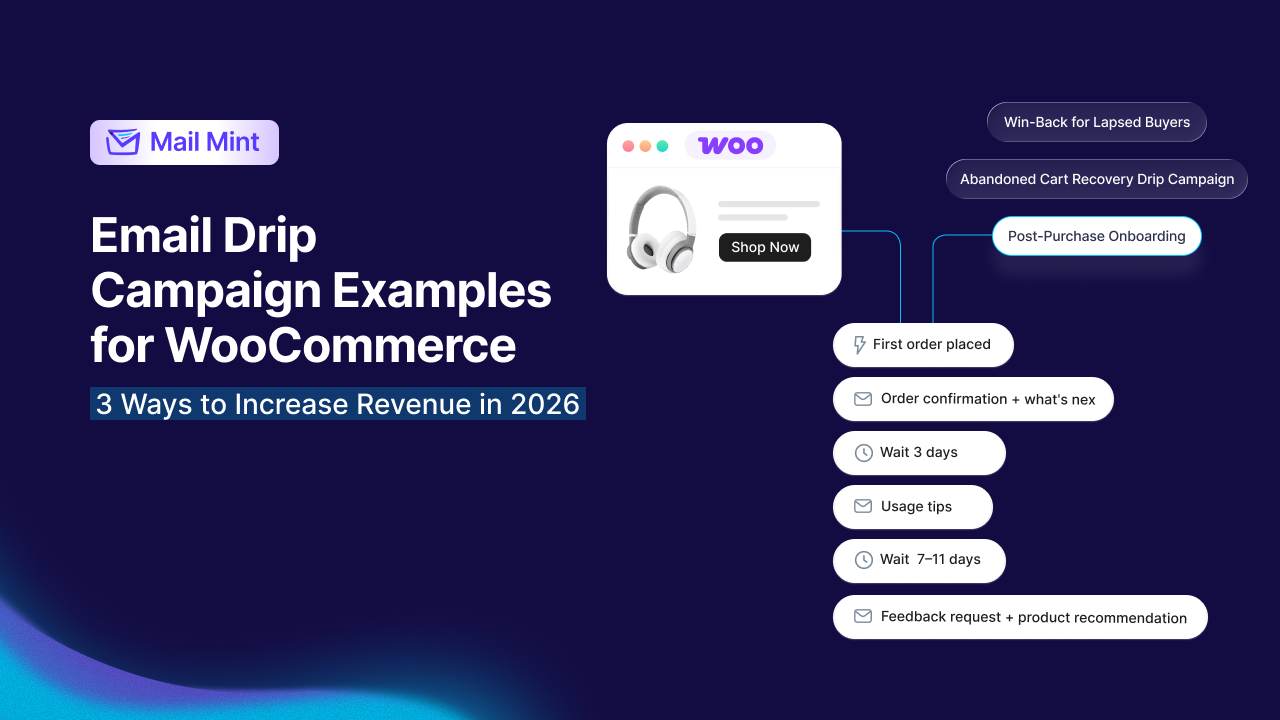
Post-Purchase Onboarding automation workflow
Trigger: First order placed
↓
Email 1: Order confirmation + what's next
↓
Wait: 3 days
↓
Email 2: Usage tips
↓
Wait: 7–11 days
↓
Email 3: Feedback request + product recommendation
3. Win-Back for Lapsed Buyers
There’s another thing you might be overlooking when you’re trying to increase sales: the customers who already bought from you.
You might think that if a customer hasn’t ordered for a while, there’s not much you can do except find a new customer, right?
But that’s not necessarily true.
A customer who bought from you before already knows your store and has already made a purchase. So instead of spending more money to find someone new, you can use a win-back drip campaign to try to bring those customers back.
A lapsed buyer is simply someone who ordered from you before but hasn’t ordered again for a while. The exact time depends on how often your customers normally buy from you.
- Sent on the trigger date: “We miss you, here’s what’s new since your last order.” Start by showing what’s new instead of immediately asking them to buy.
- Sent 7 days later: “This one’s on us: 10% back on your next order.” If the first email didn’t work, this is where you can give them a reason to come back.
- Sent 14 days later: “Last email, we promise, offer expires Friday.” Give them a clear deadline and then let it go.
For Example: Let’s use the same 800-orders-a-month store again. If around 250 customers cross the “no order in 90 days” mark each month, Omnisend’s benchmark puts reactivation conversion at 0.54%. That’s roughly 1 to 2 recovered orders a month, or around $60 to $120 in revenue. It’s not the biggest number you’ll see, but it’s still revenue from customers you’ve already paid to acquire.
If your store also collects leads before they buy through a quiz or discount pop-up, you can add a lead-nurturing drip before these three campaigns are live. The idea is the same: send the right emails based on where the customer is in their buying journey.
Win-Back automation workflow
Trigger: Customer win-back (no orders in X days)
↓
Email 1: We miss you
↓
Wait: 7 days
↓
Condition: Order placed?
↓
No → Email 2: Discount offer
↓
Wait: 14 days
↓
Condition: Order placed?
↓
No → Email 3: Final offer
Which drip campaign Should You Build First?
If you can only build one this week, I’d start with cart abandonment.
It has the shortest path from setting it up to recovering revenue because the customer has already shown buying intent. You’re not trying to create that intent from scratch. You’re just trying to bring them back to complete the purchase.
After that, I’d go with win-back. You’re reaching out to customers who already bought from you, so you don’t have to spend more on ads to find them again.
Post-purchase onboarding comes third. Not because it’s less important, but because its payoff usually takes longer to show up. You’re building toward a better customer experience and, eventually, another purchase.
Key Takeaway: If you’re starting from scratch, build cart abandonment first, win-back second, and post-purchase onboarding third. All three are worth having, but this order gives you the quickest opportunity to recover revenue while you build the others.
How to Set Up Automated Email Drip Campaigns?
All three drip campaigns above can be created using Mail Mint’s automation workflow builder. The main difference is the WooCommerce trigger you choose to start each campaign.
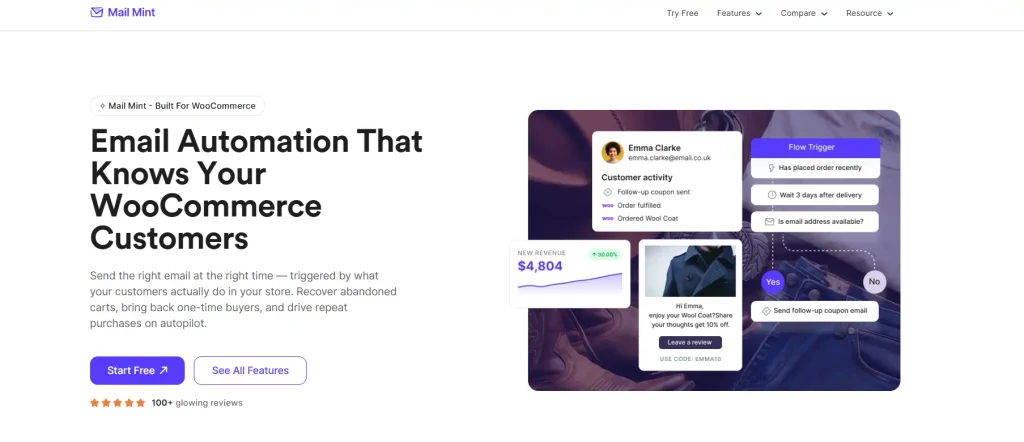
For abandoned cart recovery, first make sure Mail Mint’s abandoned cart feature is enabled. You can follow the abandoned cart recovery guide to learn more about how Mail Mint tracks abandoned carts.
Step 1: Create a New Automation
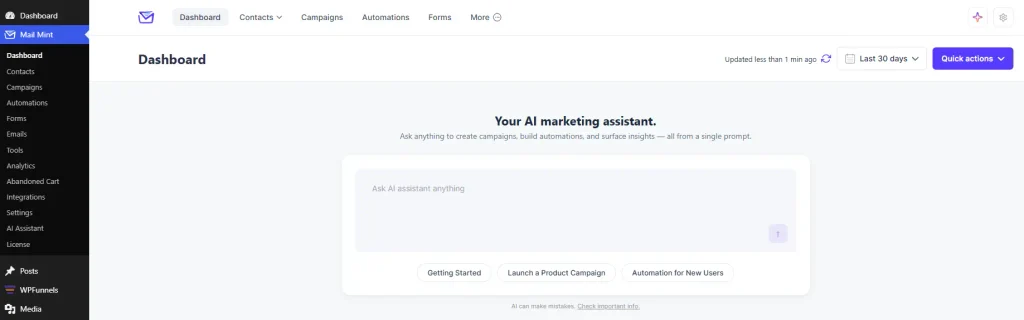
Go to the Mail Mint dashboard. Here, you’ll find several options on the left side, including Contacts, Campaigns, Automations, Forms, Emails, Tools, Analytics, Abandoned Cart, and more.
You’ll also see the AI marketing assistant in the middle of the dashboard. If you want, you can simply tell the AI assistant what you want to create.
Or, if you want to build the drip campaign yourself, click on the Automations option from the left-side menu. Then, click Create Automation to start building your workflow.
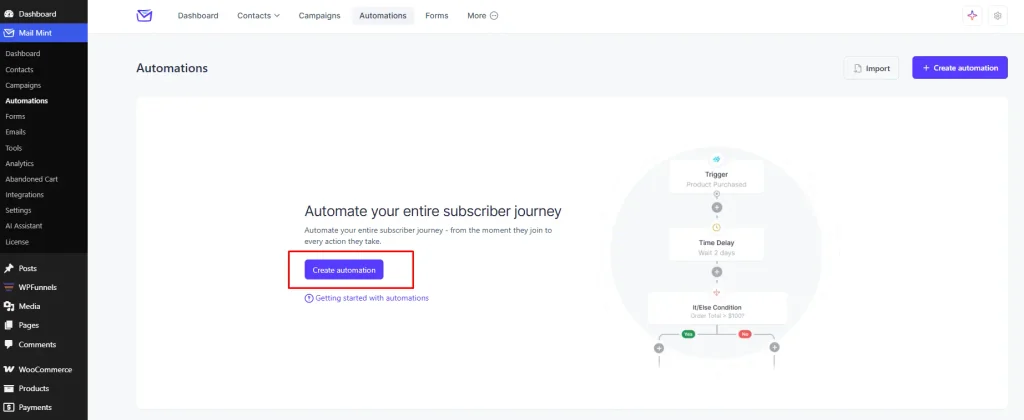
From the Automations module, click New Automation to start creating your workflow.
Mail Mint will then show you several pre-built automation templates. You can choose a WooCommerce template if it matches the drip campaign you want to create, or create one from scratch.
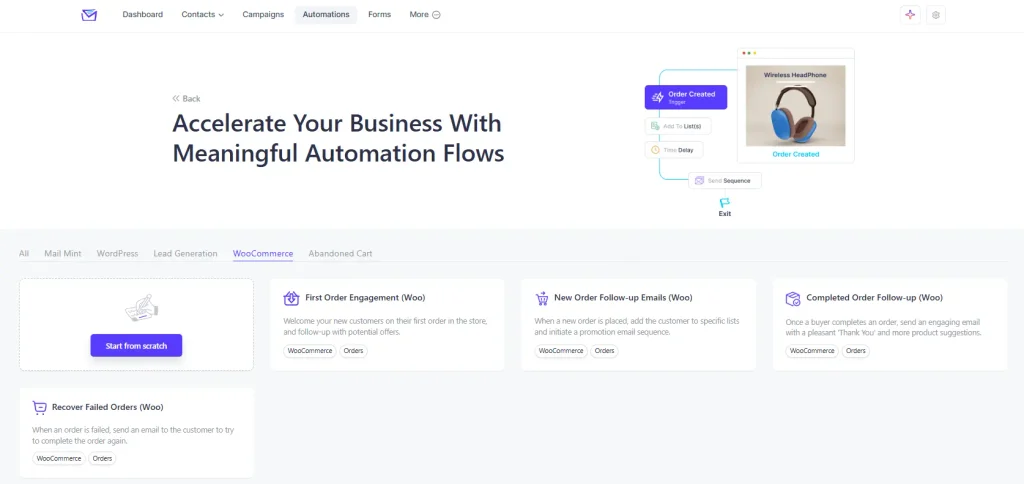
From the Automations module, click New Automation to start creating your workflow.
Mail Mint will then show you several pre-built automation templates. You can choose a WooCommerce template if it matches the drip campaign you want to create, or create one from scratch.
Step 2: Choose the Right WooCommerce Trigger
After creating your automation, you need to choose the trigger that will start your drip campaign.
Mail Mint provides several WooCommerce triggers, and each one works based on a different event in your store.
For the three drip campaigns covered in this article, you can use the following triggers:
- Abandoned Cart Recovery: Use Mail Mint’s abandoned cart tracking to identify when a cart becomes abandoned.
- Post-Purchase Onboarding: Use First Order In Store when you want the drip campaign to start after a customer’s first purchase.
- Win-Back: Use Customer Win Back to target customers based on their Last Ordered Date.
Let’s see how each one works.
Step 3: Set Up the Abandoned Cart Trigger
If you’re setting up the abandoned cart drip campaign, first go to Settings → Abandoned Cart in Mail Mint.
Here, you’ll find the Enable Cart Tracking option. Turn it on to let Mail Mint track customers’ carts.
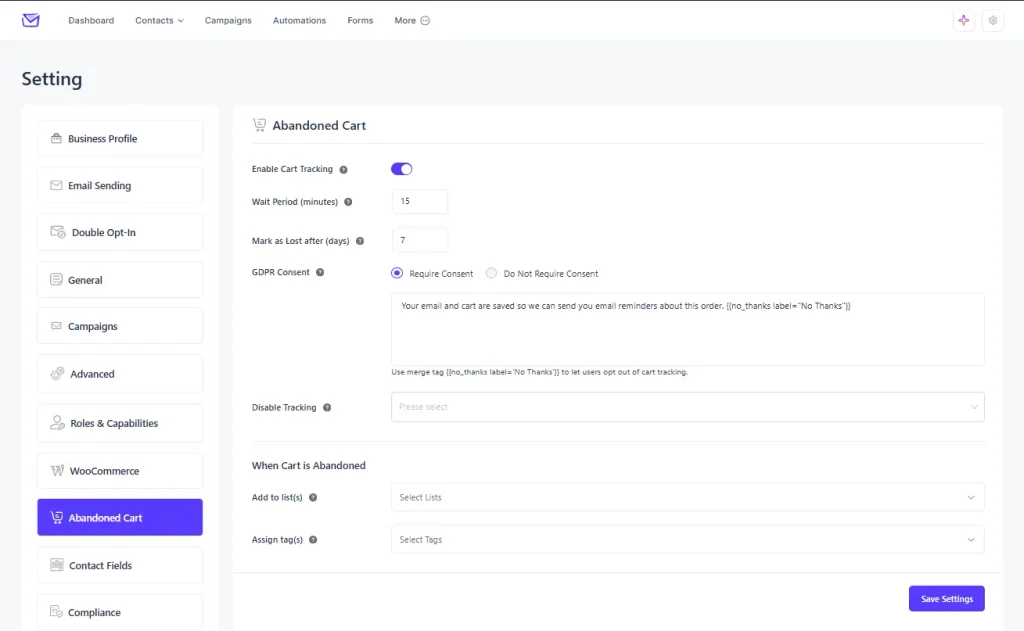
You can also configure the Wait Period (minutes). This controls how long a cart needs to remain idle before Mail Mint marks it as Abandoned. The default value is 15 minutes.
For this campaign, you can keep the default setting or change it based on how quickly you want to follow up with customers who leave their carts.
The same section also includes Mark as Lost after (days), which controls when an abandoned cart is marked as Lost.
Once you’ve enabled cart tracking, you can move back to the Automations module and create the abandoned cart workflow.
Once a cart becomes abandoned, Mail Mint can also add the shopper to a list or assign a tag if you configure those options under When Cart is Abandoned.
Step 4: Create Your Post-Purchase Drip Campaign
For the post-purchase campaign, create a new automation and select First Order In Store as the trigger.
This trigger is activated when a customer makes their first purchase in your WooCommerce store. Mail Mint’s documentation gives welcome emails for new customers as an example of how you can use this trigger.
You can then add the emails from the post-purchase drip campaign we covered earlier.
If you want the automation to start when an order is marked as completed instead, Mail Mint also provides the Order Completed trigger.
Step 5: Create Your Win-Back Drip Campaign
For the win-back campaign, create a new automation and select Customer Win Back.
This trigger uses the customer’s Last Ordered Date, so you can set the time period based on when you want to consider a customer lapsed.
For example, Mail Mint’s documentation gives 30–45 days as an example for sending a re-engagement email with a special discount offer.
You can then add the three emails from the win-back sequence we covered earlier.
Good to Know: Mail Mint’s abandoned cart settings also include options for GDPR consent, disabling tracking for selected user roles, blacklisting emails or domains, and choosing which WooCommerce order statuses mark a cart as Recovered.
Once you’ve selected the right WooCommerce trigger and configured the relevant settings, you can build the corresponding drip campaign inside the automation workflow.
If you’d rather watch the workflow being built, here’s a walkthrough of Mail Mint’s automation builder.
Pro Tip: Start with the abandoned cart drip campaign first. Once you’ve configured and tested the abandoned cart tracking, you can create the win-back and post-purchase campaigns using their respective WooCommerce triggers.
Related read: Just Out: Win Back Inactive Subscribers Automatically With Mail Mint goes deeper into the win-back trigger and how you can use it to re-engage inactive customers.
Final Thoughts
Ten generic drip campaign types might make for a longer list, but that doesn’t mean they’re all useful for your WooCommerce store.
You can start with three customer situations that directly affect your revenue: carts that don’t finish, first-time buyers who don’t come back, and customers who used to order but have stopped.
Build drip campaigns around those three, using your store’s own order and cart data, and you can cover some of the most important opportunities without creating a dozen different campaigns just because a generic list says you should.
Once these sequences are set up, they can keep running in the background while you focus on the rest of your marketing strategy. It’s not just about recovering more abandoned carts or bringing back old customers. It’s also about not having to manually follow up with each one.
Bottom Line: Start with cart abandonment recovery this week. You can download the free Mail Mint plugin and try the automation builder yourself, or go with Mail Mint Pro if you need the WooCommerce-native triggers used in these three campaigns.
If you want to go beyond these three campaigns and learn more about the broader process, check out our Email Marketing Automation Best Practices: The Complete Guide for 2026.
Frequently Asked Questions
How many emails should be in an abandoned cart drip campaign?
Three works well for most stores. An immediate reminder with no discount, a follow-up around 24 hours later with an incentive, and a final message 48 to 72 hours out.
What’s the difference between a win-back campaign and a re-engagement campaign?
Win-back is specifically for someone who’s stopped ordering, triggered by time since their last purchase. Re-engagement is broader and can apply to subscribers who never bought at all.
Do I need a separate email tool and a separate WooCommerce automation plugin?
Not if the email tool reads WooCommerce data natively. Mail Mint’s triggers come straight from your store, so there’s no CSV export or third-party sync step involved.
How long should I wait before sending a win-back email to a lapsed customer?
It depends on your average repurchase window. If people typically buy again within 30 to 45 days, set the trigger around 60 days lapsed; for less frequent purchases, 90 days or more makes more sense.
Can email drip campaigns work for lead nurturing, not just existing customers?
Yes, if you’re capturing leads before checkout through a discount pop-up or lead magnet. That sequence builds toward a first purchase rather than reacting to one, so add it once your core three are already live.