Design Funnel Steps Easily

  1. Home
  2. Docs
  3. Funnel Planning And Mapping
  4. Using Conditional Steps To Control Funnel Journey

Using Conditional Steps To Control Funnel Journey

You can control the funnel journey by using several conditional steps triggers such as cart total, or acceptance/rejection of an offer.

For example, you can use a condition that if someone rejects an Upsell offer, he will be directed to a Downsell offer. But if he accepts it, he will not see the Downsell offer and proceed to see another Upsell offer.

In this guide, I will show how you can visually use Conditions in your sales funnel easily.

How To Visually Use Conditions In Your Sales Funnel

First, create a sales funnel and add the funnel steps you want.

For this guide, let’s use 5 steps – Landing, Checkout, Upsell, Downsell, and Thank You.

Then assign the sales product in the checkout step and the offer products in the upsell and downsell steps (in the settings drawer). Then add an order bump offer in the checkout step.

It will look like this:

Sales Funnel with 5 steps

**P.S.: Some of our pre-made templates have conditional steps set by default. So if you want to learn & implement for practice by following this guide, then it’s best to create the funnel from scratch, add these five steps, assign their products, and connect them manually.

As per the funnel above, you can see, there are no conditions that decide the transition from one step to another. For example, if you think about the upsell offer, whether a buyer accepts it or rejects it, he will be offered the downsell product.

In this guide, we will use a conditional step trigger so that if a person accepts the Upsell offer, he will not see the Downsell offer and will go directly to the Thank you page. However, if he rejects the upsell offer, then he will get the downsell offer before going to the Thank you page.

So let’s begin.

Step 1 – Add The Conditional Step Icon

On the top left side, just beside the “+ Step button”, you will see there is a “+ Condition” Button.

Add conditional Trigger

Click on “+ Condition” and a conditional step icon will be created on the canvas.

Conditional Trigger Icon Added

Understanding The Conditional Steps Triggers

If you look closely, the conditional step icon actually has 3 connector points, one at the left, and two towards the right.

Conditional trigger icon

The one on the left is just to indicate that another step can be connected to it. So when you create a connector from another step and drop it on the conditional step icon, the connector arrow will be joined to this point.

The ones on the right are the points that you will be using to set the main conditional step transition.
– The one above represents true, i.e., if the condition set is met. Hence, you can see the Green “T” beside it.
– The one below represents false, i.e., if the condition set is not met, which is indicated by the Red “F” beside it.

You can click and drag from the points on the right to connect to the next step based on the conditional requirements.

When you click on the icon, you will get the option to edit the condition.

Conditional Trigger Edit

Click on the edit icon and a settings drawer will open.

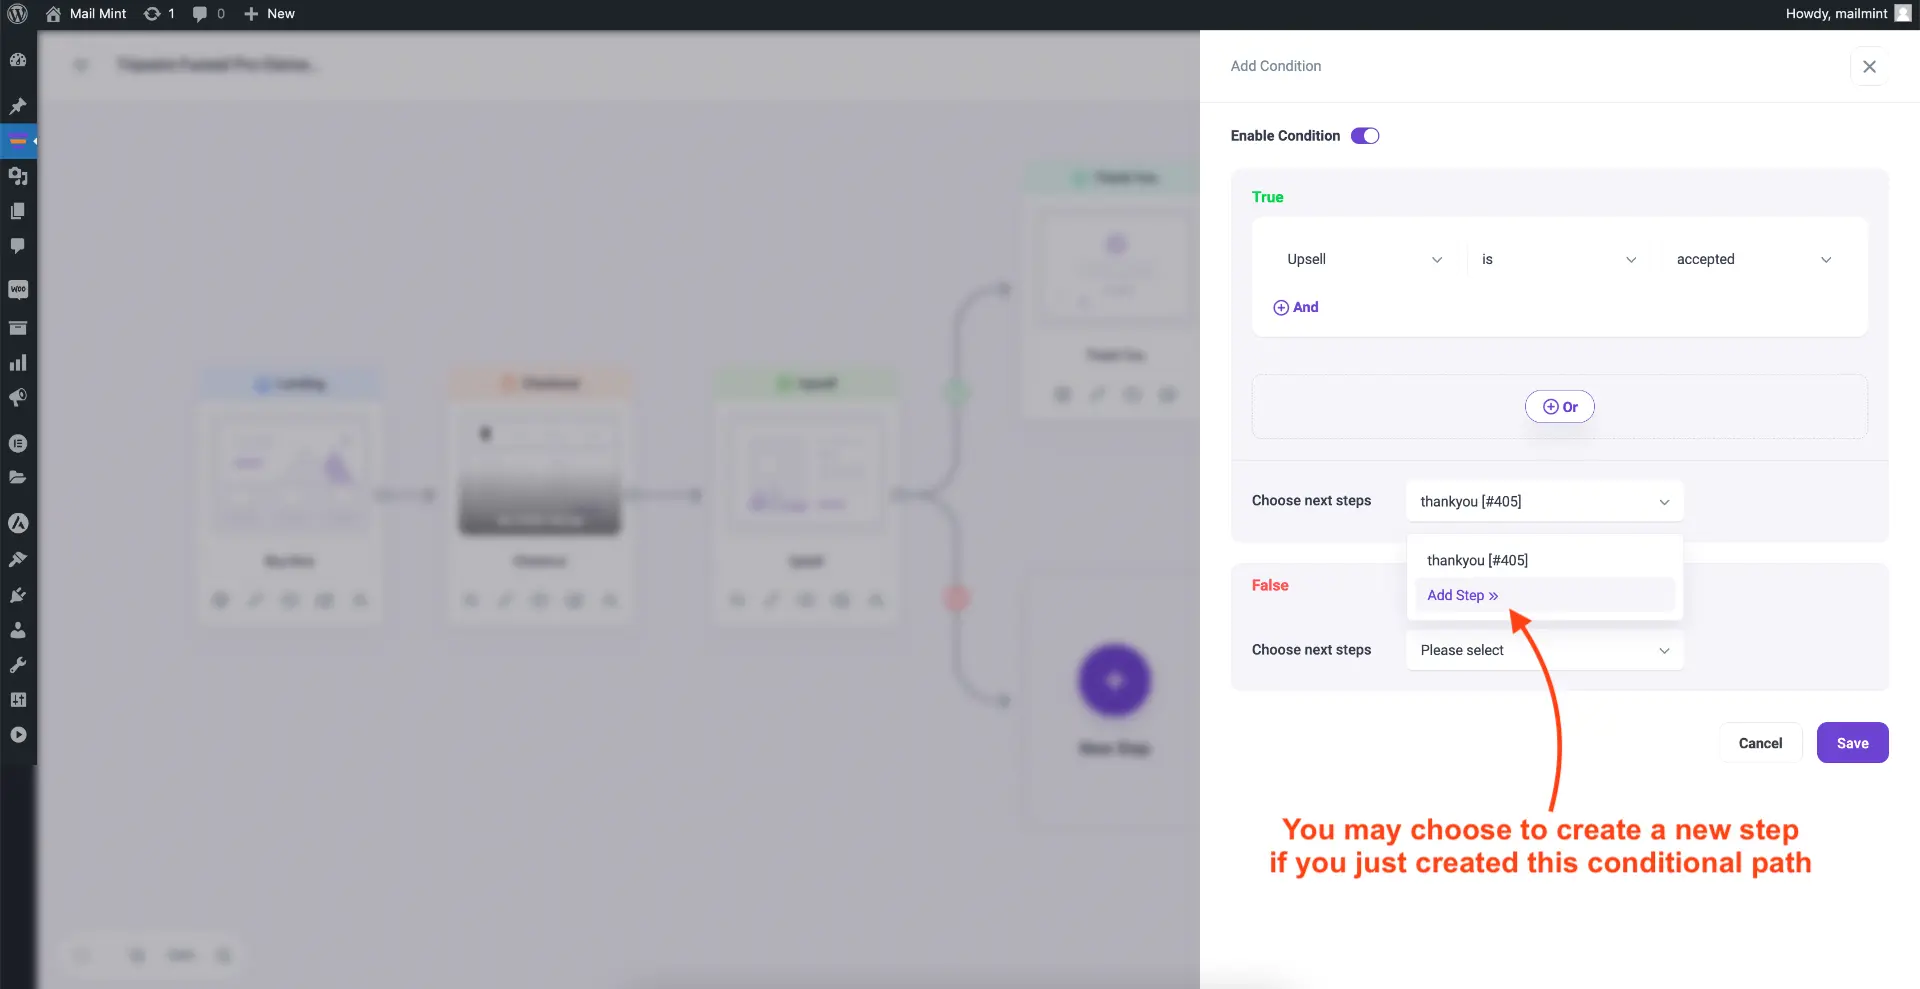
Add Condition - drawer

Here, you will get options to set conditions based on the following:

  • Order bump is accepted/rejected.
    – Use this condition when you have added an order bump at the the checkout.
    – Which ever you set here will be considered as the “True” trigger.
  • Cart Toal is Equals to/Greater Than/Less that a given amount
    – You may set a certain cart total amount as your condition towards the next step.
    – Use “Equals to” if the cart total needs an exact match.
    – Use “Greater than” or “Less than” if you want to set a dynamic condition based on cart total.
  • Upsell is accepted/rejected
    – Choose if the condition to go to next step should depend on Upsell offer acceptance or rejection.
  • Downsell is accepted/rejected
    – Choose if the condition to go to next step should depend on Downsell offer acceptance or rejection.

Remember, whichever condition you set, it will be considered as the required trigger to indicate that the condition is met and the funnel journey will follow through towards the step connected from the True connector point.

For example, if you set the condition as “Upsell offer is rejected”, then when a person will accept the offer, it will be considered as ‘condition not met’ and the funnel journey with transit towards the step that is connected from the False connector point.

You can also add multiple conditions. To do so, you may simply click on the plus icon on the right side which will prompt if it will be an “And” condition or “Or” condition.
– “And” will mean both the conditions set here have to be met to be considered as True.
– “Or” will mean that it will be considered as True if any one of the conditions is made.

Now that you have a good understanding of setting up Conditional Steps Triggers, let’s set it up in the funnel we are creating.

Step 2 – Connect The Upsell Step To The Conditional Step Icon

You may click, hold, and drag the conditional step icon to position it properly in the right place.

Next, remove the connector that connects the Upsell step to the Downsell step. And then connect the Upsell step to the Conditional Step Icon.

Connect upsell to the conditional trigger

Now, before connecting it to the next steps, let’s decide on the condition that has to be met.

Step 3 – Set The Conditions To Control The Journey

Click on the conditional step icon and then click on the edit icon and it will open the conditional settings drawer.

Since we what the person to go straight to the Thank you step after Upsell is accepted, let’s choose the Condition to be “Upsell is accepted.”

Set condition as Upsell is accepted

This means the direction towards the True connector will be triggered if someone accepts the Upsell offer. Rejection will mean the buyer will go to the step connected from the False connector.

Then click on Save Changes and close the drawer.

Step 4 – Connect The Conditional Connectors Properly

Now that the condition is set, it’s time to connect the steps.

As per our condition,
– The condition is true if Upsell is accepted.
– The condition is false if Upsell is rejected.

As per our plan, we want someone to directly go to the Thank You page when Upsell is accepted.

So click and hold the connector point that represents True, and drag and drop it on the Thank you step and they will be connected.

Connect The True Connector to Thank You

Again, we want to take the buyer to a downsell offer upon rejecting the upsell offer. So, connect the to the Downsell step from the False connector point.

Connect The False Connector to Downsell

And that’s it. The funnel is mapped as planned using a conditional step trigger.

You may go ahead and use the conditional steps triggers in whichever way you feel logical to make your sales funnel more meaningful and effective.

Now, if you have followed all the guides for Funnel Planning & Mapping till here, it means, you now know how to use all the plugin features to plan your funnel.

The next thing to do is to visually plan a funnel for your product. And once you are down planning, it’s time to design the sales funnel pages.

Was this article helpful to you? Yes 1 No

How can we help?