
Mail Mint ships with a built-in MCP (Model Context Protocol) server that connects your email marketing plugin to AI clients like Claude Desktop, Claude Code, Cursor, and OpenAI Codex. Once it’s set up, your AI agent can read your contacts, create campaigns, enroll contacts into automations, pull analytics, and more — all through an ordinary conversation.
You can think of MCP as a bridge between your AI client and Mail Mint. Instead of navigating menus and filling out forms, the AI calls the same actions you would, but through a secure, authenticated endpoint on your own WordPress site. You stay in control: every action is authorized by a WordPress Application Password you generate yourself, and you can revoke that access at any time.
Open the MCP Settings
From your WordPress admin, go to Mail Mint → Settings → MCP for AI Agents. Everything you need lives on this one page: the on/off toggle, your endpoint URL, and the ready-to-paste connection snippet for your preferred AI client.
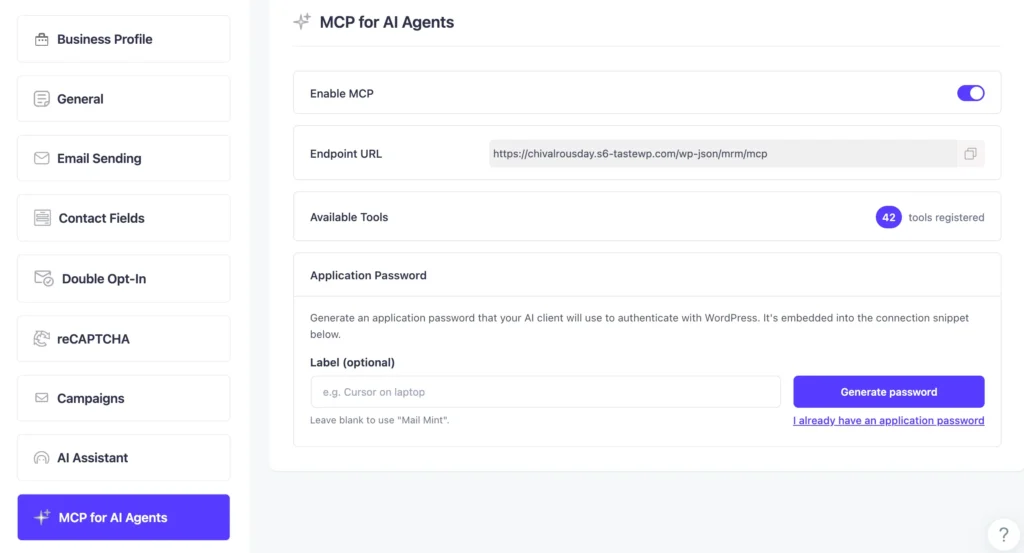
Step 1: Enable MCP for AI Agents
Switch on the Enable MCP for AI Agents toggle at the top of the page. When enabled, Mail Mint exposes its tools through a secure REST endpoint so AI agents can read and write your email marketing data with your authorization.
If you ever want to pause access for every connected AI client at once, flip this toggle off. The endpoint stops responding to MCP requests immediately — no other changes needed.
Step 2: Generate a WordPress Application Password
Mail Mint generates an Application Password for you directly on the MCP settings page — no need to go to your WordPress profile. AI clients use this password to authenticate with your site, and it gets embedded automatically into the connection snippet below.
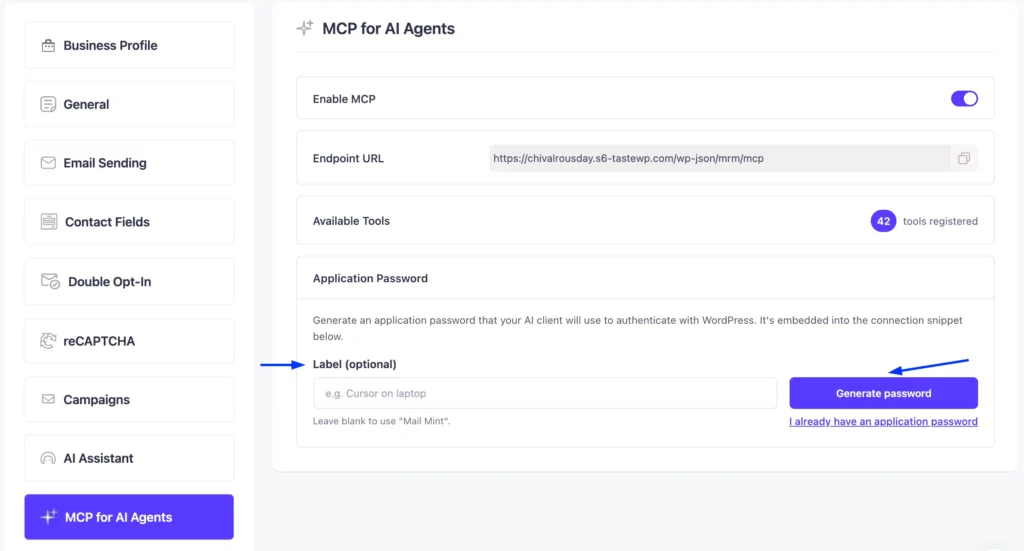
Under the Application Password section:
- Enter an optional Label to identify the connection — for example,
Cursor on laptoporClaude Desktop. Leave it blank and Mail Mint will use"Mail Mint"as the default label. - Click Generate password. Mail Mint creates the password and embeds it into the connection snippet automatically.
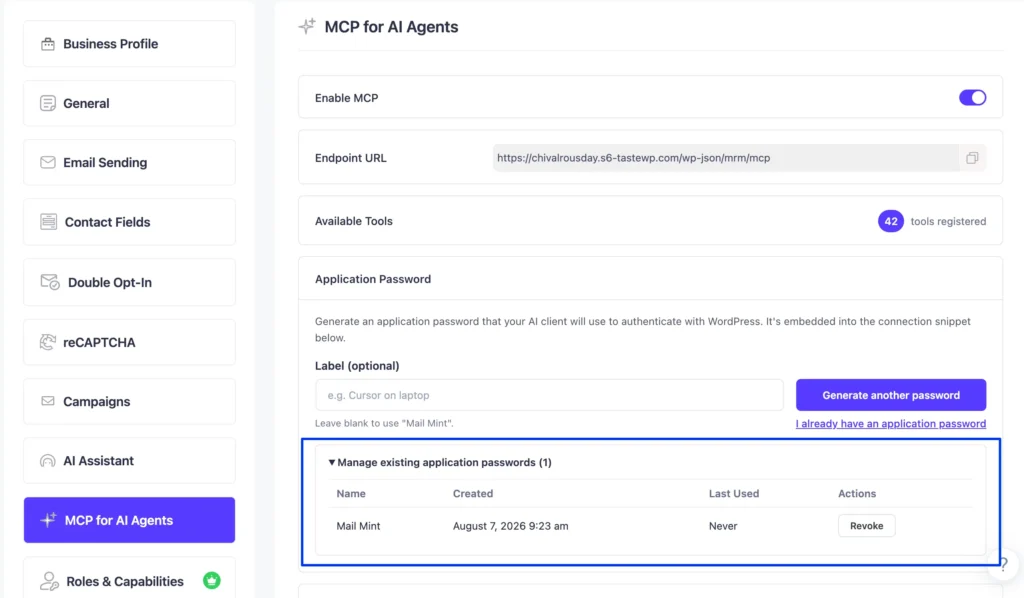
Once generated, your existing passwords are listed under Manage existing application passwords — showing the name, date created, last used, and a Revoke button for each one.
If you already have an Application Password from a previous setup, click I already have an application password to skip generation and enter it manually.
Step 3: Connect Your AI Client
Once the password is generated, scroll down to the Connect Your AI Client section. Select your AI client tab, and Mail Mint pre-fills a prompt that already includes your username and the application password — so the client can configure itself.
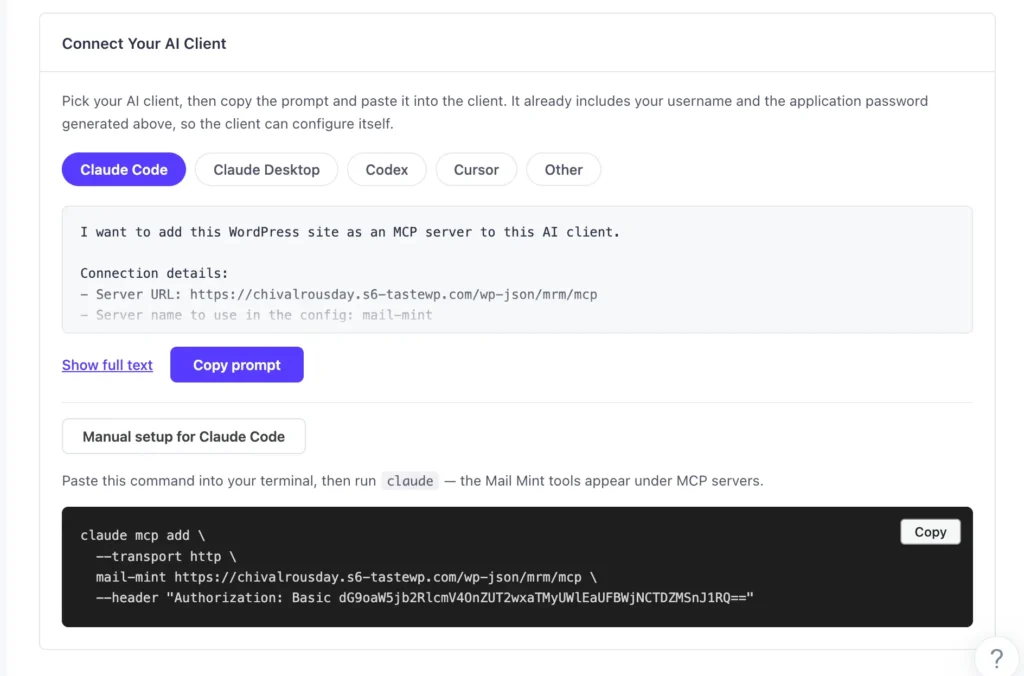
There are two ways to connect depending on your comfort level.
Option 1: Copy Prompt
Best for users who aren’t comfortable with config files or terminal commands. Your AI client reads the prompt and handles the entire setup for you.
- Select your AI client tab: Claude Code, Claude Desktop, Codex, Cursor, or Other.
- Click Show full text to expand and read the full prompt.
- Click Copy prompt.
- Open your AI client, paste the prompt, and send it.
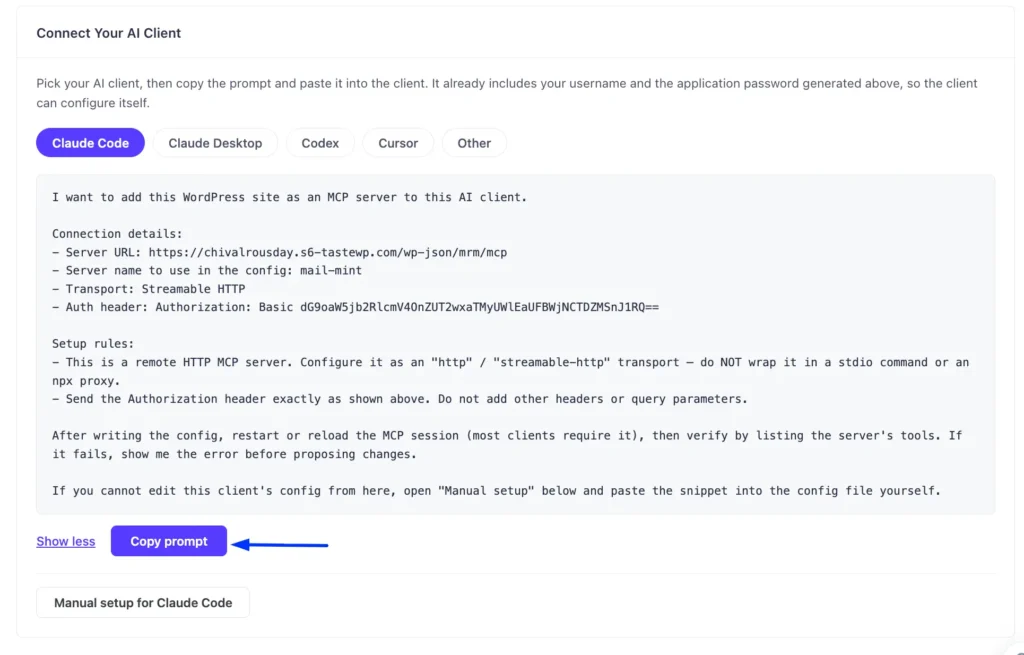
The prompt includes everything the AI client needs:
- Server URL —
https://your-site.com/wp-json/mrm/mcp - Server name —
mail-mint - Transport — Streamable HTTP
- Auth header — your pre-encoded Authorization credentials
- Setup rules — instructions to configure it as an HTTP transport (not stdio or npx proxy), send the Authorization header exactly as shown, and restart the session to verify
After sending the prompt, the client configures the connection, restarts the MCP session, and verifies the tools are listed. If it can’t edit its own config directly, it will prompt you to use the Manual setup option instead.
Warning: The prompt contains your login credentials. Only do this in an AI client running on your own computer, and never in a shared or public workspace.
Option 2: Manual Setup
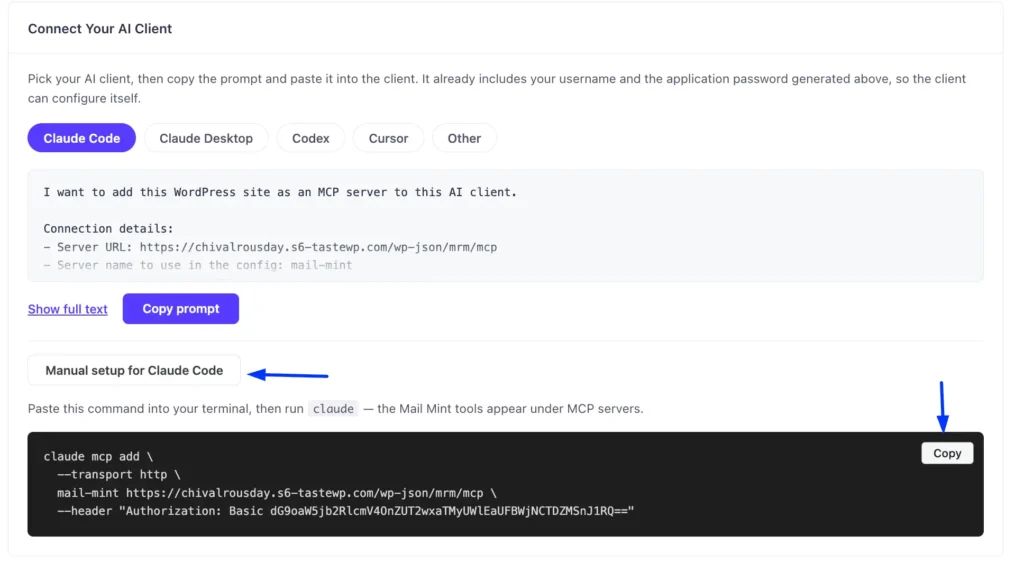
If you prefer to configure the connection yourself, click Manual setup for [client name] below the prompt. This expands a ready-to-run terminal command with all your connection details pre-filled.
Before You Start: Node.js and npx
Some clients need Node.js (which includes npx) installed on your computer:
| Client | Needs Node.js/npx? |
| Claude Code | Yes — the client itself installs through npm |
| Claude Desktop | Yes — it reaches your site through a small npx helper |
| OpenAI Codex | Yes, if your snippet starts with npx |
| Cursor | No — it connects to the URL directly |
To check whether you already have it, open Terminal (macOS) or Command Prompt (Windows) and run:
node -vIf you see a version number like v20.11.0, you’re set. If you get “command not found”, download the LTS installer from nodejs.org, run it, and close and reopen your terminal.
Tip: Not comfortable in a terminal? Ask your AI agent to check and install it for you using the Copy Prompt method described in Option 1 above.
Connecting Claude Code
Claude Code is the terminal version of Claude. Its snippet is a command you run — the quickest manual setup of the lot.
1. Install Claude Code if you don’t have it yet. Open your terminal and run:
npm install -g @anthropic-ai/claude-code2. Copy the snippet from the Claude Code tab in Mail Mint and paste it into your terminal:
claude mcp add \
  --transport http \
  mail-mint https://your-site.com/wp-json/mrm/mcp \
  --header "Authorization: Basic <encoded-credentials>"
3. Press Enter. Claude Code confirms the server was added.
4. Start Claude Code by running claude, then type /mcp to see your connected servers. mail-mint appears in the list with all its tools.
Tip: Claude Code stores this per project folder by default. To use Mail Mint from any folder on your computer, add --scope user to the end of the command.
Connecting Claude Desktop
1. Open the config file. In Claude Desktop, go to Settings → Developer → Edit Config. Claude Desktop creates the file if it doesn’t exist and shows you where it lives:
- macOS:
~/Library/Application Support/Claude/claude_desktop_config.json - Windows:
%APPDATA%\Claude\claude_desktop_config.json
2. Open the file in a plain text editor — TextEdit on macOS or Notepad on Windows both work.
3. Paste the snippet from the Claude Desktop tab in Mail Mint:
{
  "mcpServers": {
    "mail-mint": {
      "command": "npx",
      "args": [
        "-y",
        "mcp-remote",
        "https://your-site.com/wp-json/mrm/mcp",
        "--header",
        "Authorization: Basic <encoded-credentials>"
      ]
    }
  }
}
If the file already has other MCP servers, don’t replace the whole file. Add only the "mail-mint": { ... } block inside the existing "mcpServers" object, with a comma after the entry above it.
4. Save the file and fully quit Claude Desktop, then reopen it. Closing the window isn’t enough — quit it from the menu bar (macOS) or system tray (Windows).
5. Check the connection. Look for the tools icon in the message box. mail-mint appears there with its tools listed.
Warning: claude_desktop_config.json must be valid JSON. A missing or extra comma will stop Claude Desktop from loading any of your servers. If your tools disappear after an edit, paste the file into your AI agent and ask it to check the syntax.
Connecting Cursor
Cursor connects directly to the URL — no Node.js required.
1. Open Cursor’s MCP settings. In Cursor, open the command palette, search for Cursor Settings, then go to Tools & MCPs in the left sidebar. Click New MCP Server.
2. Paste the snippet into mcp.json. Copy the snippet from the Cursor tab in Mail Mint and paste it into the editor:
{
  "mcpServers": {
    "mail-mint": {
      "url": "https://your-site.com/wp-json/mrm/mcp",
      "type": "http",
      "headers": {
        "Authorization": "Basic <encoded-credentials>"
      }
    }
  }
}
3. Save and reload Cursor. Open Tools & MCPs again and you’ll see mail-mint in your Installed MCP Servers list with all available tools underneath.
Connecting OpenAI Codex
Codex connects through its own settings UI — no config file needed.
1. Open Codex Settings. In Codex, go to Settings → Connect to a custom MCP.
2. Click the “Streamable HTTP” tab — this is required before filling in the fields below.
3. Fill in the connection details from the Codex tab in Mail Mint:
Name:       mail-mint
Transport:  Streamable HTTP   ← click this tab first

URL:        https://your-site.com/wp-json/mrm/mcp

Header:
  Key:      Authorization
  Value:    Basic <encoded-credentials>
4. Click Save. Mail Mint tools will be available in your next Codex session.
Other MCP Clients
The Other tab gives you a generic configuration block you can adapt for any MCP-compliant client. Point the client at your Endpoint URL (https://your-site.com/wp-json/mrm/mcp), pass the Authorization: Basic header exactly as generated, and configure the transport as http / streamable-http — do not wrap it in a stdio command or an npx proxy.
What Your AI Agent Can Do
Once connected, your AI client gets access to Mail Mint’s full set of MCP tools across campaigns, contacts, segments, automations, tags, templates, analytics, and settings. You don’t call these tools by name — the AI picks the right one based on what you ask in plain language.
Here’s a friendly overview of what’s available, grouped by area.
Contacts
- Look up, create, update, or delete contacts
- Search and filter by status, tag, list, or any field
- Add or remove notes from a contact’s timeline
- Bulk import or update contacts in one call
Example prompts:
- “Show me all subscribed contacts tagged ‘VIP’ who joined this month.”
- “Add a note to john@example.com saying he requested a refund on August 1st.”
- “How many contacts are unsubscribed?”
Lists, Tags & Segments
- Create, rename, or delete lists and tags
- Apply or remove lists and tags from one or many contacts at once
- Preview how many contacts match a segment before saving it
Example prompts:
- “Tag everyone in the ‘Free Trial’ list as ‘Trial User’.”
- “How many contacts would match a segment of subscribers inactive for 90 days?”
Campaigns
- Browse campaigns and check their status, schedule, and performance stats
- Draft new campaigns or update existing drafts
- Schedule, send, pause, or archive campaigns
- Send a test email before going live
Example prompts:
- “Show me the open and click rates for my last 5 campaigns.”
- “Create a draft campaign called ‘August Newsletter’ for all subscribed contacts.”
- “Send a test email for the Summer Sale campaign to me.”
Automations
- List and inspect automation funnels
- See who’s currently enrolled in a specific automation
- Pause, resume, or remove a contact from an automation
Example prompts:
- “Which contacts are currently in the ‘Welcome Series’ automation?”
- “Remove jane@example.com from the ‘Win Back’ automation.”
Analytics & Reports
- Pull campaign-level stats: sent, delivered, opens, clicks, unsubscribes
- Get list growth and contact activity summaries
- Query WooCommerce revenue data tied to campaigns
Example prompts:
- “Which campaign had the highest open rate last month?”
- “How many new contacts did I add this week?”
Templates & Settings
- List and retrieve saved email templates
- Read and update Mail Mint settings
Security & Revoking Access
Application Passwords are scoped to a single connection, so revoking one only disconnects that AI client. Your main WordPress login and any other connected apps stay untouched.
- Revoke a single connection — Go to Users → Profile → Application Passwords, find the row by name, and click Revoke.
- Disable MCP entirely — Turn off the Enable MCP for AI Agents toggle on the settings page. The endpoint stops responding immediately.
- Rotate credentials — Revoke the old password, generate a fresh one, re-copy the snippet from the Connect a client panel, and paste it back into your AI client.
Troubleshooting
- Toggle is on but tools aren’t showing in the AI client. Restart the client fully after running the connect command or saving the config file. Closing the window usually isn’t enough — quit Claude Desktop from the menu bar or system tray, then reopen it.
- “Unauthorized” error in the AI client. The username or Application Password is wrong. Re-generate the password (copy it immediately), paste it back into the Connect a client panel, then re-copy the snippet into your AI client.
- “Server failed to start” error in Claude Desktop or Codex. Node.js is probably missing. Run
node -vin your terminal; if you get “command not found”, install the LTS release from nodejs.org and restart the client. - Claude Desktop loses all MCP servers after an edit.
claude_desktop_config.jsonhas a JSON syntax error — usually a missing or extra comma. Paste the file into your AI agent and ask it to fix the syntax. - Connection works locally but not on your live site. Confirm the Endpoint URL uses the correct scheme (
https) and domain. WordPress Application Passwords also require a reachable REST API at/wp-json/.
