
SaveTo Wishlist integrates directly with Mail Mint’s public contact helpers, so every wishlist action a customer takes on your store is automatically reflected as a tagged contact in Mail Mint — ready to trigger your own email automations.
What It Does
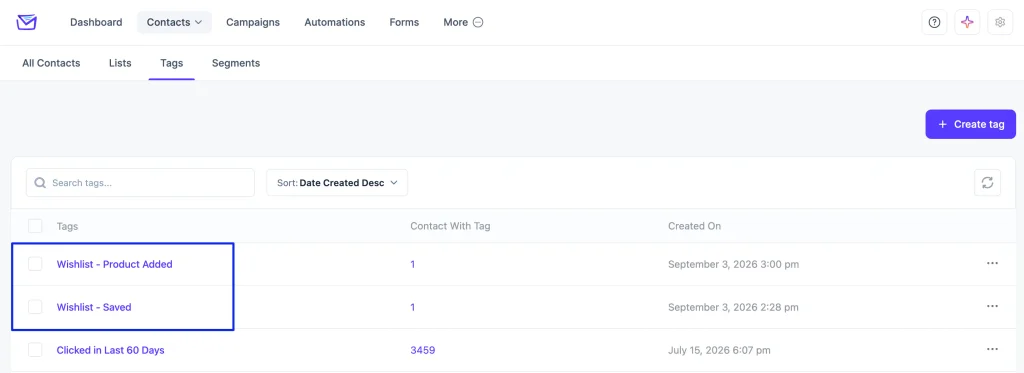
When a customer adds a product, removes a product, or saves a wishlist, SaveTo Wishlist creates or updates the matching Mail Mint contact and applies an event-named tag to it.
Mail Mint’s “Tag applied in a single contact” automation trigger fires whenever a tag is applied to a contact — so the moment SaveTo Wishlist applies one of its tags, it can start any automation you’ve built around that trigger.
All of this runs locally on your site through Mail Mint’s public contact helpers. SaveTo Wishlist makes no external HTTP calls to sync this data.
Requirements
- Mail Mint active. No additional setting is needed.
- The customer must resolve to an email address (guest checkout email, logged-in user email, etc.) — contacts without an email can’t be created in Mail Mint.
Setup
- Install and activate Mail Mint. The sync starts immediately — there’s nothing to configure on the SaveTo Wishlist side.
- Add one product to a wishlist as a test customer.
- In Mail Mint, confirm the tag was created on that contact.
- Build a Mail Mint automation using the “Tag applied in a single contact” trigger and select the relevant tag (see the walkthrough below).
Tags Applied
| Wishlist Event | Tag Title |
|---|---|
| Product added | Wishlist – Product Added |
| Product removed | Wishlist – Product Removed |
| Wishlist saved | Wishlist – Saved |
Each tag is created automatically in Mail Mint the first time it’s needed — you don’t need to pre-create them.
Behavior
- The contact is created with the customer’s first name, last name, and email.
- New contacts are created with Subscribed status.
- If Mail Mint isn’t active, SaveTo Wishlist registers none of its integration hooks — there’s no performance cost and nothing left running in the background.
Building an Automation From a Wishlist Tag
Once a wishlist tag has been applied to at least one test contact, you can build an automation around it from the Mail Mint side. Here’s the journey:
- Go to your WordPress Dashboard > Mail Mint > Automations, then click + New Automation.
- Give your automation a title — e.g., “Wishlist Product Added Follow-up.”
- Click Select A Starting Point to choose your trigger, and pick Tag Assigned from the trigger list.
- In the trigger’s settings panel, select the specific wishlist tag you want to build around — for example, Wishlist – Product Added.
- Click the + icon below the trigger to add an action — most commonly Send An Email, where you can select or create the follow-up email you want this tag to trigger.
- Add any further steps you need — a delay before the email sends, a branch based on whether the contact has purchased, or an additional tag/list action — then save your automation.
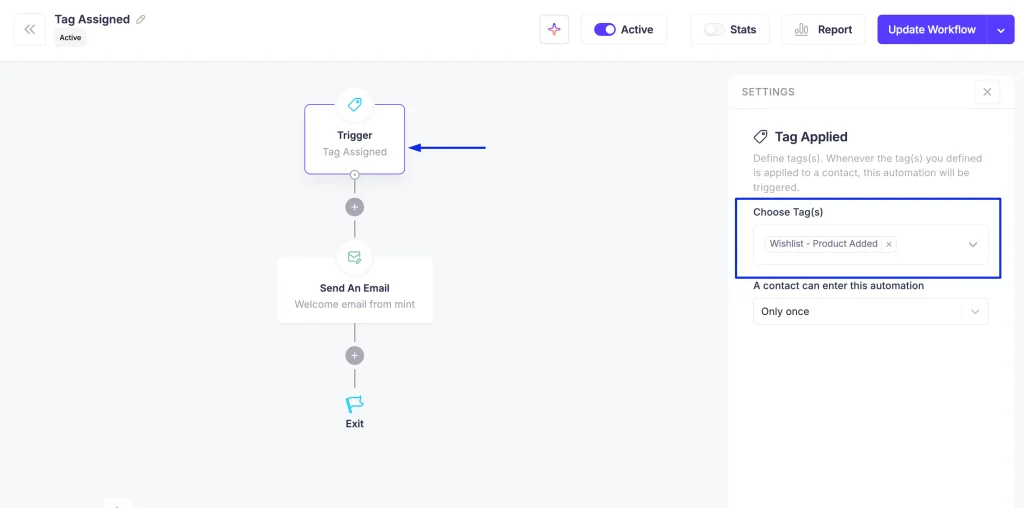
Repeat this with the other two tags to build out a full wishlist journey — for example, a nudge email a few days after Wishlist – Product Added, or a thank-you note when a customer hits Wishlist – Saved.
